Сортировать по
Популярное
Недавнее
Категории
Векторы
Фотографии
PSD
Иконки
Лицензия
Бесплатно
Premium
Цвет
Люди
Применимо только к фотографиям
С людьми
Без людей
Число людей
1
2
3
4+
Возраст
Младенцы
Дети
Подростки
Молодежь
Взрослые
Пожилые
Старики
Пол
Мужчины
Женщины
Этническая принадлежность
Южная Азия
Ближний Восток
Восточная Азия
Чернокожие
Латиноамериканцы
Индусы
Белые
Несколько рас
новинка
Тип файла
JPG
AI
EPS
PSD файлы
Невиданное новинка
Показывать неизведанный контент на Freepik
Ориентация
Пейзаж
Портрет
Квадрат
Панорама
Стиль
Применимо только к векторам.
Акварель
Flat
Мультфильм
Геометрический
Градиент
Изометрический
3D
Нарисованный от руки
Быстрое редактирование
Дата публикации
Последние 3 месяца
Последние 6 месяцев
Последний год
Freepik’s Choice
Смотрите качественные ресурсы, которые наша команда отбирает ежедневно.
Добрый день друзья! Каждый из вас знает, что подготовка ко дню рождения близкого человека – это ответственно и волнительно. Хочется организовать красивый праздник, подобрать хороший подарок. Сегодня я расскажу вам о том, какой плакат на день рождения можно сделать своими руками, желая порадовать именинника.
- Плакат на День рождения своими руками
- Оригинальный сладкий плакат
- Красивое поздравление с фотографиями
- Плакат для малыша
- Поздравление для папы
- Прикольные плакаты сестре или брату
- Читайте также:
Плакат на День рождения своими руками
Я думаю, такой сюрприз как плакат никого не оставит равнодушным, ведь в нем будет частичка вашей любви и тепла, а это нельзя купить ни за какие деньги.
Оригинальный сладкий плакат
Поздравление с вкусняшками в последнее время становится все более востребованным и популярным. Вы без особых проблем сможете самостоятельно сделать такой презент, удивив виновника торжества, а я постараюсь помочь вам с подходящими идеями.
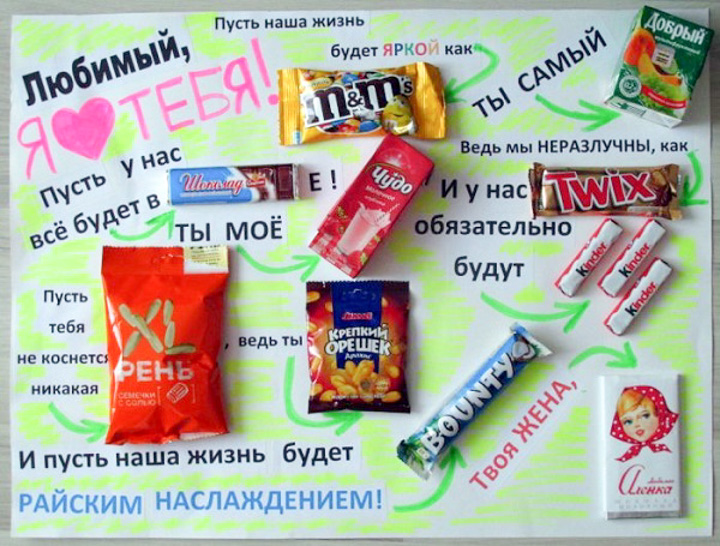
Вы можете оформить настоящую стенгазету из сладостей на большом ватмане. Такой презент точно понравится близкой подруге или парню, все зависит от слов и сладостей, которые вы решите выбрать для оформления.
Для работы вам нужно будет подготовить:
- ватман;
- сладости, подходящие под тематику поздравления;
- фломастеры;
- клей;
- кусок ДВП нужного размера.
Сначала придумайте макет, разложите сладости на бумаге и посмотрите, какие ассоциации и пожелания подойдут в каждом конкретном случае. Затем приклейте угощения, возьмите фломастеры и напишите слова поздравлений. В произвольном порядке разрисуйте ватман и приклейте его к ДВП, чтобы готовая стенгазета могла использоваться именинником в качестве сувенира или даже картины на стену. Подобный вариант – идеальное решение, если вы решили поздравить парня или мужа. Он будет тронут вашими стараниями и желанием порадовать его.
Совет
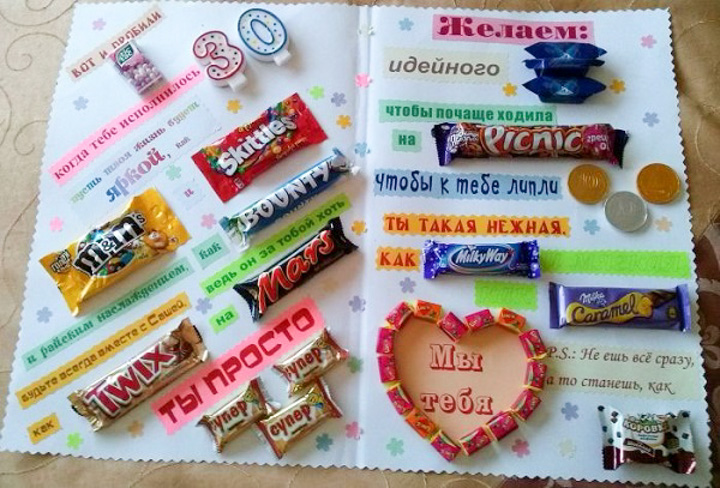
Если такой вариант вам кажется слишком громоздким, предлагаю немного изменить формат, превращая плакат в открытку. Конечно, ее размеры тоже будут внушительными, но выглядит подобный презент очень необычно и сразу привлекает к себе внимание.
Для работы вам потребуется:
- лист плотной бумаги;
- клей;
- сладости или даже обертки из-под них;
- фломастеры.
Если вы не любите рисовать и писать поздравления от руки, предварительно выберите шаблоны в интернете или напечатайте их на цветной бумаге и вырежьте. Сложите лист бумаги пополам и начинайте размещать на нем сладкую композицию, приклеивая каждую деталь. Для декора можете использовать бусины, стразы, блестки. Здесь нет ограничений, главное, чтобы в работу вы вложили душу.
Столь нестандартный сюрприз станет оригинальным дополнением к подарку для бабушки. Поверьте, за свою жизнь она много видела вариантов поздравительных открыток, но такой вариант просто приведет ее в восторг.
Если вы решили нестандартно поздравить мужа, подарите ему стильную картину, где вместе со сладостями будут написаны ваши слова любви. Сначала приклейте все детали к ватману, затем разукрасьте, добавьте немного блеска и приклейте к листу ДВП нужного размера. Заранее позаботьтесь о подходящей раме и при необходимости попросите кого из друзей помочь вам на завершающем этапе создания сладкого плаката-картины для любимого.
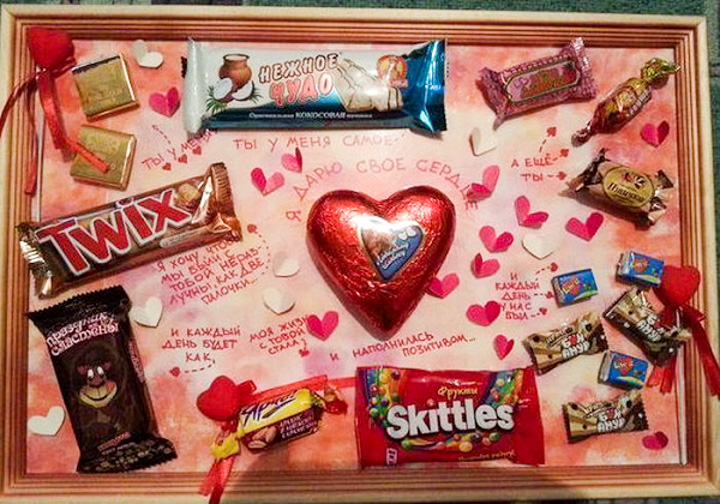
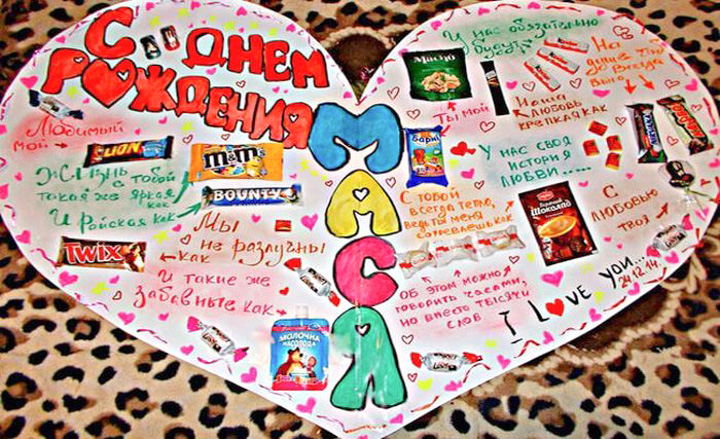
Красиво и нестандартно смотрится фигурный плакат, украшенный сладостями. Он станет хорошим дополнением подарка для любимого человека, мамы. Сама форма сердца уже говорит о ваших теплых чувствах к имениннику, а наполнение плаката лишь подтвердят это.
Присмотритесь внимательнее к «вкусным» и трогательным плакатам ко дню рождения, возможно, они вдохновят и вас на создание собственного шедевра.
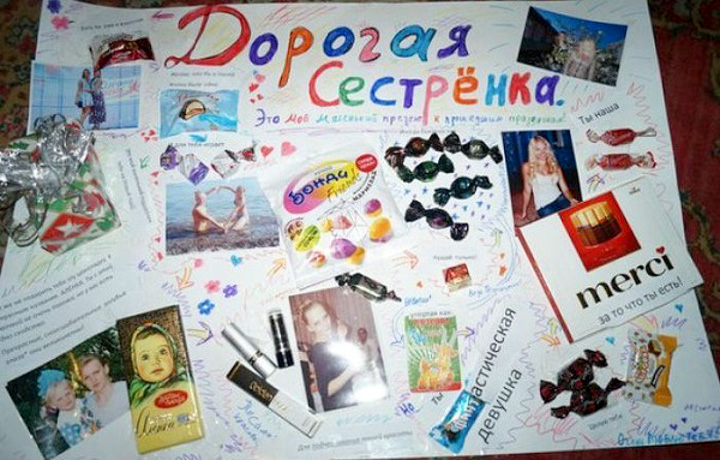
Красивое поздравление с фотографиями
Оригинальное поздравление можно дополнить яркими фото именинника. Готовясь к празднику, выберите самые веселые, нестандартные и искренние кадры. Обязательно дополните их пожеланиями и теплыми словами.
Такой плакат можно сделать для ребенка, добавив к фото изображения его любимых героев. Маленькому имениннику такой сюрприз точно придется по душе, а плакат будет еще долго напоминать о замечательном дне.
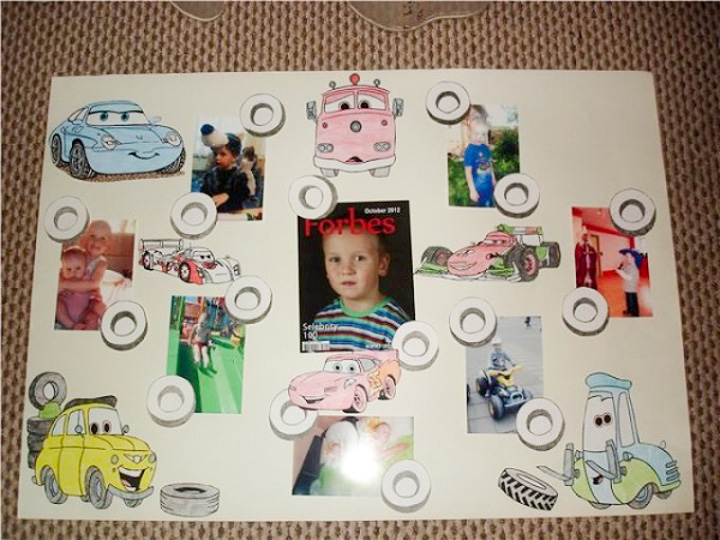
Оригинально оформить плакат можно в фоторедакторе, а затем просто распечатать его. Для работы вам нужно выбрать красивый фон, интересные поздравления и, конечно же, фотографии.
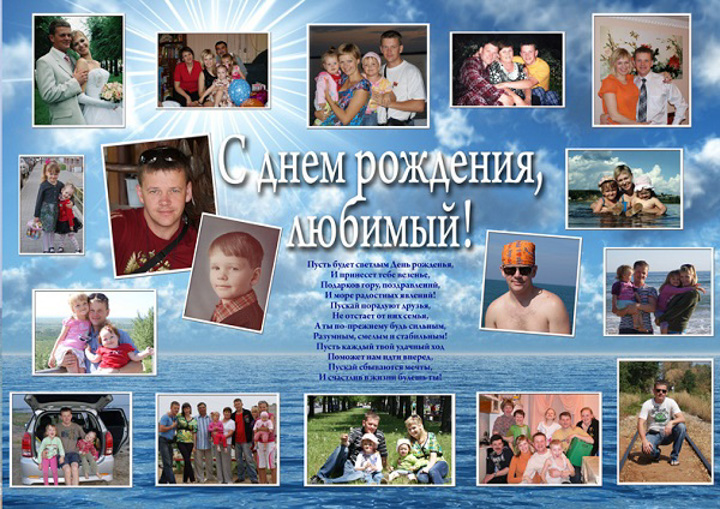
Пользоваться подобными графическими редакторами достаточно просто. Разработчики предлагают воспользоваться готовыми шаблона или создать собственный дизайн для поздравительного плаката. Посмотрите, какой стильный подарок вы можете создать для своего супруга, удивив его в День рождения.
Если вам очень нравится рисовать и проявлять свой творческий потенциал, оставьте в стороне графические редакторы и воспользуйтесь еще одной моей идеей.
Для работы подготовьте:
- ватман;
- листы красной и розовой бумаги;
- ножницы;
- карандаш;
- клей;
- фломастеры или краски;
- фотографии.
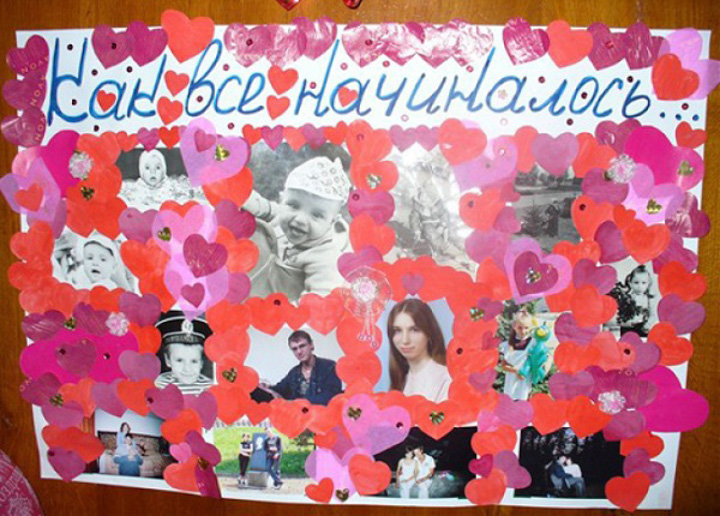
Сначала вам нужно на цветной бумаге нарисовать пару сердечек, которые и станут вашими шаблонами, вырезать их и повторить такую работу, создавая россыпь подобных фигурок. Они и станут обрамлением и украшением будущего плаката.
Теперь рассмотрите выбранные фото, разложите их в желаемом порядке, оставьте место для поздравления имениннику. Сначала красками или фломастерами оформите надпись. В качестве декора можете использовать блестки или даже стразы, действуйте по своему усмотрению.
Теперь пришло время крепить фотографии. Приклейте их в выбранном порядке. Заполните пространство на плакате вырезанными розовыми и красными сердечками.
Такой трогательный и нежный подарок порадует вашу вторую половинку, родителей, детей и близких друзей. Вся работа у вас займет не больше часа времени. Чтобы плакат не мялся, приклейте его на основу из ДСП.
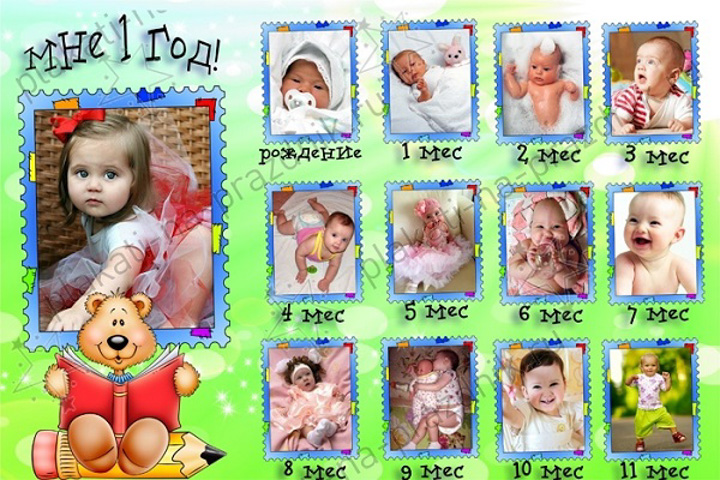
Плакат для малыша
С особым трепетом и волнением родители готовятся к первому Дню рождения своего малыша. Вы можете сделать прикольный плакат к празднику, который ребенок с удовольствием будет изучать и в более старшем возрасте.
Я предлагаю вам сделать красивый коллаж на ватмане, где будут показаны самые важные первые 12 месяцев жизни ребенка. Такой сюрприз можно подготовить для дочки и сына.
Для работ вам нужно подготовить:
- 12 фотографий, которые и покажут, как ваш малыш рос и развивался на протяжении первого года своей жизни;
- разноцветная бумага;
- ножницы;
- клей;
- готовые поздравления.
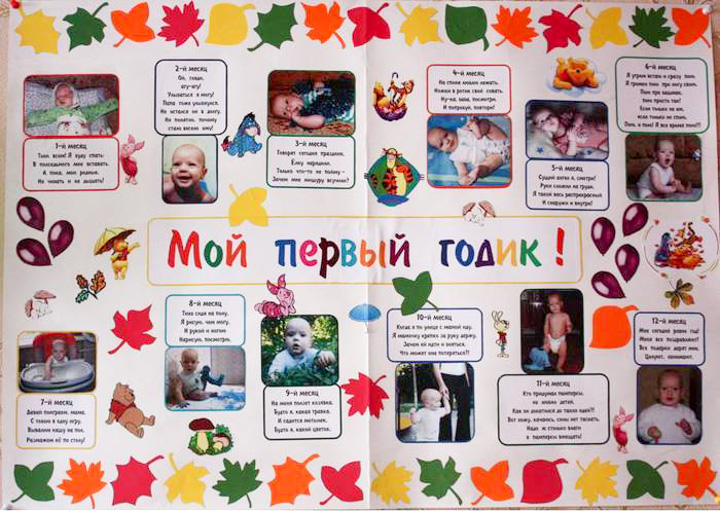
Распечатайте шаблон надписи «Мой первый годик», перенесите его на цветную бумагу и вырежьте каждую букву. Используйте бумагу разных цветов, так плакат будет выглядеть намного красочнее. Соберите все буквы и наклейте их посередине.
Теперь пришел черед фотографий, разместите их в любом порядке, добавьте пожелания и веселые стишки о достижениях крохи в каждый новый период жизни.
Из цветной бумаги вырежьте сердечки, листики, можете добавить изображения различных героев мультфильмов. Такой плакат выглядит очень ярко и, повзрослев, ребенок обязательно оценит такую работу мамы и папы.
Создать поздравление для праздника в таком формате можно и уже в знакомом фоторедакторе. Вам достаточно будет выбрать фон, добавить фотографии и работа будет сделана. Готовый плакат распечатайте и украсьте им комнату малыша в день праздника.
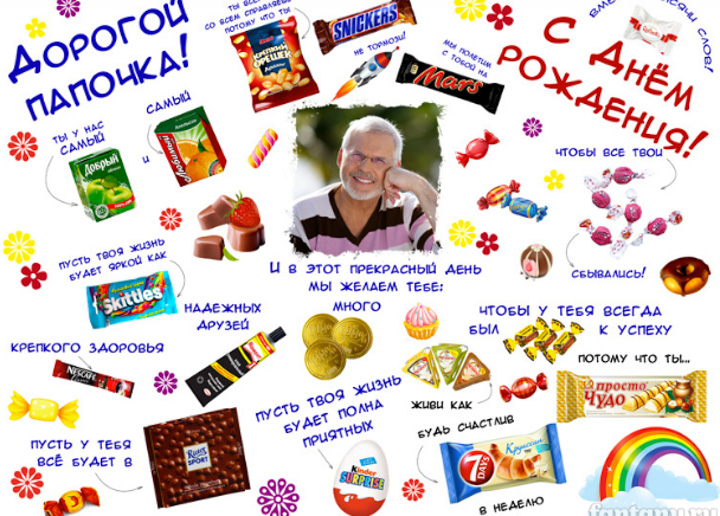
Поздравление для папы
Каждому ребенку хочется по-особенному поздравить родителей с праздником. Если вы готовитесь к юбилею папы или просто решили его порадовать и снова сказать слова любви и благодарности в день праздника, предлагаю сделать оригинальный плакат.
Можете поэкспериментировать со сладостями, если папа неравнодушен к кондитерским изделиям и по достоинству оценит креативную идею и творческий подход к созданию поздравительного плаката.
На фото вы видите только один из возможных вариантов оформления такого сюрприза к празднику. Вы можете экспериментировать с поздравлениями, выбирать сладкое наполнение по своему вкусу. В результате у вас получится удивить именинника и доставить ему массу приятных эмоций.
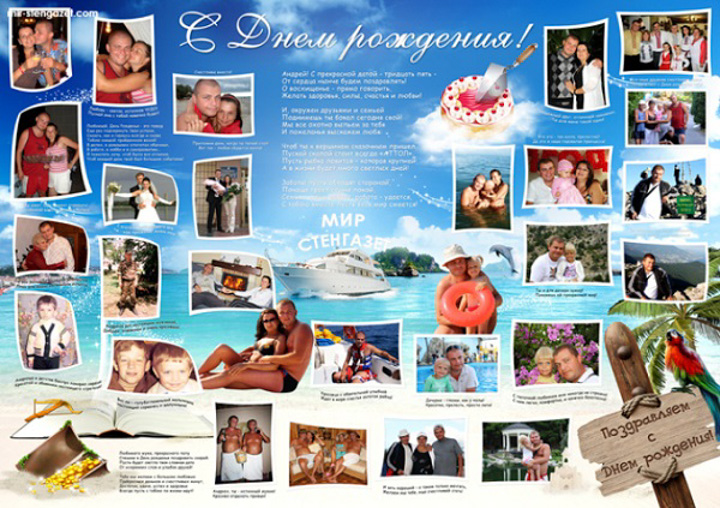
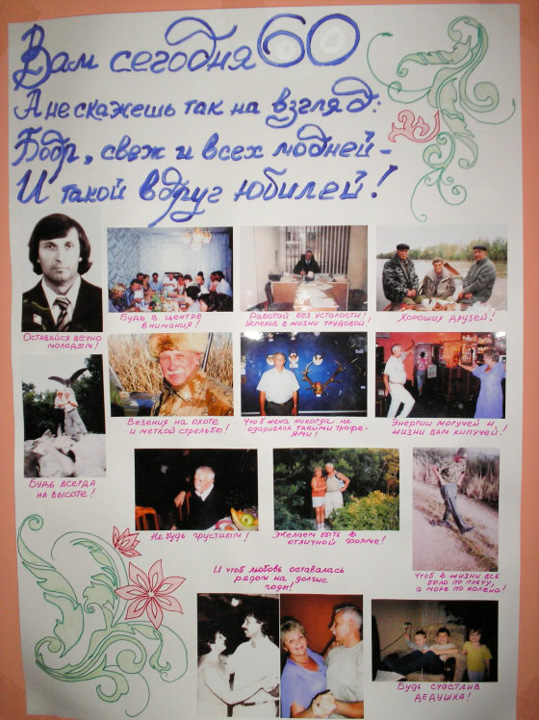
Красиво выглядит праздничный плакат с фотографиями разного времени. Попробуйте хоть на мгновение вернуть родного человека во времена беззаботной юности, снова покажите историю любви родителей и позвольте посмотреть, какого человека вы любите всем сердцем и поздравляете с праздником.
Соберите трогательные моменты в одну картину и увидите в глазах отца безграничную благодарность и любовь за каждый этот миг.
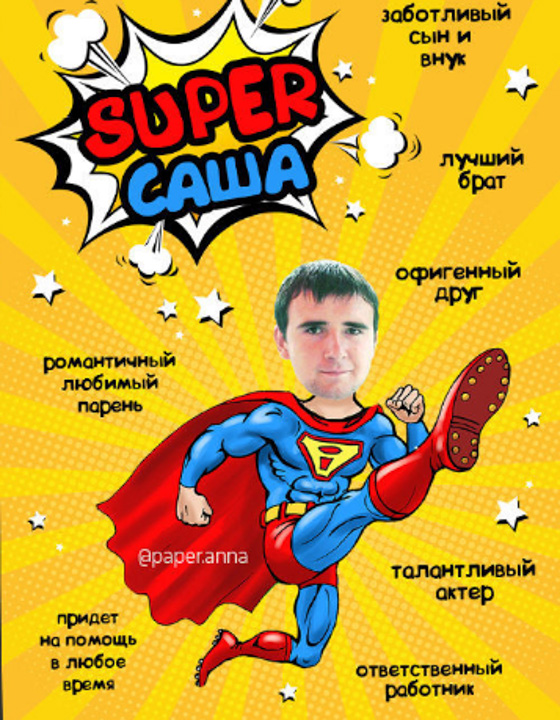
Прикольные плакаты сестре или брату
Если вы еще не знаете, как сделать интересное поздравление для родного именинника, посмотрите на это фото и вдохновитесь яркой и трогательной идеей.
Выберите детские фотографии, на которых запечатлены с братом или сестрой, добавьте немного креатива и искренних поздравлений. Сладости лишь завершат общую концепцию плаката.
Читайте о том, как сделать праздничный конверт.
Если вам хочется чего-то яркого, сделайте плакат, превратив родного человека в настоящего супергероя. Не забудьте упомянуть о его достоинствах и поместите такой подарок в красивую раму. Он точно займет свое почетное место в доме именинника, заставляя улыбаться каждый раз при взгляде на смешное и одновременно трогательное поздравление.
Создавать красивые поздравительные плакаты не так долго и тяжело, как могло показаться на первый взгляд. Экспериментируйте с удовольствием, удивляйте своих близких и делитесь впечатлениями о подобных сюрпризах в комментариях.
Обязательно подписывайтесь на обновления блога, делитесь публикациями с друзьями в социальных сетях и почаще заходите в гости. До скорой встречи!
С уважением, Анастасия Скореева
Читайте также:

1th anniversary celebration. gold numbers with glitter gold confetti, serpentine.PREMIUM

Bright pink bunch of birthday balloons.PREMIUM

1th anniversary celebration. gold numbers with glitter gold confetti, serpentine.PREMIUM

3d rendering concept of set of wrapped gift boxes and geometric confetti elements for commercial design. holiday presents. birthday presents. 3d render.PREMIUM

Christmas and new year banner design of gift box and balloons on black background 3d renderPREMIUM

3d cute surprise gift box with falling confettiPREMIUM

Hearts on pink background for valentine days. copy space, 3d render.PREMIUM

Golden gift box festival celebration,golden christmas gift box on a light blue background,3d renderingPREMIUM

Copper balloons bunch on orange wall background. horizontal banner. 3d illustration renderPREMIUM

Stage podium with heartPREMIUM

Green polka dot gift box with red bow and confetti. space for text. vector holiday top view illustration.PREMIUM

Christmas lights isolated on transparent background. set of golden christmas glowing garlands. vector illustration.PREMIUM

3d rendering concept of opened gift box showing space inside with small gifts and geometric elements compose in blue theme for commercial design. 3d render illustration.PREMIUM

Valentine banner background of heart shape balloon with gift box, 3d renderingPREMIUM

Wall scene with arches, balloons, present box, podium. 3d rendering interior. platform for product presentation, mock up background.PREMIUM

3d rendered colorful foil balloons, hearts, podium on the floor. set of platforms for product presentation, mock up background. minimal design, birthday party, valentine`s day, presentation. pastel colorsPREMIUM

Balloon golden podium present, celebrate happy birthday, gold platform banner. vectorPREMIUM

Shiny color satin ribbon on black backgroundPREMIUM

Valentine banner background of heart shape balloon with gift box, 3d renderingPREMIUM

Confetti gold ribbons. celebration luxury greeting rich card.PREMIUM

Chinese style architecture, landmark ancient buildings in beijing, vector illustration, chinese translation: party founding dayPREMIUM

A big one purple gift with the inscription 2022. for posts, sales and festive christmas greetings. 3d renderingPREMIUM

Valentine banner background of heart shape balloon in the air, 3d renderingPREMIUM

Christmas, new year or birthday background — decorated wall with gift boxes and colorful air balloonsPREMIUM

3d illustration gift in a beautiful purple packaging box, a satin ribbon bow flies with the help of uplifting balloons on a blue background. festive paraphernalia, gift set.PREMIUM

Jumping excited asian woman holding and presenting gift boxPREMIUM

Colorful cover design with cute zebra unicorn a blooming meadow. children cartoon background. vector illustration. cover page template layout. for notebooks, planners, brochures, books. two-page coverPREMIUM

Notification of gift delivery. flying items such as bell, gift, package and money. 3d renderingPREMIUM

Happy birthday cartoon invitation banners with chocolate cake and balloons. greeting card, flyer, invite for celebration, poster with sweet dessert, b-day wishes graphic design, vector illustrationPREMIUM

Group of three cute sweet baby elephant pink girl adorable smile sitting on flowers bouquets, watercolor animal nursery cartoon han drawn illustrationPREMIUM

Unicorn girl posing near happy birthday cake. idea for decorating unicorn style birthday party. unicorn decoration for festival party girl.PREMIUM

Celebration banner with gold confetti and balloonsPREMIUM

Shiny color satin ribbon on white backgroundPREMIUM

Vector illustration of open box with gold confetti , isolated on transparent backgroundPREMIUM
2048 design happy new year. new year 2023 logo design for brochure design. card. banner. christmas decor 2023PREMIUM

Celebrations banner with blue and silver balloonsPREMIUM

Golden stage podium with falling down colorful confetti and balloons on light background. fashion mockup pedestal template vector illustration.PREMIUM

Rose gold glitter festive shiny decoration. vectorPREMIUM

3d cute surprise gift box with falling confettiPREMIUM

Pink podium with round stage, gift boxes, and balloons. 3d renderingPREMIUM

Happy birthday. handwritten calligraphic text. isolated hand lettering in two style, black and white. vector illustration. happy birthday text design.PREMIUM

Birthday party with birthday cupcake, celebration sparkler and colorful falling confettiPREMIUM

Kids birthday party. dinosaur theme cake. little girl blowing candles and opening gifts. children event. decoration for dinosaurs themed celebration.PREMIUM

Ballons stars and confetti celebration birthday backgroundPREMIUM

Festive booth promotion stock white gift box mockup, balloon cream background. advertising store sale. concept black friday, christmas, new year. 3d renderingPREMIUM

Selection of colorful sweets. set of various candies, chocolates, donuts, cookies, lollipops, ice cream top view on black concrete backgroundPREMIUM
Golden and black party balloons frame vector illustration on transparent backgroundPREMIUM

Set of happy birthday vertical poster with colorful balloons , confetti and streamers on dark background . isolated vector elementsPREMIUM

Unicorn girl holding gold confetti air baloon and letter 7. idea for decorating unicorn style birthday party. unicorn decoration for festival party girl.PREMIUM

Happy birthday . banner or greeting card background for birthday celebration . purple and white color concept . vector illustration eps10PREMIUM

Platform 3d background with rainbow and unicorn on pinkPREMIUM

11 years anniversary vector design element. isolated eleven years jubilee with gift box, balloons and confetti on a bright background.PREMIUM

Gold luxury 90 percent of number discount template background 3d render concept for sale promotionPREMIUM

Vector low poly polygonal background of present box.PREMIUM

Birthday party neon sign set. fizzy wine, balloons, hat, person, cake, firework. vector illustration in neon style, bright banner for topics like holiday, festive event, celebrationPREMIUM

сandy city with cake castle, houses cakes, ice creams, sweets, lollipops and cookies. panorama of candy town.vector cartoon background for kids games.PREMIUM

Celebration party banner with blue color balloons background. sale vector illustration. grand opening card luxury greeting rich. frame template.PREMIUM

Vector illustration of celebration banner with gold confetti and balloons, isolated on transparent backgroundPREMIUM

Shiny gold confetti and pieces of serpentine isolated on black background. bright festive overlay effect with yellow tinsels. vector illustration. paper foil stars falling downPREMIUM

Celebrating 60th years birthday vector illustration. sixty anniversary celebration. adult birth day. open gift box with numbers three and eight flying on balloonsPREMIUM

Man hand holding a burning sparkler. bengal firePREMIUM

3d pink banner background for mother’s day and valentine’s day. composition design with open gift box, heart shape and golden rose.PREMIUM

Vector illustration cartoon of happy kids decorating birthday cake.PREMIUM

Holiday violet illustration with balloons for design banner,ticket, leaflet, card, poster and so on. happy birthday bright background confetti, serpentine and balloonsPREMIUM

3d rendering concept of a present box opens up with geometric confetti elements around and blank space for commercial design. 3d render. 3d illustration.PREMIUM

Pink birthday with balloons background.PREMIUM

Vector illustration of celebration banner with gold confetti and balloonsPREMIUM

Yellow serpentine falling vector blue background. isolated spiral illustration. confetti swirl branch. gold carnival design.PREMIUM

Shiny color satin ribbon on white backgroundPREMIUM

Its for you. portrait of cute asian girl holding present and giving box to camera, yellow wallPREMIUM

Profitable gifts for a romantic or valentines day. an open gift with hearts and a percentage. online sale. 3d renderingPREMIUM

Triangle bunting party flags set color vector holiday backgroundPREMIUM

Background with pastel delicate soft air balloons of round shape and confetti, flying in random on white backdrop to the right side of the composition and text grand opening of woman or girl bussinessPREMIUM

Illustration 3d style party with balloons on pink background.PREMIUM

7 th years anniversary and open gift box with explosions confetti. template seven birthday celebration on blue background vector illustrationPREMIUM

Frame with glaze donuts and sprinkles. background of various colored sweet pastries.PREMIUM

Holiday sparkler, black outline white background, isolated, vector illustration, clipart, design, decoration, iconPREMIUM

Greeting card for the holiday, poster of hand holding bouquet of flowers, holiday gift, vector illustration for happy mothers day, valentines day, birthday, womens dayPREMIUM

One year old baby girl eats watermelon. paper flag garland on background. summer time.PREMIUM

Vector illustration colorful flags, balloos and confetti of italy. festive celebration party background.PREMIUM

Round empty frame with realistic elegant balloons with tinsel and bokeh decoration , luxury concept for web and print, golden black and silver colorsPREMIUM

Cartoon balloon set. vector glossy balloons isolated on white background for party invitations decorationPREMIUM

Shiny gold satin ribbon on white backgroundPREMIUM

Family celebrating birthday at home vector illustration. boy in crown opening present. father holding gift box. children cartoon characters in b-day hats. mother with chocolate cake flat drawingPREMIUM

Party background with flags vector illustration. eps 10.PREMIUM

Abstract sparkling fireworks design for new year party and christmas celebration poster.PREMIUM

Number 16 birthday party composition with balloons and gift boxes. 3d renderingPREMIUM

Simple and various fireworks pattern design in the night sky. simple pattern design template.PREMIUM

Online shop banners discount pink color birthday theme. celebration voucher happy birthday. decorating with gift box, cake on cloud paper cut, and papercraft style vector illustrator.PREMIUM

Group of happy smiling business people holding gift box and celebrating birthday or anniversary. concept you won prize, winner, surprize or christmas event or grand opening with prize drawing.PREMIUM

Pink shopping bag and levitation gifts with bows. poster with place for text. 3d renderingPREMIUM

Color glossy happy birthday balloons banner background vector illustration eps10PREMIUM

Pennant flag garland. birthday party fiesta carnival decoration. garlands with color flags 3d vector illustration. carnival decoration hanging on rope, celebration banner with placePREMIUM

A green party balloons isolated header backgroundPREMIUM

Number 23 gray on gray background with golden confetti — 3d renderingPREMIUM

Pastel birthday background with balloons, confetti and streamers, top viewPREMIUM

Happy 1st birthday party celebration balloon, bunting and gift box. 3d renderPREMIUM

Garland of color flags and confetti on white background. party web banner. celebration background. vector illustration. flat style.PREMIUM

Thirtieth anniversary celebration with confetti — 3d renderingPREMIUM

Set of happy birthday vertical poster with colorful balloons , confetti and streamers on dark background . isolated vector elementsPREMIUM
![]()
Download Article
![]()
Download Article
Birthday banners are a great addition to any party, but store-bought banners can feel impersonal, especially if you wish to add the person’s name. Fortunately, it is very easy to make a birthday banner. This article will show you lots of ways to make such a banner.
Steps
Getting Started
-

1
Come up with a message. Your message can be as simple or complex as you want it to be. Here are some ideas to get you started:
- HAPPY BIRTHDAY
- HAPPY BIRTHDAY BOB
- HAPPY 30th BOB (the «th» will be on one sheet)
- HAPPY SWEET 16
- HAPPY 16th BIRTHDAY JANE (the «th» will be on one sheet)
- HAPPY SWEET 16 JANE
-
2
Come up with a layout. Most banners will have the entire message on the same line, but you don’t have to do this. You can make your banner look more interesting by giving it a different layout. Here are some ideas to get you started:
- All the words can be on the same line
- Each word can be on a different line
- HAPPY BIRTHDAY can be on one line, and the person’s name can be one a different line.
Advertisement
-
3
Decide on a theme. This can make choosing your colors, patterns, and fonts a lot easier. You can match the theme to the party, the person’s interests, or come up with your own theme. Here are some ideas to get you started:
- If you want to use a train theme, consider making a pennant banner with square pennants. Each pennant will make a train cart. Make a train engine shape to use at the front of your banner.
- For an underwater theme, use lots of blues and greens. Use some fish and bubble stickers around the letters.
- For a princess theme, consider what sort of princess this is. Typical princess colors are pink and silver, but if your princess is from a specific movie, you might want to use the colors from her dress instead.
- Consider what the person likes. Does he or she have a favorite food, animal, color, book, or movie? Choose one of those and design your banner around that.
-
4
Play with font. You can use a standard block letter font, or a fancy italic or cursive font. Larger, thicker fonts might be more appealing to children. If your banner has a party or theme, consider matching the font to that. For example, if you are doing a princess themed banner, consider using a cursive or italic font.
-
5
Choose a color scheme. This will help your banner look more unified and interesting. Choosing random colors might result in something that looks less than appealing. Here are some ideas to get you started:
- Use three different colors, such as red, yellow, and blue.
- Use different shades of the same color. For example: light blue, medium blue, and dark blue.
- Use all cool colors, such as green, blue, and purple. You can also use all warm colors, such as red/pink, orange, and yellow.
- Use metallic colors, such as gold or silver.
- Alternate contrasting colors, such as white and black.
-
6
Don’t be afraid to use prints and patterns. You can make your banner look really interesting and unique with some patterned scrapbooking paper. Here are some things to consider:
- Combine solid colors and patterns. For example: solid blue and white with blue dots.
- Combine patterns, such as vertical stripes, horizontal stripes, and dots.
- Try to use similar colors in your patterns. This will tie the design together and prevent the patterns and colors from clashing.
-
7
Use blank spaces to add designs. When creating a banner, you will likely end up with some blank spaces between and around the words. You can leave them blank, or you can fill them in with images that match the theme. Here are some ideas to get you started:
- If you are making a pennant banner for a snow-themed party, and you have blank pennants between the words, consider gluing a snowflake onto the blank pennant.
- If you are painting a banner for a superhero-themed party, consider adding a border using comic book strips. You can also buy comic book-themed scrapbooking paper instead if you don’t want to sacrifice any old comic books.
- If you are making a banner for someone who likes the ocean, consider filling in any blank spaces with images of fish, shells, and sea bubbles.


Advertisement
-
1
Choose your paper. The best paper to use for this is cardstock. You can find it in the scrapbook section of an arts and crafts store. It comes in many different colors. You can also use construction paper, but it will not be as bright and it will not be as durable.
-
2
Trace your letter shapes onto the paper.[1]
Find some large stencils and use them to trace the letters onto your paper. You should be able to fit several letters onto one page. Make sure that the letters are several inches high; you want to be able to read the banner easily from across the room.- Try to use a pencil while tracing so that you can erase the lines later.
- You can also print the letter outlines out onto the paper. If you are using cardstock, feed one sheet at a time through your printer.
-
3
Cut the letters out. You can use scissors or a sharp craft knife. Be sure to cut just inside the lines you made when tracing the letter. If you see any pencil marks, be sure to erase them.
-
4
Measure and cut your string. The string needs to be long enough to fit all of the letters, plus an additional 12 inches (30.48 centimeters) at each end. This will allow you to hang the banner.
-
5
Arrange your letters. They can be as close together or as far apart as you like. They will hang better, however, if you include some space between each letter.
-
6
Glue the letters to the banner. Flip the letters over. Draw a thin line of glue along the top edge of each letter. Press the string down into the glue.
- You can also use clear tape to stick the string to the back of the letters if you are short on time.
-
7
Let the glue dry before hanging the banner. Depending on the type of glue you used, this can take anywhere from a few hours to a whole day.


Advertisement
-
1
Choose your paper. You can use any type of paper you want to make your pennants. The best paper to use is scrapbooking paper because it is very colorful. Cardstock is also a good option because it is sturdy. The paper can be all one color, or multiple colors.
-
2
Make sure you have enough paper to spell out your message. You will need one sheet of paper for each letter in your message. You will also need an extra sheet for the spaces between each word.
-
3
Create a template for the pennants using thick cardstock paper. You can use almost any shape you want, but the most popular shapes are circles, triangles, and rectangles. Make the template a few inches larger than the letters you are planning on using. It needs to be large enough so that you can easily read it across the room.
- If you are using a rectangle, consider cutting a ^ shape into the bottom.[2]
- If you are using a rectangle, consider cutting a ^ shape into the bottom.[2]
-
4
Trace the template onto the back of each paper and cut the shapes out. Use a pencil if you can. Once you have cut the shapes out, erase any pencil marks that are still visible. These will be your pennants. You will be sticking the letters onto these.
- If you could not find a pencil, cut the shapes out just inside the lines you have made.
-
5
Consider cutting a smaller version of the pennant shape and gluing it down onto the pennant first. Use a contrasting color. This will create a sort of frame around the letter. To do this, take your template and cut it smaller all around by ½ to 1 inch (1.27 to 2.54 centimeters). Trace the template onto contrasting sheets of paper, cut the shapes out, and attach them to the center of each pennant. You can use glue or clear, double-sided tape.
-
6
Create your letters and stick them down onto the pennants. The letters need to be several inches high, but smaller than the pennants. You will need one letter for pennant. Consider using a contrasting color to make them more visible. Here are some ideas on what you can use for the letters:
- Use some large, letter stickers.
- Paint the letters on using stencils and acrylic paint.
- Cut the letters out of paper and glue them on. You can even use glitter scrapbooking paper for some extra sparkle.
-
7
Choose and cut your string. Choose a thin string, such as baker’s twine, yarn, or balloon ribbon. Plan on leaving about 12 inches (30.48 centimeters) of string at the front and end of your banner so that you can hang it.
-
8
Consider weaving some string through the pennants.[3]
This method will work best on triangle and square-shaped pennants. Use a hole punch to poke a hole in each top corner. Then, weave the ribbon through the holes like so:- Push the string down through the left hole.
- Bring the string across the back of the pennant.
- Pull the string up through the right hole.
- Push the string down through the left hole of the next pennant.
- Bring it across the back of the pennant, and pull it back up through the right hole.
- Keep doing this until you have no more pennants.
-
9
Consider taping the string to the back of your banner.[4]
Flip the shape over, and lay the string across the back. Position it about ½ inch (1.27 centimeters) below the top edge. Secure it in place with a long piece of clear tape. The tape should go from one side of the shape to the other.- If you are using a rectangle shape, tape the string 1 inch (2.54 centimeters) down from the top edge. Fold the top edge back by 1 inch (2.54 centimeters) on top of the string. Secure it with glue or clear, double-sided tape.
-
10
Wait for any glue and paint to dry before hanging the banner. Depending on what you used, this can take anywhere between a few hours to a whole day.


Advertisement
-
1
Buy enough butcher paper to fit your message. You can find colorful butcher paper online, in teacher supply stores, and in certain university/college art stores. Regular arts and crafts stores may not sell butcher paper.
- You can also use fabric instead, but you may want to hem the edges so that they do not fray.
- White butcher paper may seem plain, but it will give you a nice canvas to work on.
-
2
Draw some guidelines on the paper using a pencil and ruler. Draw lightly with the pencil so that you can erase the marks easier later on. This will help ensure that your words are straight and not crooked.
-
3
Lightly sketch out your message using a pencil. You don’t have to get the font right at this point—just try to get the rough shape and size. This will help you position the stencils later on. Again, remember to draw lightly so that the pencil does not show through the paint.
-
4
Place your stencil where you want it. Some stencils will have a sticky back and will stay put while you paint. If your stencil moves around too much, tape the edges down using painter’s tape.
-
5
Paint over the stencil using acrylic paint. You can use a foam brush or a stencil brush to apply the paint. Apply the paint using a light, tapping motion. Try not to apply too much paint at once; you can always apply another coat or two. If you apply too much paint at once, the paint may leak under the stencil and create puddles.
- If you are painting on fabric, use fabric paint instead.
-
6
Move the stencil over to the next letter. You may want to start out by painting every other letter first, then going back and painting the missing letters. This will give the paint time to dry, and you won’t have to worry about accidentally touching and smearing wet paint.
-
7
Let the paint dry before you hang the banner. Depending on what type of paint you used, this can take anywhere between 20 minutes to 2 hours. Hang your banner up by either taping or tacking it to the wall.


Advertisement
-
1
Open a new file in Photoshop and set the dimensions for your banner. Don’t worry about making your banner super large. You can always make it bigger later. Your local print shop should also be able to print the banner larger.
- Consider starting out with a 500 by 200-pixel banner.
-
2
Use the fill tool to set a background color, if desired. You can find the fill tool on the side menu. It looks like a paint bucket. You can leave the background white, or you can make it a different color. You can also choose to add a gradient.
- To create a gradient: right-click on the paint bucket, and select the gradient option. Choose the two colors you want; they are located at the bottom of the side menu. Click on your banner, drag down a little, and let go.
-
3
Select the type tool. You can find it on the side menu. It usually looks like a letter T. Click on it, and then click on your background where you want the text to be.
-
4
Choose the font, color, and size of your text. You can find these options along the top of the screen. For the color, consider choosing something that contrasts with the background.
-
5
Type out your birthday message. If the text is not to your liking, highlight it, and change it by choosing the font options located along the top of the screen.
-
6
Save your file onto your computer and a USB flash drive. You will want to save it as a Photoshop document first. This will keep the layers intact so that you can return to them and change them, if necessary. You will also want to save a printable version of your file. This will usually be a JPEG or PDF file. Check with your local print shop to see what sorts of files they can print.
-
7
Take the USB flash drive with you to your local print shop to print it. From there, you will be able to choose the paper you want it printed on. You will also be able to choose the size as well.


Advertisement
-
1
Use colorful paper bags. Get enough colorful paper bags to spell out your message. Make sure that all of the bags are the same size. Stick one letter to the front of each bag. You can use letter stickers, or cut your own letters out of colorful paper and glue them on.
-
2
Use paper cups. Get enough colored paper cups to spell out your message. Stick one letter onto the front of each cup. Use clothespins to secure the cups to a lone piece of ribbon.
- You can cut your own letters out of colorful paper and stick them onto the cups using glue.
- You can also use large letter stickers
-
3
Use balloons. Get enough clear, latex balloons to spell out your message. Fill each balloon with a handful of colorful, paper confetti. If you are doing it alone, the easiest way will be to use a funnel. Then blow the balloons up and tie the ends into knots. Stick one letter onto each balloon. Tie the balloons onto a long piece of string to create a birthday banner garland.[5]
- The balloons must be clear, or the confetti won’t show.
- Rub the balloons across some carpet or your hair. This will create static and make the confetti spread out.
- You can use giant letter stickers, poster letters, or vinyl letter stickers.
-
4
Use paper doilies to make the pennants. When making a pennant banner, consider using paper doilies. You can fold them in half over the string and glue them in place, or you can tape them. You can also secure the doilies to the string using clothespins. Use delicate, cursive or italic letter stickers in a contrasting color to form your message.
-
5
Use colorful clothespins to attach pennants to string. Instead of using tape or glue, try pinning the pennants to the string instead. This will give you a more rustic look, which can work well with country, burlap, and shabby-chic themes.


Advertisement
Ask a Question
200 characters left
Include your email address to get a message when this question is answered.
Submit
Advertisement
-
Consider matching the theme of your banner to the theme of the party.
-
Keep the person’s likes and dislikes in mind. You would not want to make a banner using colors that the person hates.
-
Use things that the person likes as inspiration. If the person really likes the color blue and cats, consider making a blue banner with lots of kitty cats on it.
Advertisement
-
Banners made out of paper are fragile. Do not hang them outside if it will rain. Also, be careful not to tear them.
Advertisement
Things You’ll Need
- Scrapbook paper or cardstock
- Stencils
- Pencil
- Scissors or craft knife
- String
- Glue or clear tape
- Scrapbook paper or cardstock
- Pencil
- Scissors
- String
- Glue, hole punch, or tape
- Butcher paper
- Pencil
- Ruler
- Stencils
- Acrylic paint
- Foam brush or stencil brush
- Painter’s tape (optional)
Video
References
About This Article
Thanks to all authors for creating a page that has been read 51,068 times.
Did this article help you?
Get all the best how-tos!
Sign up for wikiHow’s weekly email newsletter
Subscribe
You’re all set!
![]()
Download Article
![]()
Download Article
Birthday banners are a great addition to any party, but store-bought banners can feel impersonal, especially if you wish to add the person’s name. Fortunately, it is very easy to make a birthday banner. This article will show you lots of ways to make such a banner.
Steps
Getting Started
-
1
Come up with a message. Your message can be as simple or complex as you want it to be. Here are some ideas to get you started:
- HAPPY BIRTHDAY
- HAPPY BIRTHDAY BOB
- HAPPY 30th BOB (the «th» will be on one sheet)
- HAPPY SWEET 16
- HAPPY 16th BIRTHDAY JANE (the «th» will be on one sheet)
- HAPPY SWEET 16 JANE
-
2
Come up with a layout. Most banners will have the entire message on the same line, but you don’t have to do this. You can make your banner look more interesting by giving it a different layout. Here are some ideas to get you started:
- All the words can be on the same line
- Each word can be on a different line
- HAPPY BIRTHDAY can be on one line, and the person’s name can be one a different line.
Advertisement
-
3
Decide on a theme. This can make choosing your colors, patterns, and fonts a lot easier. You can match the theme to the party, the person’s interests, or come up with your own theme. Here are some ideas to get you started:
- If you want to use a train theme, consider making a pennant banner with square pennants. Each pennant will make a train cart. Make a train engine shape to use at the front of your banner.
- For an underwater theme, use lots of blues and greens. Use some fish and bubble stickers around the letters.
- For a princess theme, consider what sort of princess this is. Typical princess colors are pink and silver, but if your princess is from a specific movie, you might want to use the colors from her dress instead.
- Consider what the person likes. Does he or she have a favorite food, animal, color, book, or movie? Choose one of those and design your banner around that.
-
4
Play with font. You can use a standard block letter font, or a fancy italic or cursive font. Larger, thicker fonts might be more appealing to children. If your banner has a party or theme, consider matching the font to that. For example, if you are doing a princess themed banner, consider using a cursive or italic font.
-
5
Choose a color scheme. This will help your banner look more unified and interesting. Choosing random colors might result in something that looks less than appealing. Here are some ideas to get you started:
- Use three different colors, such as red, yellow, and blue.
- Use different shades of the same color. For example: light blue, medium blue, and dark blue.
- Use all cool colors, such as green, blue, and purple. You can also use all warm colors, such as red/pink, orange, and yellow.
- Use metallic colors, such as gold or silver.
- Alternate contrasting colors, such as white and black.
-
6
Don’t be afraid to use prints and patterns. You can make your banner look really interesting and unique with some patterned scrapbooking paper. Here are some things to consider:
- Combine solid colors and patterns. For example: solid blue and white with blue dots.
- Combine patterns, such as vertical stripes, horizontal stripes, and dots.
- Try to use similar colors in your patterns. This will tie the design together and prevent the patterns and colors from clashing.
-
7
Use blank spaces to add designs. When creating a banner, you will likely end up with some blank spaces between and around the words. You can leave them blank, or you can fill them in with images that match the theme. Here are some ideas to get you started:
- If you are making a pennant banner for a snow-themed party, and you have blank pennants between the words, consider gluing a snowflake onto the blank pennant.
- If you are painting a banner for a superhero-themed party, consider adding a border using comic book strips. You can also buy comic book-themed scrapbooking paper instead if you don’t want to sacrifice any old comic books.
- If you are making a banner for someone who likes the ocean, consider filling in any blank spaces with images of fish, shells, and sea bubbles.
Advertisement
-
1
Choose your paper. The best paper to use for this is cardstock. You can find it in the scrapbook section of an arts and crafts store. It comes in many different colors. You can also use construction paper, but it will not be as bright and it will not be as durable.
-
2
Trace your letter shapes onto the paper.[1]
Find some large stencils and use them to trace the letters onto your paper. You should be able to fit several letters onto one page. Make sure that the letters are several inches high; you want to be able to read the banner easily from across the room.- Try to use a pencil while tracing so that you can erase the lines later.
- You can also print the letter outlines out onto the paper. If you are using cardstock, feed one sheet at a time through your printer.
-
3
Cut the letters out. You can use scissors or a sharp craft knife. Be sure to cut just inside the lines you made when tracing the letter. If you see any pencil marks, be sure to erase them.
-
4
Measure and cut your string. The string needs to be long enough to fit all of the letters, plus an additional 12 inches (30.48 centimeters) at each end. This will allow you to hang the banner.
-
5
Arrange your letters. They can be as close together or as far apart as you like. They will hang better, however, if you include some space between each letter.
-
6
Glue the letters to the banner. Flip the letters over. Draw a thin line of glue along the top edge of each letter. Press the string down into the glue.
- You can also use clear tape to stick the string to the back of the letters if you are short on time.
-
7
Let the glue dry before hanging the banner. Depending on the type of glue you used, this can take anywhere from a few hours to a whole day.
Advertisement
-
1
Choose your paper. You can use any type of paper you want to make your pennants. The best paper to use is scrapbooking paper because it is very colorful. Cardstock is also a good option because it is sturdy. The paper can be all one color, or multiple colors.
-
2
Make sure you have enough paper to spell out your message. You will need one sheet of paper for each letter in your message. You will also need an extra sheet for the spaces between each word.
-
3
Create a template for the pennants using thick cardstock paper. You can use almost any shape you want, but the most popular shapes are circles, triangles, and rectangles. Make the template a few inches larger than the letters you are planning on using. It needs to be large enough so that you can easily read it across the room.
- If you are using a rectangle, consider cutting a ^ shape into the bottom.[2]
- If you are using a rectangle, consider cutting a ^ shape into the bottom.[2]
-
4
Trace the template onto the back of each paper and cut the shapes out. Use a pencil if you can. Once you have cut the shapes out, erase any pencil marks that are still visible. These will be your pennants. You will be sticking the letters onto these.
- If you could not find a pencil, cut the shapes out just inside the lines you have made.
-
5
Consider cutting a smaller version of the pennant shape and gluing it down onto the pennant first. Use a contrasting color. This will create a sort of frame around the letter. To do this, take your template and cut it smaller all around by ½ to 1 inch (1.27 to 2.54 centimeters). Trace the template onto contrasting sheets of paper, cut the shapes out, and attach them to the center of each pennant. You can use glue or clear, double-sided tape.
-
6
Create your letters and stick them down onto the pennants. The letters need to be several inches high, but smaller than the pennants. You will need one letter for pennant. Consider using a contrasting color to make them more visible. Here are some ideas on what you can use for the letters:
- Use some large, letter stickers.
- Paint the letters on using stencils and acrylic paint.
- Cut the letters out of paper and glue them on. You can even use glitter scrapbooking paper for some extra sparkle.
-
7
Choose and cut your string. Choose a thin string, such as baker’s twine, yarn, or balloon ribbon. Plan on leaving about 12 inches (30.48 centimeters) of string at the front and end of your banner so that you can hang it.
-
8
Consider weaving some string through the pennants.[3]
This method will work best on triangle and square-shaped pennants. Use a hole punch to poke a hole in each top corner. Then, weave the ribbon through the holes like so:- Push the string down through the left hole.
- Bring the string across the back of the pennant.
- Pull the string up through the right hole.
- Push the string down through the left hole of the next pennant.
- Bring it across the back of the pennant, and pull it back up through the right hole.
- Keep doing this until you have no more pennants.
-
9
Consider taping the string to the back of your banner.[4]
Flip the shape over, and lay the string across the back. Position it about ½ inch (1.27 centimeters) below the top edge. Secure it in place with a long piece of clear tape. The tape should go from one side of the shape to the other.- If you are using a rectangle shape, tape the string 1 inch (2.54 centimeters) down from the top edge. Fold the top edge back by 1 inch (2.54 centimeters) on top of the string. Secure it with glue or clear, double-sided tape.
-
10
Wait for any glue and paint to dry before hanging the banner. Depending on what you used, this can take anywhere between a few hours to a whole day.
Advertisement
-
1
Buy enough butcher paper to fit your message. You can find colorful butcher paper online, in teacher supply stores, and in certain university/college art stores. Regular arts and crafts stores may not sell butcher paper.
- You can also use fabric instead, but you may want to hem the edges so that they do not fray.
- White butcher paper may seem plain, but it will give you a nice canvas to work on.
-
2
Draw some guidelines on the paper using a pencil and ruler. Draw lightly with the pencil so that you can erase the marks easier later on. This will help ensure that your words are straight and not crooked.
-
3
Lightly sketch out your message using a pencil. You don’t have to get the font right at this point—just try to get the rough shape and size. This will help you position the stencils later on. Again, remember to draw lightly so that the pencil does not show through the paint.
-
4
Place your stencil where you want it. Some stencils will have a sticky back and will stay put while you paint. If your stencil moves around too much, tape the edges down using painter’s tape.
-
5
Paint over the stencil using acrylic paint. You can use a foam brush or a stencil brush to apply the paint. Apply the paint using a light, tapping motion. Try not to apply too much paint at once; you can always apply another coat or two. If you apply too much paint at once, the paint may leak under the stencil and create puddles.
- If you are painting on fabric, use fabric paint instead.
-
6
Move the stencil over to the next letter. You may want to start out by painting every other letter first, then going back and painting the missing letters. This will give the paint time to dry, and you won’t have to worry about accidentally touching and smearing wet paint.
-
7
Let the paint dry before you hang the banner. Depending on what type of paint you used, this can take anywhere between 20 minutes to 2 hours. Hang your banner up by either taping or tacking it to the wall.
Advertisement
-
1
Open a new file in Photoshop and set the dimensions for your banner. Don’t worry about making your banner super large. You can always make it bigger later. Your local print shop should also be able to print the banner larger.
- Consider starting out with a 500 by 200-pixel banner.
-
2
Use the fill tool to set a background color, if desired. You can find the fill tool on the side menu. It looks like a paint bucket. You can leave the background white, or you can make it a different color. You can also choose to add a gradient.
- To create a gradient: right-click on the paint bucket, and select the gradient option. Choose the two colors you want; they are located at the bottom of the side menu. Click on your banner, drag down a little, and let go.
-
3
Select the type tool. You can find it on the side menu. It usually looks like a letter T. Click on it, and then click on your background where you want the text to be.
-
4
Choose the font, color, and size of your text. You can find these options along the top of the screen. For the color, consider choosing something that contrasts with the background.
-
5
Type out your birthday message. If the text is not to your liking, highlight it, and change it by choosing the font options located along the top of the screen.
-
6
Save your file onto your computer and a USB flash drive. You will want to save it as a Photoshop document first. This will keep the layers intact so that you can return to them and change them, if necessary. You will also want to save a printable version of your file. This will usually be a JPEG or PDF file. Check with your local print shop to see what sorts of files they can print.
-
7
Take the USB flash drive with you to your local print shop to print it. From there, you will be able to choose the paper you want it printed on. You will also be able to choose the size as well.
Advertisement
-
1
Use colorful paper bags. Get enough colorful paper bags to spell out your message. Make sure that all of the bags are the same size. Stick one letter to the front of each bag. You can use letter stickers, or cut your own letters out of colorful paper and glue them on.
-
2
Use paper cups. Get enough colored paper cups to spell out your message. Stick one letter onto the front of each cup. Use clothespins to secure the cups to a lone piece of ribbon.
- You can cut your own letters out of colorful paper and stick them onto the cups using glue.
- You can also use large letter stickers
-
3
Use balloons. Get enough clear, latex balloons to spell out your message. Fill each balloon with a handful of colorful, paper confetti. If you are doing it alone, the easiest way will be to use a funnel. Then blow the balloons up and tie the ends into knots. Stick one letter onto each balloon. Tie the balloons onto a long piece of string to create a birthday banner garland.[5]
- The balloons must be clear, or the confetti won’t show.
- Rub the balloons across some carpet or your hair. This will create static and make the confetti spread out.
- You can use giant letter stickers, poster letters, or vinyl letter stickers.
-
4
Use paper doilies to make the pennants. When making a pennant banner, consider using paper doilies. You can fold them in half over the string and glue them in place, or you can tape them. You can also secure the doilies to the string using clothespins. Use delicate, cursive or italic letter stickers in a contrasting color to form your message.
-
5
Use colorful clothespins to attach pennants to string. Instead of using tape or glue, try pinning the pennants to the string instead. This will give you a more rustic look, which can work well with country, burlap, and shabby-chic themes.
Advertisement
Ask a Question
200 characters left
Include your email address to get a message when this question is answered.
Submit
Advertisement
-
Consider matching the theme of your banner to the theme of the party.
-
Keep the person’s likes and dislikes in mind. You would not want to make a banner using colors that the person hates.
-
Use things that the person likes as inspiration. If the person really likes the color blue and cats, consider making a blue banner with lots of kitty cats on it.
Advertisement
-
Banners made out of paper are fragile. Do not hang them outside if it will rain. Also, be careful not to tear them.
Advertisement
Things You’ll Need
- Scrapbook paper or cardstock
- Stencils
- Pencil
- Scissors or craft knife
- String
- Glue or clear tape
- Scrapbook paper or cardstock
- Pencil
- Scissors
- String
- Glue, hole punch, or tape
- Butcher paper
- Pencil
- Ruler
- Stencils
- Acrylic paint
- Foam brush or stencil brush
- Painter’s tape (optional)
Video
References
About This Article
Thanks to all authors for creating a page that has been read 51,068 times.
Did this article help you?
Get all the best how-tos!
Sign up for wikiHow’s weekly email newsletter
Subscribe
You’re all set!