Вся сила Linux в использовании терминала. Это такая командная оболочка, где вы можете выполнять различные команды, которые будут быстро и эффективно выполнять различные действия. Ну впрочем, вы наверное это уже знаете. Для Linux было создано множество скриптов, которые выполняются в различных командных оболочках. Это очень удобно, вы просто объединяете несколько команд, которые выполняют определенное действие, а затем выполняете их одной командой или даже с помощью ярлыка.
Но у новичков может возникнуть вопрос — как запустить скрипт в Linux, что для этого нужно сделать, что будет происходить и какие команды нужно выполнить. Но сначала нужно рассмотреть как работают скрипты и что такое исполняемость.
Как работают скрипты
В Linux почти не используется расширение файла для опережения его типа на системном уровне. Это могут делать файловые менеджеры и то не всегда. Вместо этого, используются сигнатуры начала файла и специальные флаги. Система считает исполняемыми только те файлы, которым присвоен атрибут исполняемости.
Теперь о том, как работают скрипты. Это обычные файлы, которые содержат текст. Но если для них установлен атрибут исполняемости, то для их открытия используется специальная программа — интерпретатор, например, оболочка bash. А уже интерпретатор читает последовательно строку за строкой и выполняет все команды, которые содержатся в файле. У нас есть несколько способов выполнить запуск скрипта linux. Мы можем запустить его как любую другую программу через терминал или же запустить оболочку и сообщить ей какой файл нужно выполнять. В этом случае не нужно даже флага исполняемости.
Сначала рассмотрим пример небольшого sh скрипта:
#!/bin/bash
echo "Hello world"

Вторая строка — это действие, которое выполняет скрипт, но нас больше всего интересует первая — это оболочка, с помощью которого его нужно выполнить. Это может быть не только /bin/bash, но и /bin/sh, и даже /usr/bin/python или /usr/bin/php. Также часто встречается ситуация, что путь к исполняемому файлу оболочки получают с помощью утилиты env: /usr/bin/env php и так далее. Чтобы выполнить скрипт в указанной оболочке, нужно установить для него флаг исполняемости:
chmod ugo+x script.sh

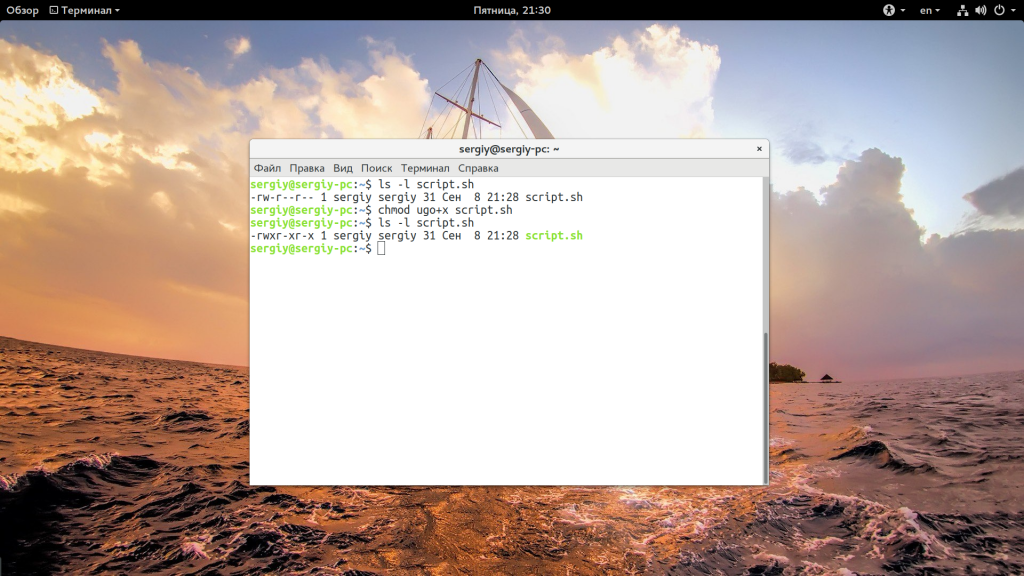
Мы разрешаем выполнять запуск sh linux всем категориям пользователей — владельцу, группе файла и остальным. Следующий важный момент — это то место где находится скрипт, если вы просто наберете script.sh, то поиск будет выполнен только глобально, в каталогах, которые записаны в переменную PATH и даже если вы находитесь сейчас в той папке где находится скрипт, то он не будет найден. К нему нужно указывать полный путь, например, для той же текущей папки. Запуск скрипта sh в linux:
./script.sh

Или полный путь от корня:
/home/user/script.sh

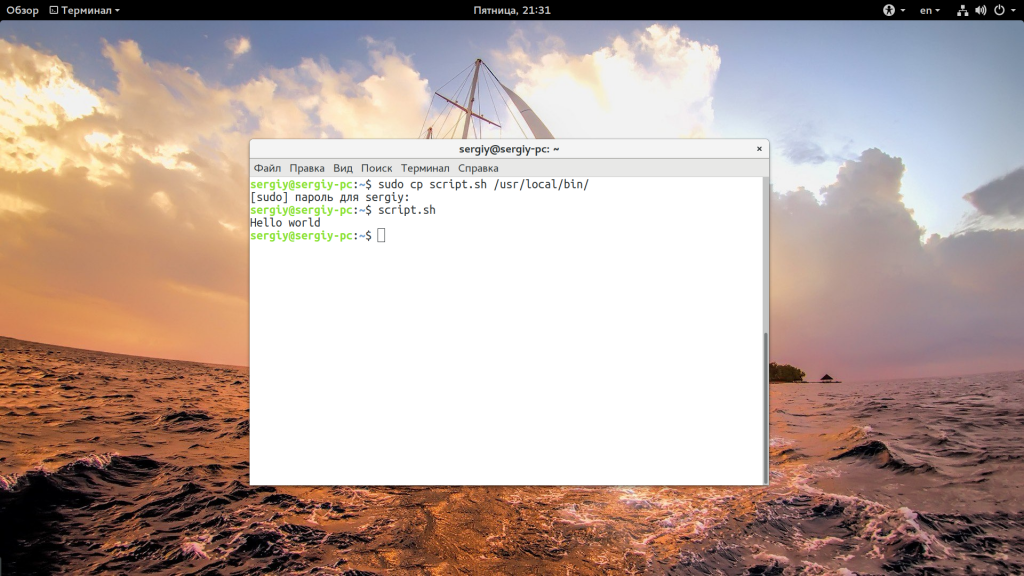
Если вы не хотите писать полный путь к скрипту, это можно сделать, достаточно переместить скрипт в одну из папок, которые указаны в переменной PATH. Одна из них, которая предназначена для ручной установки программ — /usr/local/bin.
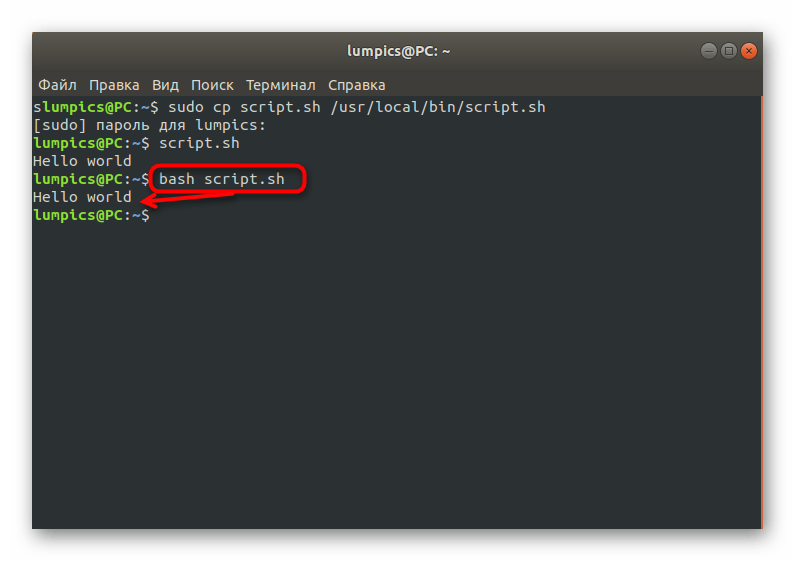
cp script.sh /usr/local/bin/script.sh
Теперь вы можете выполнить:
script.sh
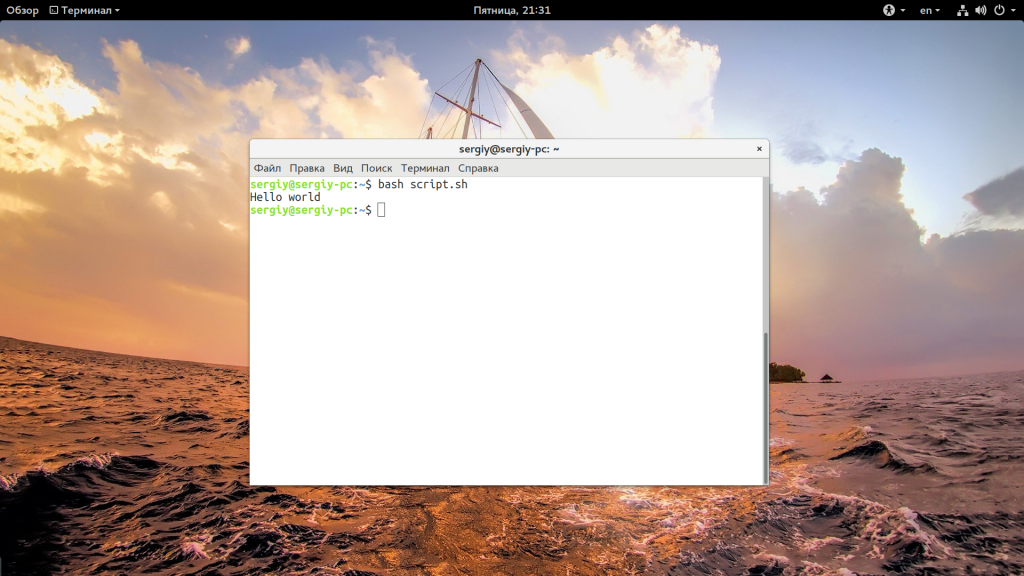
Это был первый способ вызвать скрипт, но есть еще один — мы можем запустить оболочку и сразу же передать ей скрипт, который нужно выполнить. Вы могли редко видеть такой способ с bash, но он довольно часто используется для скриптов php или python. Запустим так наш скрипт:
bash script.sh
А если нам нужно запустить скрипт на php, то выполните:
php script.php
Вот так все просто здесь работает. Так можно запустить скрипт как фоновый процесс, используйте символ &:
script.sh &
Даже запустить процесс linux не так сложно.
Выводы
Как видите, запуск скрипта sh в linux — это довольно простая задача, даже если вы еще плохо знакомы с терминалом. Существует действительно много скриптов и некоторые из них вам возможно придется выполнять. Если у вас остались вопросы, спрашивайте в комментариях!

Статья распространяется под лицензией Creative Commons ShareAlike 4.0 при копировании материала ссылка на источник обязательна .
Об авторе
![]()
Основатель и администратор сайта losst.ru, увлекаюсь открытым программным обеспечением и операционной системой Linux. В качестве основной ОС сейчас использую Ubuntu. Кроме Linux, интересуюсь всем, что связано с информационными технологиями и современной наукой.
Contents
- Intro
- Bash — Everyday Ubuntu life
-
Commands
- Creating folders
- Deleting files
- Deleting folders and their sub-folders
- Running commands as root
- Opening GUI applications as root
- Backing up your files
- Backing up your Directories
- Checking system performance
- Check Devices
- Show network Information
- Show wireless information
-
Scripting
- Variables
- If Statements
-
Storing application stdout to a variable:
- Example
- Example 2
-
FUNctions
-
Example
- Debugging
-
Example
-
Other Scripting Languages related to Bash
-
tr
- Example
- Example
-
AWK
- pidof clone
-
SED
- Basic Substitution
-
tr
Bash scripting is one of the easiest types of scripting to learn, and is best compared to Windows Batch scripting. Bash is very flexible, and has many advanced features that you won’t see in batch scripts.
However if you are a ‘non-computer-savvy’ person that won’t mean a thing to you. Bash is the language that you will learn to love as much of everyday Ubuntu life is done/can be done using the Terminal. You will soon learn that most things can be done through both GUI (Graphical User Interface) and CLI (Command Line Interface), however some things are more easily achieved from one or the other. For example, changing file permissions of a folder and all its sub folders is more easily achieved using cli instead gui.
NOTE: Text that is inside the box are to be entered into a terminal as follows:
If it's inside a box like this... enter it into a terminal unless instructed to do otherwise. Except this box. Of course. Silly.
You can also just copy and paste if needed.
Intro
In this document we will discuss useful everyday commands, as well as going a bit more in depth into scripting and semi-advanced features of Bash. Bash is not only used to run programs and applications, but it can also be used to write programs or scripts.
Bash — Everyday Ubuntu life
During your time as an Ubuntu user you will use the terminal to perform tasks such as
- Creating folders
- Deleting files
- Deleting folders and their sub-folders
- Opening applications as root
- Backing up your files
- Backing up your folders
- Checking system performance
- Check Devices
- Checking wireless connection
Along with many other things, the list above will be the commands we will discuss.
Commands
Creating folders
Creating folders can be done simply in the file manager nautilus by right clicking and selecting ‘Create Folder’, but if you want to do this from a cli environment you would type the following in the terminal:
mkdir /home/joe/Desktop/new_folder
the mkdir (make directory) command creates the folder then the file path tells it where to create the folder.
Deleting files
Deleting files are done with the rm command as follows:
rm /home/joe/file_to_be_deleted
the rm (remove) command is used to remove anything through a cli environment.
Deleting folders and their sub-folders
The command you are about to read can potentially (if used incorrectly) destroy your system!
rm -r /home/joe/useless_Parent_folder
To force (note most of the time you will not need to use -f)
rm -rf /home/joe/useless_Parent_folder
This command is slightly different to the one before, it uses two options ‘-r’ which means recursive (will delete the folder and all sub-folders) and ‘-f’ means force (will not ask for your permission). This command is perfectly fine for deleting a dir and all its sub-dirs. The next commands should !!**!!NEVER!!**!! be run. Unless you want to say goodbye to your system.
rm -rf /*
rm -rf /
This will delete everything from your root folder downwards, which if you did a standard install would be everything.
Running commands as root
When working on the command line, you usually want to work with the default permissions. This way you insure that you won’t accidentally break anything belonging to the system or other users, so long as the system and other users haven’t altered their file permissions. Yet there will be times when you wish to copy a file to a system folder (like /usr/local/bin) to make it available to all users of the system. Only the system administrator (i.e. the user ‘root’) should have permission to alter the contents of system directories like /usr/local/bin. Therefore trying to copy a file (like a program downloaded from the Internet) into that folder is forbidden by default.
cp Downloads/some_downloaded_program /usr/local/bin
cp: cannot create regular file `/usr/local/bin/some_downloaded_program': Permission denied
Since it would be very tedious to always login as root to do administrative work (in fact you should avoid logging in as root with a graphical desktop) you can use the sudo program to execute a single command as root.
sudo cp Downloads/some_downloaded_program /usr/local/bin
The default Ubuntu installation is configured so that the user who was created during system installation is allowed to use this command. It will prompt for the password and execute the command as the root user.
Opening GUI applications as root
Sometimes you will want to edit a config file in your root folder, in order to save changes to this file you need root privileges so we need to open our text editor as root. All you will need is just sudo or pkexec to show a gui password popup.
sudo gedit
Note a lot of kde apps will not work like kate or dolphin.
Backing up your files
To create a backup of a file, we’re going to use the cp (copy) command. The basic syntax for cp is as follows:
cp source_file dest_file
This will copy the ‘source_file’ to the ‘dest_file’. Now, using the previous example, we want to backup ‘/path/to/conf_file.txt’. To accomplish this, we type the following:
sudo cp /path/to/conf_file.txt /path/to/conf_file.txt.old
That’s fine and dandy, but what if I want to copy my file to another directory? Well that’s just as easy. Let’s say instead of copying /path/to/conf_file.txt to the /path/to/ directory, you want to copy it to a directory where you store all of your backup files, say /my/backup/folder/. In order to accomplish this you would type:
cp /path/to/conf_file.txt /my/backup/folder/    #saves conf_file.txt to /my/backup/folder/
#OR
cp /path/to/conf_file.txt /my/backup/folder/conf_file_new_name.txt
***This is a typical safety measure that has saved many users in the past from a complete disaster.***
Okay, so we know how to copy a file: a) to a different filename and b) to a different folder. But how do we copy entire directories?
Backing up your Directories
To backup one directory to another, we introduce cp -r (recursive) option. The basic syntax is as follow:
cp -r /directory/to/be/copied/ /where/to/copy/to/
So if we wanted to copy all of the contents of our /path/to/ folder to our /my/backup/folder, we would type the following:
cp -r /path/to/ /my/backup/folder/foldername #foldername can be whatever you want the foldername to be
Checking system performance
If your computer starts to lag, you can see which applications are using the most CPU power with this command:
top
This is generally the same information given as the GUI application ‘System Monitor’.
Check Devices
USB Devices:
If a USB device stops working, you may want to see if it is still connected/detected. To check if a device is connected/detected, type the following:
lsusb
PCI Devices:
As PCI devices are checked with:
lspci
Show network Information
To see the status of your network connection, use the command:
ip addr
This command will show you your ip, what type of connection you are using, etc.
Show wireless information
Like the command ip stated above, you can use iwconfig to check the settings of your wireless connection without editing anything. In a terminal enter:
iwconfig
This also shows packets sent/received.
Scripting
NOTE: The commands given in the scripting section are to be put into the text editor and not in the terminal unless instructed otherwise.
Bash is primarily a scripting language, so it would be a crime not to talk about scripting. Let’s dive straight in with a bash script. More precisely the infamous «Hello World» script. You can create a bash script by opening your favorite text editor to edit your script and then saving it (typically the .sh file extension is used for your reference, but is not necessary. In our examples, we will be using the .sh extension but instead Linux uses #!/path/to/runtime or in this case #!/bin/bash).
 #!/bin/bash

echo "Hello, World"
The first line of the script just defines which interpreter to use. NOTE: There is no leading whitespace before #!/bin/bash. That’s it, simple as that. To run a bash script you first have to have the correct file permissions. We do this with chmod command in terminal (change mode) as follows:
chmod a+x /where/i/saved/it/hello_world.sh   #Gives everyone execute permissions
# OR
chmod 700 /where/i/saved/it/hello_world.sh   #Gives read,write,execute permissions to the Owner
This will give the file the appropriate permissions so that it can be executed. Now open a terminal and run the script like this:
/where/i/saved/it/hello_world.sh
Hopefully you should have seen it print Hello, World onto your screen. If so well done! That is your first Bash script.
TIP If you type:
pwd
You will see the directory that you are currently working in (pwd stands for ‘print working directory’). If your current working directory is /where/i/saved/it/, then you can shorten the above command to:
prompt$ pwd
/where/i/saved/it
prompt$ ./hello_world.sh
Now, lets get to more interesting aspects of Bash programming, Variables!
Variables
Variables basically store information. You set variables like this using text editor:
var="FOO"
‘var’ can be anything you want as long as it doesn’t begin with a number. «FOO» can be anything you want.
To access the information from the variable you need to put a ‘$’ in front of it like this:
var="FOO"
echo $var
Try entering those lines into a terminal one at a time; you will see that the first one just gives you another prompt and the second one prints FOO.
But that’s all a bit boring. So let’s make a script to ask the user for some information and then echo that information.
 #!/bin/bash
clear
echo "Please enter your name"
read name
echo "Please enter your age"
read age
echo "Please enter your sex. Male/Female"
read sex
echo "So you're a $age year old $sex called $name"
read allows the user to input information where it is then stored in the variable defined after the read. read variable would take whatever input the user entered and store it in $variable. We then access this with echo and set up a neat sentence. This script is reasonably messy though; read has another function that could halve the size of this script.
clear
read -p "Please enter your name  : " name
read -p "Please enter your age  : " age
read -p "Please enter your sex. Male/Female  : " sex
echo "So you're a $age year old $sex called $name"
That is more efficient code. However it’s still a bit messy when run. A solution? Good old white spaces!
clear
read -p "Please enter your name  : " name
echo ""
read -p "Please enter your age  : " age
echo ""
read -p "Please enter your sex. Male/Female  : " sex
echo ""
echo "So you're a $age year old $sex called $name"
Now we have an efficient and clean Bash script.
If Statements
An if statement can be used to check for something and do something else depending on the outcome of the check. For example, if I had an ‘apple’, I would want to make sure it’s still an ‘apple’ and not an ‘orange’ because I don’t like Oranges!
The syntax for an if statement is
if [something]
        then
        elif
        then
        elif
        then
        ....etc....
        else
fi
The else if statement or (elif) is not necessary, but it can be used if needed.
An if statement to check if our $fruit variable is an ‘apple’ would look like this
echo "Please enter type of fruit"
read fruit

if [ $fruit = apple ]
        then echo "Good, I like Apples"
        else echo "Oh no, I hate Oranges!"
fi
Just to explain this statement,
if [ the contents of $fruit is 'apple' ]
        then say "Good, I like Apples"
        if it's not, then say "Oh no, I hate Oranges!"
finish
If statements are an easy concept to grasp as they are similar to the «if» used in spoken English. But say you wanted to have 4 or 5 checks, the answer may be to write 4 or 5 statements but that’s not the most practical way. This is where elif comes in handy.
if [ $fruit = apple ]
        then echo "Good, I like Apples"
elif [ $fruit = pear ]
        then echo "Good, I like Pears"
elif [ $fruit = banana ]
        then echo "Good, I like Bananas"
        else echo "Oh no, I hate Oranges!"
fi
This saves us from from repetitive scripting. There are better ways to check what the fruit is, but we won’t go into that now.
Storing application stdout to a variable:
Application stdout ( what you see on the terminal screen, with an un-piped application ) can be saved and used in Bash. The simplest and most elegant way is to use command substitution, by wrapping the code in $(…)
Example
fooVar=$(who)
echo $fooVar
This code should output the current users, their respective ttys, and date of login. Note that this strips newlines. Be sure to do any parsing in line ( | grep, etc ) and then pass it to a variable. We will try this again, but grep for tty7, the GUI’s tty.
Example 2
fooVar=$(who | grep tty7)
echo $fooVar
This should output the single user that is currently logged into the WM. Let’s move on to more advanced data manipulation within command substitution.
FUNctions
Bash lets you create a function on the fly, really handy if you plan on using a code block more then once. Functions reduce the amounts of editing you have to do in a script, if and when you have to update your script. Let’s get to it!
Example
Here is an example script:
echo "echo is Called"
echo "Functions are FUN!"
echo "echo is Called"
Although this example is simple, you can see that if you want to change «echo is Called» to say «foo is Called» you would have to edit twice.
Below is the same app using functions.
echoFunction() {
  echo "echo is Called"
}
fooBar() {
  echo "Functions are FUN!"
}

echoFunction;
fooBar;
echoFunction;
# You call functions without (), just the function name then a semicolon.
This example, as you can see may be longer now, but you can imagine how, adding features, this will eliminate code and reduce complexity. Also, you can see if you want to change the echo call, you have to edit one line, not two.
Debugging
I always find it useful to trace a script to find out why something does not work as expected. To trace, start it through bash explicitly and use the -x option, like so:
bash -x ./script.sh
This will write each command to standard error (preceded by a ‘+ ’) before it is executed.
tr
tr is one of the most basic applications to pipe data through that uses a basic scripting syntax. In this case, it accepts Regular Expressions. Let’s do a normally complicated task, transforming a string to all uppercase.
Example
read foo
var=$(echo $foo | tr "{a-z}" "{A-Z}")
 # {a-z} Matches a through z
 # {A-Z} matches A through Z
echo $var
The output should look something like this:
this is a test
THIS IS A TEST
tr also can TRanslate strings, so let’s translate all «tar» in $foo to «bar».
Example
echo "Type in: I love tars"
read foo
var=$(echo $foo | tr "t" "b")
echo $var
the output should look something like this:
I love tars
I love bars
AWK
AWK ( Short for Aho, Weinberger & Kernighan )
awk has its own custom scripting language, suitable for a tutorial by itself, so I will cover only the basics to help assist when you are bash scripting. This is not meant to be complete or comprehensive in any way.
pidof clone
Let’s make a quick pidof clone that prompts for a process identifier, then echoes the process ID.
read pname
ps -ef | grep -v grep | grep $pname | awk '{print $2}'
Let’s take some pipes out and use only awk for the filtering
read pname
ps -ef | awk -v p=${pname} '$8 ~ p { print $2 }'
Single quotes are used to pass the awk command(s). The curly braces are to use the awk language (for stuff like prints, ifs, etc.). Print prints the column passed given by the $ markup, space delimited.
The awk -v option allow passing a shell value into an awk variable, the $8 is a field variable (column 8 of the ps -ef command’s output) and the operator ~ is a regular expression match.
There are a lot more commands than the print command, including if statements, etc., and is worth looking into if you are interested in what you see here!
SED
sed is one of the most complicated scripting languages on the GNU / Linux system. I am only going to cover the s/ command here.
Basic Substitution
Try this out to show that sed can not only replace inline, but unlike tr, replace with a longer or shorter string than before.
read foo
echo $foo | sed "s/foo/bars/"
When this command is run, it should substitute the first appearance of «foo» with «bars».
This is an example of the output.
I love to go to foo
I love to go to bars
CategoryCommandLine
For 15.04 and later:
To run a (short-lived)1 command at startup using systemd, you can use a systemd unit of type OneShot. For example, create /etc/systemd/system/foo.service containing:
[Unit]
Description=Job that runs your user script

[Service]
ExecStart=/some/command
Type=oneshot
RemainAfterExit=yes

[Install]
WantedBy=multi-user.target
Then run:
sudo systemctl daemon-reload
sudo systemctl enable foo.service
Essentially, this is just converting a typical Upstart job to a systemd one (see Systemd for Upstart users).
You can run multiple commands from the same service file, using multiple ExecStart lines:
[Service]
ExecStart=/some/command
ExecStart=/another/command some args
ExecStart=-/a/third/command ignore failure
The command must always be given with the full path. If any command fails, the rest aren’t run. A - before the path tells systemd to ignore a non-zero exit status (instead of considering it a failure).
Relevant:
- Arch Wiki entry on systemd
man 5 systemd.service
For user sessions, you can create the systemd unit in ~/.config/systemd/user instead. This should work with 16.04 onwards, but not earlier releases of Ubuntu with systemd (since those still used Upstart for user sessions). User session units can be controlled with the same commands as with system services, but with the --user option added:
systemctl --user daemon-reload
systemctl --user status foo.service
Shell syntax
Note that, unlike Upstart, systemd doesn’t run the Exec* commands through a shell. It performs some limited variable expansion and multiple command (separated by ;) itself, but that’s about it as far as shell-like syntax goes. For anything more complicated, say redirection or pipes, wrap your command in sh -c '...' or bash -c '...'.
1As opposed to long-lived daemons.
The true power of a Bash script is utilized when it is run. But how to do that? Well, there are a plethora of ways to run a Bash script( shell script). Some of them may be useful in certain conditions, while it doesn’t matter how you run the script. Bash scripts are usually executed in the terminal or command-line interface.
To run a Bash script there are many ways. Some of them are given below:
- Using bash or sh.
- Using source.
- Running directly in a bash environment.
For making some of these methods work, the script must have a shebang as the header to indicate it’s a shell script or bash script in this case. So, be sure to include the command below at the top of the file.
#!/bin/bash
This command will make the script run under the bash interpreter. It is recommended to write the shebang header even if it works without them.
Using bash or sh
This is the most standard way of executing the bash script. You must have git bash installed if you are using Windows. For Linux and macOS, bash is installed by default. In this method, we type bash followed by the file name with extension i.e. sh in this case. In a terminal, run the following code by replacing the filename with your bash script filename.
bash filename.sh
Here, bash is a program that contains the shell environments necessary to run the script from the bash shell. So this will execute the script from the bash interpreter.

Using bash command to run the script.
We can also use sh to run the script as it will direct to the default shell in the setup environment.
sh filename.sh
Using the sh command to run the bash script.
From the above example, we were able to run a bash script using bash as well as the sh command. If you are not in the same folder/directory as the script, make sure you specify the relative path to the script.
Using source
This method is quite easy to run a bash script, and all of them are quite simple. We just need to type in “source” before the file/script name with an extension. In a terminal, run the following code by replacing the filename with your bash script filename.
source filename.sh
The script will simply get executed after “sourcing” the file. The source command will execute the shell script as the default bash command provided you are in the bash shell. You need to be in the bash shell to execute the script using the source command.
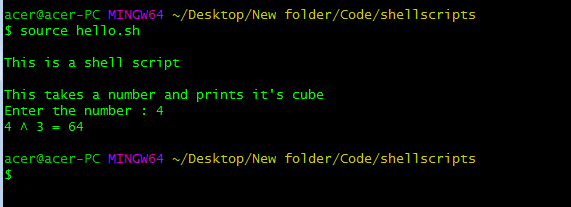
Using Source to run a bash script
From the screenshot of the script running, we can see that the source works exactly like the bash or sh command. The above script is a very basic script, but that doesn’t matter as long as the script is errorless and bug-free. Also, you need to add the relative path here as well if you are not in the same directory as the bash script.
By specifying the path to the script and chmod
This is a standalone method to run a bash script. We have to execute the script as an executable, we can run the script anywhere provided we have a bash shell somewhere in the environment. To make it executable we need to make sure we have the rights to run the file as an executable. We will use chmod for changing the rights on the file/script. In a terminal, run the following code by replacing the filename with your bash script filename.
chmod +x filename.sh
The above command will allow us to execute the file. So it changes the mode of the file, the file should be read-only, executable, or any other mode for files. If you are using Linux and are not the root user, simply use sudo before the command chmod. The +x command will make sure the file is executable by everyone in the environment.
After the permission of the file is taken care of, we can now simply execute the file as follows. The command below takes into consideration that you are in the same directory as the file/ bash script is in.
./filename.sh
If you are not on the same path as the bash script, make sure you provide the relative path to the file or the bash script.
./pathToTheFile.sh
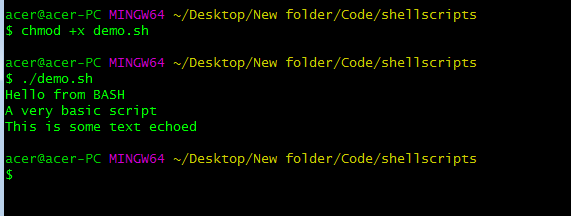
using chmod and executing the script.

Executing a script from a relative path.
The above snippets and screenshots show that we can run the scripts in a bash environment by changing the mode of the file using the chmod.
From the following guide, we were able to run scripts in Linux using various methods and programs. So, those were some methods to run a bash script on Linux or pretty much anywhere.
The true power of a Bash script is utilized when it is run. But how to do that? Well, there are a plethora of ways to run a Bash script( shell script). Some of them may be useful in certain conditions, while it doesn’t matter how you run the script. Bash scripts are usually executed in the terminal or command-line interface.
To run a Bash script there are many ways. Some of them are given below:
- Using bash or sh.
- Using source.
- Running directly in a bash environment.
For making some of these methods work, the script must have a shebang as the header to indicate it’s a shell script or bash script in this case. So, be sure to include the command below at the top of the file.
#!/bin/bash
This command will make the script run under the bash interpreter. It is recommended to write the shebang header even if it works without them.
Using bash or sh
This is the most standard way of executing the bash script. You must have git bash installed if you are using Windows. For Linux and macOS, bash is installed by default. In this method, we type bash followed by the file name with extension i.e. sh in this case. In a terminal, run the following code by replacing the filename with your bash script filename.
bash filename.sh
Here, bash is a program that contains the shell environments necessary to run the script from the bash shell. So this will execute the script from the bash interpreter.
Using bash command to run the script.
We can also use sh to run the script as it will direct to the default shell in the setup environment.
sh filename.sh
Using the sh command to run the bash script.
From the above example, we were able to run a bash script using bash as well as the sh command. If you are not in the same folder/directory as the script, make sure you specify the relative path to the script.
Using source
This method is quite easy to run a bash script, and all of them are quite simple. We just need to type in “source” before the file/script name with an extension. In a terminal, run the following code by replacing the filename with your bash script filename.
source filename.sh
The script will simply get executed after “sourcing” the file. The source command will execute the shell script as the default bash command provided you are in the bash shell. You need to be in the bash shell to execute the script using the source command.
Using Source to run a bash script
From the screenshot of the script running, we can see that the source works exactly like the bash or sh command. The above script is a very basic script, but that doesn’t matter as long as the script is errorless and bug-free. Also, you need to add the relative path here as well if you are not in the same directory as the bash script.
By specifying the path to the script and chmod
This is a standalone method to run a bash script. We have to execute the script as an executable, we can run the script anywhere provided we have a bash shell somewhere in the environment. To make it executable we need to make sure we have the rights to run the file as an executable. We will use chmod for changing the rights on the file/script. In a terminal, run the following code by replacing the filename with your bash script filename.
chmod +x filename.sh
The above command will allow us to execute the file. So it changes the mode of the file, the file should be read-only, executable, or any other mode for files. If you are using Linux and are not the root user, simply use sudo before the command chmod. The +x command will make sure the file is executable by everyone in the environment.
After the permission of the file is taken care of, we can now simply execute the file as follows. The command below takes into consideration that you are in the same directory as the file/ bash script is in.
./filename.sh
If you are not on the same path as the bash script, make sure you provide the relative path to the file or the bash script.
./pathToTheFile.sh
using chmod and executing the script.
Executing a script from a relative path.
The above snippets and screenshots show that we can run the scripts in a bash environment by changing the mode of the file using the chmod.
From the following guide, we were able to run scripts in Linux using various methods and programs. So, those were some methods to run a bash script on Linux or pretty much anywhere.
Содержание
- Шаг 1: Создание проверочного скрипта
- Шаг 2: Настройка скрипта для утилиты env
- Шаг 3: Запуск имеющегося скрипта
- Вопросы и ответы
Шаг 1: Создание проверочного скрипта
Сначала мы предлагаем создать проверочный скрипт, который в будущем будем запускать. Конечно, вы можете пропустить данный этап, если сценарий командной строки уже имеется. Отметим, что сейчас мы не будем разбирать синтаксис языков программирования, а лишь расскажем, что каждому под силу создать собственный скрипт или вставить содержимое в файл для дальнейшего его вызова по обстоятельствам.
- Запустите «Терминал» удобным для вас образом, например, через меню приложений или горячую клавишу Ctrl + Alt + T.
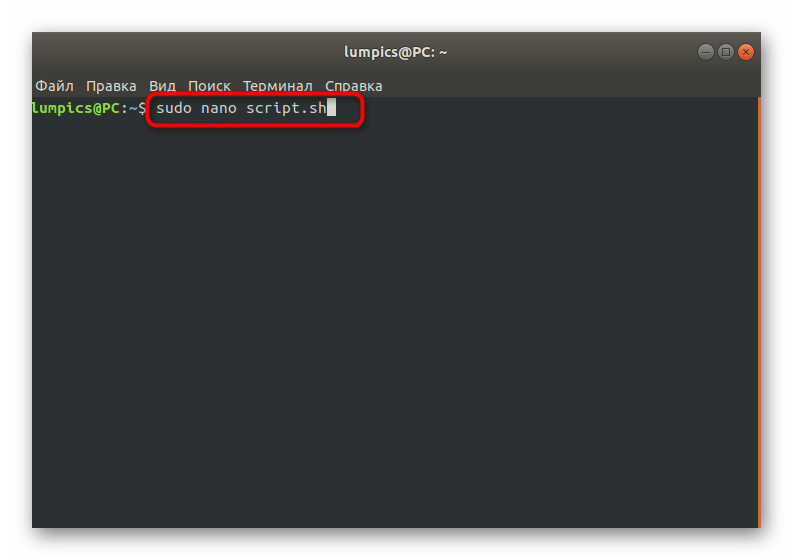
- Здесь используйте команду
sudo nano script.sh, где nano — используемый текстовый редактор, а script.sh — название создаваемого файла. Можно создавать файл, например, через тот же vi или gedit, сути это не изменит, а название элемента тоже меняется по личным предпочтениям пользователя. - Подтвердите это действие, введя пароль от учетной записи суперпользователя, поскольку оно выполняется с аргументом sudo.
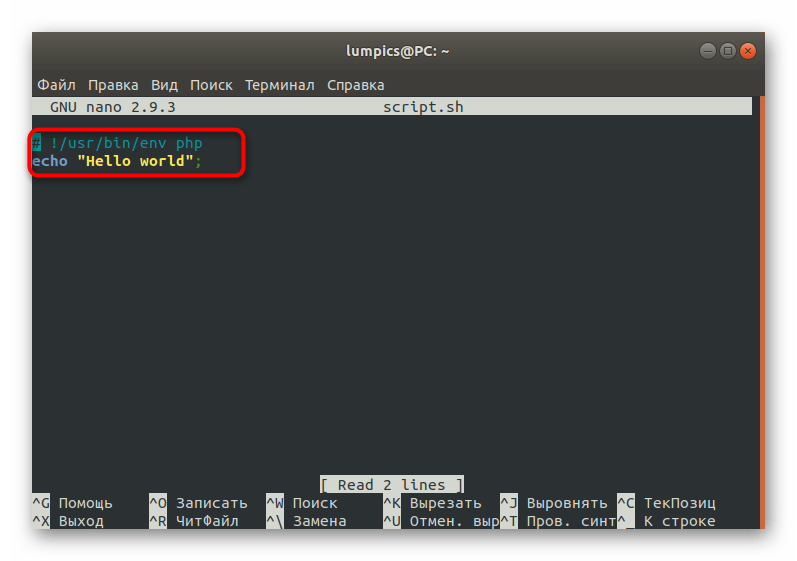
- Откроется новый файл, в который можно вставить строки скрипта. Ниже вы видите стандартный пример, отвечающий за вывод сообщения «Hello world». Если имеется содержимое другого характера, просто вставьте его в консоль, убедившись, что все строки написаны верно.
#!/bin/bash
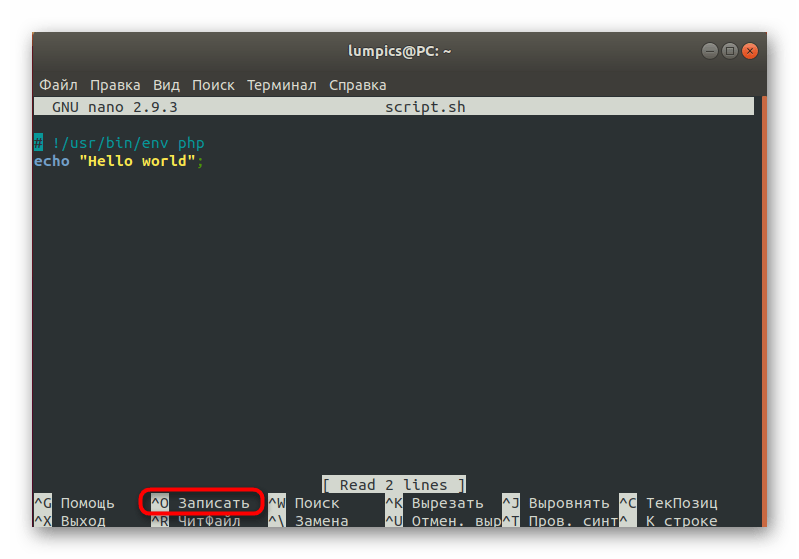
echo "Hello world" - После этого можно сохранить настройки, зажав комбинацию клавиш Ctrl + O.
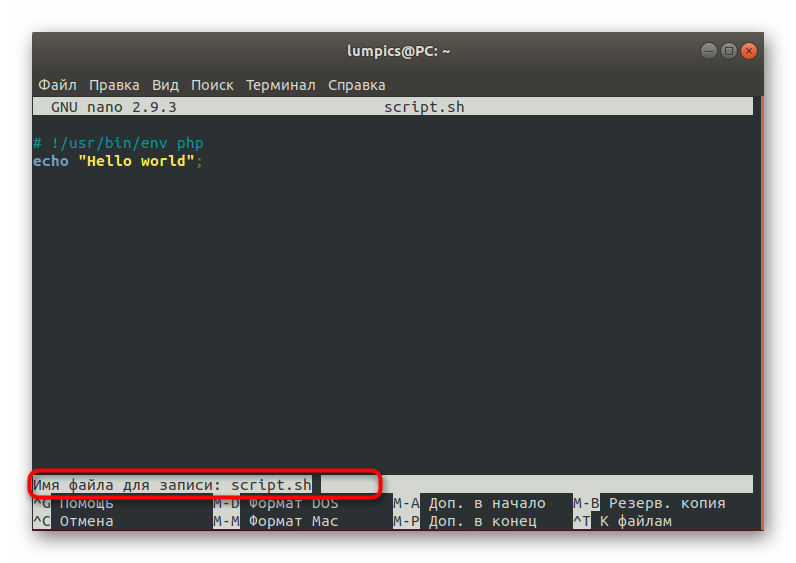
- Имя файла изменять не нужно, поскольку его мы задали при создании. Просто нажмите на Enter, чтобы завершить сохранение.
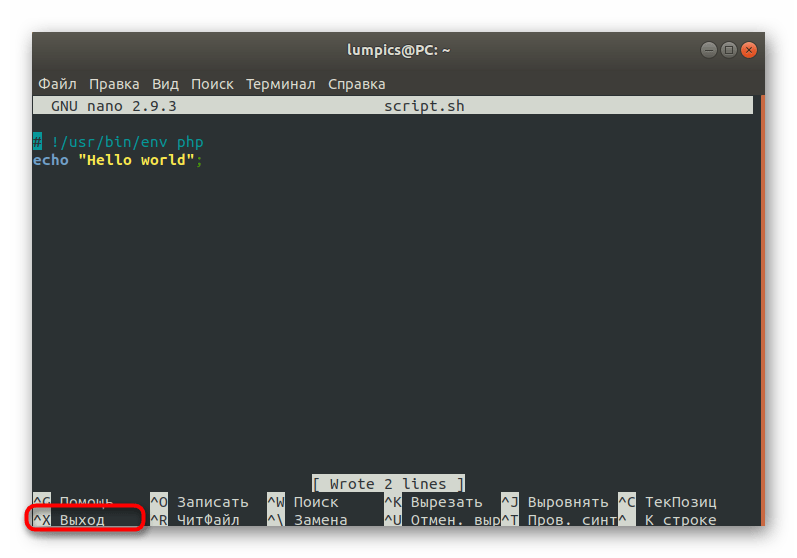
- Покиньте текстовый редактор через Ctrl + X.


Как видим, ничего сложного в создании собственных скриптов для Bash нет, однако вся особенность заключается в знании кода. Придется либо писать его с нуля самому, либо скопировать готовые решения из свободных источников. После того, как скрипт успешно реализован в файле, можно смело переходить к следующему этапу.
Шаг 2: Настройка скрипта для утилиты env
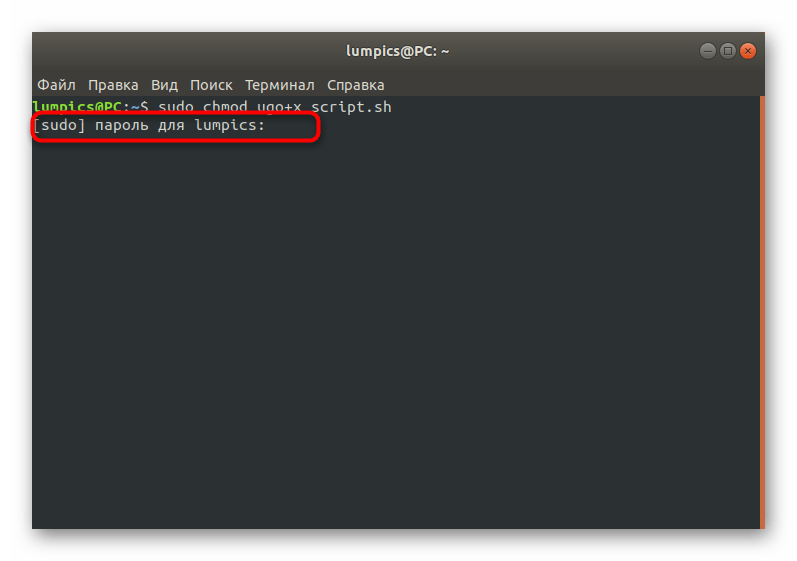
Этот шаг тоже является не обязательным, однако без него не обойтись пользователям, которые задействуют утилиту env для запуска скрипта. Без предварительной настройки он просто не откроется, поскольку изначально не были получены соответствующие разрешения. Добавляются они через команду sudo chmod ugo+x script.sh, где script.sh — название необходимого файла.

Не забывайте, что все действия, выполняемые через аргумент sudo, требуют подтверждения подлинности учетной записи через ввод пароля суперпользователя. После этого отобразится новая строка для запуска команд, что означает успешное применение настройки.
Шаг 3: Запуск имеющегося скрипта
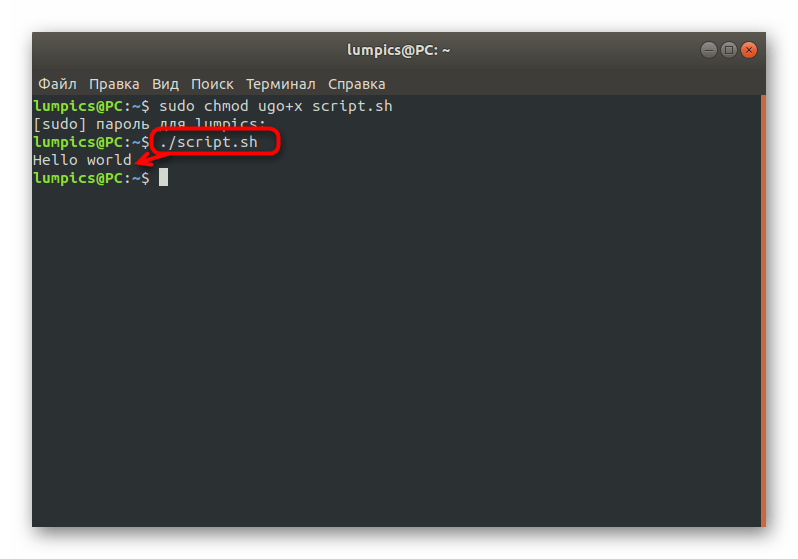
Перейдем к основному шагу, который и заключается в непосредственном запуске имеющегося скрипта. Для начала рассмотрим простую команду, которая имеет вид ./script.sh и отвечает за запуск файла из текущего места расположения. Результат вывода вы видите на приведенном ниже скриншоте. За пример мы взяли созданный ранее сценарий. По тому же принципу можно указать и полный путь к объекту, чтобы строка изменилась, например, на /home/user/script.sh.

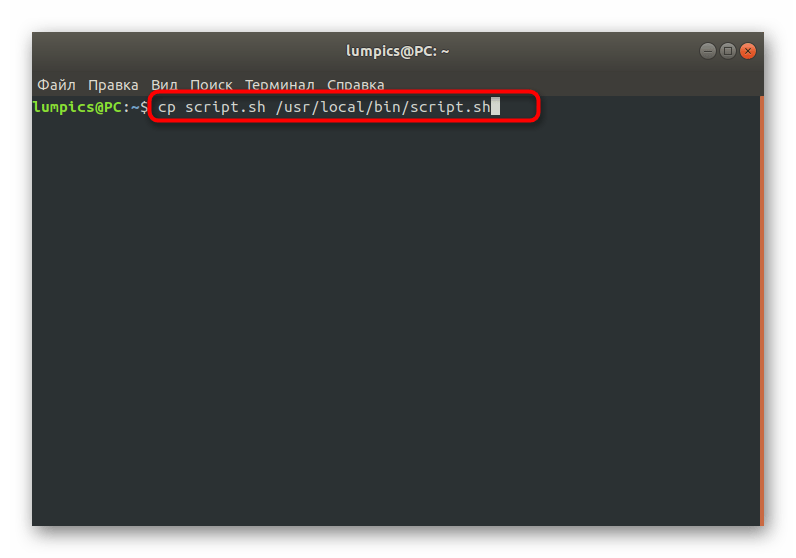
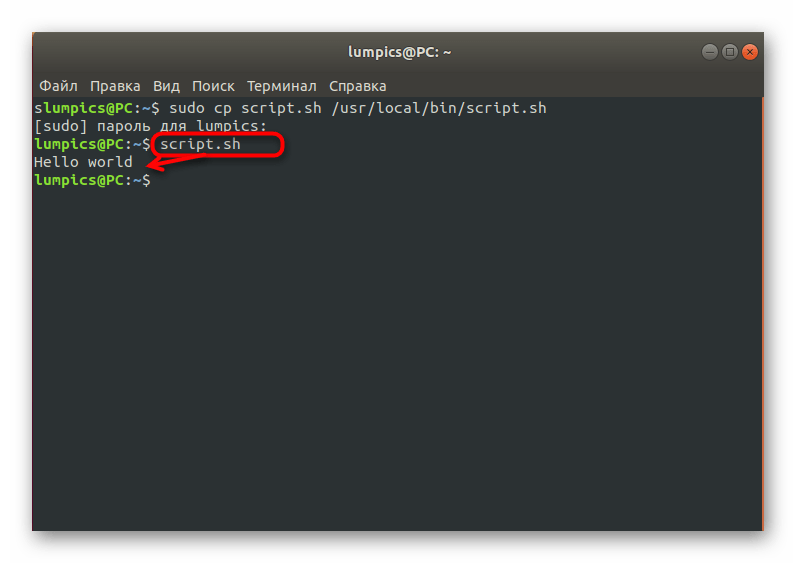
В Linux имеется системная переменная PATH. В нее входит ряд папок, отвечающих за выполнение самых разнообразных действий. Одна из них называется /usr/local/bin и используется для ручной инсталляции программ. Если вы не желаете постоянно указывать полный путь к скрипту для его активации, просто добавьте его в одну из папок PATH. Для этого используется строка cp script.sh /usr/local/bin/script.sh.
После этого запуск будет доступен путем простого ввод названия файла с учетом расширения.
Второй метод открытия заключается в одновременном вызове оболочки. Вам следует переместиться в директорию со скриптом и написать bash script.sh. Этот метод хорош тем, что позволяет не вписывать полный путь к объекту или предварительно добавлять его в соответствующие директории PATH.
Это все, что мы хотели рассказать о взаимодействии со скриптами в Linux. Вам остается только создать соответствующий файл или открыть уже имеющийся, используя приведенные выше рекомендации.
Еще статьи по данной теме:
Помогла ли Вам статья?
На чтение 6 мин Просмотров 1.8к. Обновлено 01.09.2021
Bash — очень популярный язык оболочки и команд, и его можно использовать с операционными системами Linux, macOS и Windows. Этот язык широко используется для автоматизации задач и выполнения повторяющихся задач с большей легкостью и удобством. Программы, которые вы пишете на этом языке, известны как сценарии Bash. Это обсуждение сосредоточено на различных методах запуска сценария Bash на машине Ubuntu 20.04.
Содержание
- Запуск скрипт Bash в Ubuntu 20.04
- Требования к запуску скрипта Bash — важность Shebang
- Различные методы запуска скрипта Bash
- Метод 1: Создание исполняемого файла
- Метод 2: Использование ключевого слова «bash»
- Метод 3: Использование ключевого слова «sh»
- Метод 4: Используя графический интерфейс Ubuntu 20.04
- Заключение
Запуск скрипт Bash в Ubuntu 20.04
Каждый раз, когда вы создаете программу в Bash, вам необходимо выполнить или запустить ее, чтобы получить желаемые результаты. Однако перед запуском сценария Bash необходимо соблюдать определенный протокол. Если этот протокол отсутствует в вашем сценарии Bash, вы просто не сможете его выполнить. Мы узнаем о важности этого протокола в прилагаемом разделе нашей статьи.
Требования к запуску скрипта Bash — важность Shebang
Рассказывая о различных методах запуска сценария Bash в Ubuntu 20.04, мы создали простой сценарий Bash с именем Bash.sh, который просто напечатает «Hello World!» сообщение на терминале. Этот сценарий можно увидеть на изображении ниже:

В этом сценарии Bash мы использовали команду «echo» для вывода желаемого сообщения на терминал. Однако нас интересует первая строка этого сценария Bash, то есть #! / Bin / bash. Эта строка называется Shebang, и она также известна как предварительное условие для запуска сценария Bash. Важность этой строки можно понять из того факта, что при выполнении вашего сценария Bash ваша система ищет эту конкретную строку, чтобы отличить сценарий Bash от любого другого типа файла.
Следовательно, если эта строка будет отсутствовать в вашем сценарии Bash, ваша система никогда не узнает, что вы пытаетесь запустить сценарий Bash, и, к сожалению, указанный вами сценарий Bash никогда не будет выполнен. Таким образом, какой бы сценарий Bash вы ни пытались создать в любой операционной системе, вы должны начать с Shebang.
Различные методы запуска скрипта Bash
Существует четыре различных метода запуска сценария Bash в Ubuntu 20.04, и мы подробно обсудим следующие методы:
Метод 1: Создание исполняемого файла
Как следует из названия этого метода, вам сначала нужно сделать исполняемый файл сценария Bash, что можно сделать, выполнив следующую прикрепленную команду:
В качестве альтернативы вы также можете запустить команду, показанную ниже, чтобы сделать исполняемый файл сценария Bash:
Выполнение любой из команд, как упоминалось выше, не будет генерировать никаких выходных данных на терминале. Более того, Bash.sh в обеих указанных выше командах представляет имя файла Bash, который мы хотим сделать исполняемым. Вы можете заменить его на имя любого из сценариев Bash, которые вы хотите запустить после того, как сделаете их исполняемыми.
Теперь, когда мы сделали наш скрипт Bash исполняемым, мы можем запускать его в любое время, просто с помощью следующей прикрепленной команды:
Важно отметить, что создание исполняемого файла сценария Bash — это однократный процесс. После выполнения сценария Bash вы можете запускать его столько раз, сколько захотите, не делая его каждый раз исполняемым. Однако, если вы внесете какие-либо изменения в свой сценарий Bash, вам придется снова сделать его исполняемым, прежде чем запускать его, чтобы ваши изменения вступили в силу.
Результат нашего сценария Bash, то есть «Hello World!» сообщение показано на изображении ниже:

Метод 2: Использование ключевого слова «bash»
Этот метод можно использовать, если вы хотите обойти команду создания исполняемого файла сценария Bash, т.е. если вы хотите запустить сценарий Bash напрямую, не делая его исполняемым. Вам просто нужно выполнить следующую прикрепленную команду:
Здесь «bash» представляет ключевое слово, которое действительно творит чудеса. Это ключевое слово объединяет функциональные возможности создания исполняемого файла сценария Bash и его запуска. Следовательно, как только вы запустите указанную выше команду, ваш сценарий Bash сразу же запустится. Следовательно, отображение вывода, показанного на изображении ниже, на вашем терминале:

Метод 3: Использование ключевого слова «sh»
Опять же, как и метод № 2, этот метод можно использовать, если вы не хотите создавать исполняемый файл сценария Bash перед его запуском. Вместо этого вы хотите запустить его напрямую. Для достижения этой цели вам нужно будет выполнить следующую прикрепленную команду:
Здесь ключевое слово «sh» объединяет функциональность по созданию исполняемого файла сценария Bash и его запуску. Как только вы запустите команду, как упоминалось выше, будет выполнен указанный вами сценарий Bash, которым в нашем случае был Bash.sh. Поэтому мы получили сообщение «Hello World!» на нашем терминале, как показано на изображении ниже:

Метод 4: Используя графический интерфейс Ubuntu 20.04
Как пользователи компьютеров, мы все понимаем, что не все из нас любят знаменитый интерфейс командной строки систем на базе Linux. Есть еще некоторые пользователи, которые предпочитают использовать удобный графический интерфейс пользователя (GUI), где все кажется довольно простым и интуитивно понятным. Они никогда не теряются при выполнении желаемых задач в своей системе. Именно поэтому мы решили поделиться основанным на графическом интерфейсе методом запуска сценария Bash в системе Ubuntu 20.04.
Для этого метода вам сначала нужно найти файл сценария Bash, перейдя в диспетчер файлов вашей системы. Если в вашей системе установлены настройки по умолчанию, и вы никогда не меняли их раньше, вам не нужно будет ничего делать, кроме как дважды щелкнуть файл сценария Bash. Как только вы это сделаете, вам будет представлено диалоговое окно, в котором вам просто нужно нажать на опцию Run in Terminal, как показано на следующем изображении:

Сразу после этого выбранный вами сценарий Bash немедленно запустится в терминале и отобразит предполагаемый результат, как показано на изображении ниже:

Однако, если ваши системные настройки по умолчанию изменены, вы можете просто перейти к настройкам в вашем файловом менеджере. После этого нужно перейти на вкладку Behavior, из которой нужно перейти в раздел Executable Text Files. Наконец, вам нужно будет выбрать вариант «Спросите, что делать», чтобы продолжить работу с методом, который мы только что обсудили. После того, как вы выполните эту процедуру, ваша система всегда будет спрашивать вас, что вы хотите делать со своими исполняемыми файлами, как только вы дважды щелкаете по ним.
Заключение
В этой статье описаны все методы запуска сценария Bash в системе Ubuntu 20.04. С помощью этих методов вы можете очень удобно запускать сценарии Bash. Более того, вы можете без проблем выбрать любой из этих методов для запуска ваших сценариев Bash, потому что все эти методы дадут одинаковые результаты.