Вчера я внезапно захотел изучить Selenium, поэтому я проверил некоторые введения в Интернете и обнаружил, что некоторые учебные пособия в основном являются более старыми версиями, которые немного неудобны в использовании, поэтому я попытался написать некоторые из последних версий сегодня. Пожалуйста, обратитесь кОфициальный сайт Selenium, Следующее содержание статьи сопровождается на компьютерах MacSelenium-IDE официальная документацияНаписано для последней версии. На самом деле официальная документация хорошо написана, с картинками и текстом, вы можете попробовать прочитать официальную.
Эта статья о Selenium-IDE, а не о Selenium.
Почему ты так говоришь? Пожалуйста, смотрите рисунок ниже.

Selenium
Selenium-IDE — это просто инструмент для записи скриптов. Просто для начала.
В настоящее время Selenium-IDE поддерживает не только FireFox, но и Chrome. Эта статья использует FireFox в качестве примера.

Добавление компонентов в Selenium IDE

FireFox Все компоненты

Поисковый компонент Senlenium IDE

Добавить Senlenium в Firefox
После добавления Selenium он появляется в правой части строки меню браузера, например, значок Se на первом изображении статьи. Дважды щелкните значок, чтобы открыть Selenium IDE, как показано ниже:

Selenium IDE
Особенности IDE
Панель инструментов (Панель инструментов)
Красный источник в дальнем правом углу панели инструментов — кнопка записи. Используется для записи сценария работы пользователя в браузере.

Панель инструментов

Контроль скорости: используется для контроля скорости выполнения сценария использования.

Выполнить все: если в текущем проекте есть несколько тестовых случаев, использование этой кнопки выполнит все варианты использования.

Одиночное выполнение: при использовании этой кнопки будет использоваться только выбранный вариант использования. Если текущий проект имеет только один вариант использования, эта кнопка имеет тот же эффект, что и кнопка «Выполнить все».

Пауза / Возобновление: Может использоваться для приостановки или возобновления работающего варианта использования.

Стоп: остановка варианта использования, который выполняется в данный момент.

Шаг за шагом: используется для пошагового использования варианта использования. Он в основном используется для отладки вариантов использования.

Запись: Используется для записи сценария работы пользователя в браузере.
** Панель тестовых примеров **
Записанный сценарий будет отображаться здесь

Панель теста
Поля ввода Command, Target и Value отображают текущую выбранную команду и ее параметры. Это поля ввода, которые могут изменять текущую выбранную команду. Первый параметр, указанный на вкладке «Справка» нижней панели команды, всегда находится в поле «Цель». Если второй параметр указан на вкладке «Ссылка», он всегда находится в поле «Значение». Поле «Комментарий» позволяет добавить комментарий к текущей команде для последующего чтения.

Конфигурация команды
Примечание. Вкладка «Справка» — очень полезная функция, она используется для отображения описания функции выбранной в настоящий момент Команды, включая параметры, требуемые Командой (не все Команды должны иметь значения как Цель, так и Значение), чтобы вы могли быстро понять Команду. использование. Я проверил другие документы и обнаружил, что предыдущие версии доступны. Он временно скрыт правительством и будет вновь открыт в ближайшем будущем.
Панель навигации

Navigation Panel
Консольная панель
Log
Когда вы запускаете тестовый пример, на этой панели автоматически отображаются сообщения об ошибках и информационные сообщения о прогрессе, даже если вы сначала не выбрали вкладку «Журнал». Эти сообщения обычно используются для отладки тестовых случаев. Обратите внимание на кнопку очистки, чтобы очистить журнал.

Log
Reference
Официальный сайт описывает, что эта функция все еще находится в стадии разработки и будет обновлена в ближайшее время (последний раз официальный сайт обновлялся в 2018-4-23).
Сборка тестов
There are three primary methods for developing test cases. Frequently, a test developer will require all three techniques.
Запись (запись)
При первом использовании Selenium IDE рекомендуется использовать функцию записи. Кнопка записи отключена по умолчанию (предыдущая версия была включена по умолчанию). Красный источник указывает, что функция записи отключена.
В процессе записи Selenium-IDE автоматически заполняет команды сценария на панели тестовых сценариев в соответствии с вашими действиями на веб-странице. Эти команды в основном бывают следующих типов:
- Нажмите на ссылку одним щелчком мыши
- Введите команду ввода значения
- Выберите значение из выпадающего списка выбора команды
- Нажатие флажков или переключение кнопок переключателей
Объяснение новичка Статья 4: Флажок является полем множественного выбора, вы можете выбрать несколько, радио-переключатель — то, что параметры взаимоисключающие, можно выбрать только один.
Вот некоторые «ловушки», на которые стоит обратить внимание:
- Команды ввода могут потребовать нажатия на другие области веб-страницы для записи.
Добавить проверки и утверждения с помощью контекстного меню. (Добавление проверок и подтверждений с помощью контекстного меню)
Your test cases will also need to check the properties of a web-page. This requires assert and verify commands. We won’t describe the specifics of these commands here; that is in the chapter on Selenium Commands – “Selenese”. Here we’ll simply describe how to add them to your test case.
Как мне добавить утверждения? Пока вы записываете сценарий (красный источник превращается в красный квадрат), щелкните правой кнопкой мыши в любом месте страницы. Вы увидите контекстное меню, показывающее команды проверки и / или подтверждения.

Щелкните правой кнопкой мыши во время записи сценария
При первом использовании Selenium-IDE может быть не так много опций, так как количество использований увеличивается, в это меню автоматически добавляется больше команд.
Edit (Редактирование)
Вставить команду
На панели «Контрольный пример» выберите команду в контрольном примере, в которую требуется вставить команду. Щелкните левой кнопкой мыши строку, в которую вы хотите вставить новую команду. Щелкните правой кнопкой мыши и выберите команду «Вставить»: среда IDE добавит пустую строку перед выбранной вами строкой. Теперь используйте команду edit text field, чтобы ввести новую команду и ее параметры.

Вставить команду и ее параметры
Вставить комментарий
Мы можем добавлять комментарии к каждой команде, чтобы улучшить читаемость скрипта.

Insert Comment
Opening and Saving a Test Case
To save a Selenium IDE project, click the save button at the top right hand side, Selenium IDE will download a .side file, which contains all test cases and suites.
Все файлы, сохраненные Selenium-IDE, являются файлами .side.
Запуск тестовых случаев
Во введении панели инструментов мы познакомились с тем, как выполнять тестовые случаи. Вот несколько дополнений:
- Стоп в середине.
Самая большая роль точек останова — это отладка, которая может помочь найти проблемную точку как можно скорее. Например, на рисунке ниже, если мы хотим разбить 17-ю строку, мы выбираем новую строку, щелкните правой кнопкой мыши и выберите Toggle breakpoint. Затем, когда скрипт будет выполнен снова, программа остановится здесь, только до 16 строк. Затем результат выполнения строки 16 также будет выводиться на консоль, поэтому вы можете определить, есть ли какие-либо проблемы со сценарием, до строки 16.

Breakpoints
- Начните с середины
Эта функция также используется для отладки. Если вы используете эту функцию, то сценарий до этого не будет выполнен. Метод Add такой же, как и Stop in the Middle.

Start from the Middle
- Выполнить любую отдельную команду
Дважды щелкните, чтобы выполнить одну команду. Это в основном используется при написании сценария, и вы не уверены в правильности сценария.
Double-click any single command to run it by itself. This is useful when writing a single command. It lets you immediately test a command you are constructing, when you are not sure if it is correct. You can double-click it to see if it runs correctly. This is also available from the context menu.
Using Base URL to Run Test Cases in Different Domains
Selenium Commands – “Selenese”
Команду Selenium часто называют Selenese.
Здесь мы подробно объясним эти команды и представим многие из вариантов, которые вы делаете при тестировании веб-приложений при использовании Selenium.
In selenese, one can test the existence of UI elements based on their HTML tags, test for specific content, test for broken links, input fields, selection list options, submitting forms, and table data among other things. In addition Selenium commands support testing of window size, mouse position, alerts, Ajax functionality, pop up windows, event handling, and many other web-application features. The Command Reference lists all the available commands.
В selenese вы можете проверить существование элементов пользовательского интерфейса на основе их HTML-тегов, тестов на конкретное содержимое, тестов на наличие неработающих ссылок, полей ввода, параметров списка выбора, форм отправки и данных таблиц. Кроме того, команды Selenium поддерживают размер тестового окна, положение мыши, оповещения, функциональность Ajax, всплывающие окна, обработку событий и многие другие функции веб-приложений. Справочник команд перечисляет все доступные команды.
Selenium commands come in three “flavors”: Actions, Accessors, and Assertions(Я действительно не знаю, как перевести это предложение, поэтому я скопировал его напрямую)
-
Actions
Действия — это команды, которые обычно управляют состоянием приложения. Они делают такие вещи, как «нажмите на эту ссылку» и «выберите эту опцию». Если операция завершится неудачно или возникнут ошибки, выполнение текущего теста будет остановлено. -
Accessors
Средства доступа проверяют состояние приложения и сохраняют результат в переменной, например storeTitle. Они также используются для автоматического создания утверждений. -
Assertions
Утверждения похожи на средства доступа, но они подтверждают, что состояние приложения соответствует ожидаемому. Например, «убедитесь, что заголовок страницы X» и «проверьте, если флажок установлен».
All Selenium Assertions can be used in 2 modes: “assert” and “verify”. For example, you can “assertText” and “verifyText”. When an “assert” fails, the test is aborted. When a “verify” fails, the test will continue execution, logging the failure. This allows a single “assert” to ensure that the application is on the correct page, followed by a bunch of “verify” assertions to test form field values, labels, etc.
Все утверждения Selenium можно использовать в двух режимах: «подтвердить» и «проверить». Например, вы можете использовать «assertText» и «verifyText». Когда «assert» не выполняется, тест отменяется. Если «проверка» не пройдена, тест продолжится и запись не будет выполнена. Это позволяет одному «утверждению» гарантировать, что приложение находится на правильной странице, а затем связку «проверять» утверждения для проверки значений полей формы, меток и т. Д.
Синтаксис скрипта
Команды Selenium просты, они состоят из команды и двух параметров. Это команда, цель, значение.
Параметры не всегда обязательны, это зависит от команды. В некоторых случаях оба требуются, в других случаях требуется параметр, а в других случаях команда может быть полностью без параметров. Как показано ниже:

Пример состава команды Selenium
Параметры разные, но обычно они:
- Локатор, используемый для идентификации элементов пользовательского интерфейса на странице.
- Текстовый шаблон, используемый для проверки или подтверждения содержимого страницы.
- Текстовый режим или переменные селена для ввода текста в поле ввода или выберите параметр из списка параметров.
Выше три пункта будут подробно описаны позже.
Тестовый набор
Набор тестовых наборов представляет собой набор из нескольких вариантов использования.

Выполнение тестового набора
Обычно используемые команды селена
Чтобы подвести итог нашего введения в Selenium, мы покажем вам несколько типичных команд Selenium. Это, вероятно, наиболее часто используемые команды для построения тестов.
open
Откройте страницу с URL.
click
Выполняет одиночный щелчок и при необходимости ожидает загрузки новой страницы.
type
ввод.
sendKeys
Ввод с клавиатуры.
verifyTitle/assertTitle
Проверьте заголовок текущей страницы.
Разница: verifyTitle используется для проверки того, что заголовок текущей страницы равен ожидаемому значению. Если он не выполняется, текущий шаг завершается неудачно, и сценарий продолжает выполняться;
assertTitle используется для проверки того, что заголовок текущей страницы равен ожидаемому значению. Если он не выполняется, текущий сценарий завершается ошибкой и сценарий не будет продолжать выполняться.
Например: мы можем использовать команду assertTitle в начале теста, чтобы проверить, равно ли свойство title страницы ожидаемому значению. Если оно не равно, страница может быть неправильно перемещена. Нет необходимости продолжать последующие операции. , Скрипт будет немедленно прекращен.
verifyTextPresent
Убедитесь, что указанный текст существует.
verifyElementPresent
Убедитесь, что указанный элемент пользовательского интерфейса существует, как определено его разметкой HTML, и отображается на странице.
verifyText
Проверяет указанный текст и соответствующие теги HTML на странице.
verifyTable
Проверьте ожидаемое содержимое таблицы.
Проверка элементов страницы
Проверка элементов пользовательского интерфейса на веб-странице, вероятно, является наиболее распространенной функцией автоматического тестирования. Selenese позволяет несколькими способами проверять элементы пользовательского интерфейса.Важно понимать эти разные подходыПотому что эти методы определяют, что на самом деле проверяется.
Например, вы можете проверить:
- Элемент появляется где-то на странице?
- Определенный текст где-то на странице?
- Конкретный текст находится в конкретной позиции на странице?
Точки 2 и 3 немного окольны? Это похоже на смысл. Я сознательно попросил мою сестру, которая занималась английским языком обучения, объяснить это, и в сочетании с официальными документами это в основном означает следующее:
Например, если вы тестируете текстовый заголовок, вас может больше беспокоить текстовое содержимое заголовка и расположение текста (например, находится ли он вверху страницы). Другая ситуация заключается в том, что если вы тестируете изображение, отображаемое на главной странице, изображение необходимо часто менять (содержимое изображения и положение отображения изображения), но вам важно только, есть ли на странице изображения или нет во время теста. Содержание изображения и позиция отображения.
Вот объяснение документации:
For example, if you are testing a text heading, the text and its position at the top of the page are probably relevant for your test. If, however, you are testing for the existence of an image on the home page, and the web designers frequently change the specific image file along with its position on the page, then you only want to test that an image (as opposed to the specific image file) exists somewhere on the page.
Использовать утверждение или проверку? (Утверждение или проверка?)
Мы уже говорили о различиях между утверждением и проверкой. Вот несколько дополнительных объяснений. Используется ли подтверждение или утверждение?
Выбор между «утверждением» и «проверкой» в конечном счете делается для удобства ошибки (не обязательно ошибка, это должно быть несоответствие ожиданий, и иногда наши ожидания могут быть неверными из-за различий в понимании с PM) управление.
Если вы проверяете, что страница, отображаемая браузером, не та, которую вы ожидали во время теста (например, номер страницы неправильный, вам нужно использовать утверждение в это время и немедленно прекратить тестирование, когда вы обнаружите такие ошибки). По сути, вам не нужно проверять правильность первого абзаца на странице (потому что содержимое страницы не должно отображаться на этой странице). Если это произойдет, вы можете приостановить тестовый случай, чтобы вы могли расследовать причину и своевременно решить проблему (по крайней мере, вы хотите, чтобы содержимое, отображаемое на этой странице, соответствовало ожидаемому, а затем судило, правильно ли это содержимое или нет).
С другой стороны, вы можете захотеть проверить многие атрибуты страницы, а не останавливать тестовый пример, если он не пройден, поскольку это позволит вам проверить все ошибки на странице и предпринять соответствующие действия. (В настоящее время вам необходимо использовать проверку, проверить все ошибки варианта использования и записать их, а затем устранить их одну за другой).
На самом деле «assert» завершится неудачно и прервет текущий тестовый пример, в то время как «validation» не удастся, но продолжит выполнение тестового примера.
Лучшее использование этой функции — логически группировать команды тестирования, начиная с «assert», а затем запускать каждую группу с одной или несколькими командами «verify». Пример:
| Command | Target | Value |
|---|---|---|
| open | /projects/ide/ | |
| assertTitle | Selenium IDE | |
| verifyElementPresent | css=#mainContent img |
В приведенном выше примере сначала открывается страница, а затем «утверждается», что правильная страница может быть загружена путем сравнения заголовка с ожидаемым значением. Только после прохождения этого пути будет запущена следующая команда, которая «проверит», существует ли образ в ожидаемом месте.
Определить существование элемента (verifyElementPresent)
Используйте эту команду, когда нужно проверить наличие определенного элемента пользовательского интерфейса, а не его содержимого. Эта проверка не проверяет текст, только теги HTML. Распространенным методом является проверка, существует ли изображение.
| Command | Target | Value |
|---|---|---|
| verifyElementPresent | //div/p/img |
Эта команда проверяет изображение, которое состоит из Наличие HTML-тега указывается, отображается на странице и следует
Теги и
Теги. Первый (и единственный) параметр — это локатор, который сообщает команде Selenese, как найти элемент. Следующий раздел объясняет локатор.
verifyElementPresent можно использовать для проверки наличия любых HTML-тегов на странице. Вы можете проверить ссылки, абзацы, разделы
Существование и т. Д. Вот еще несколько примеров.
| Command | Target | Value |
|---|---|---|
| verifyElementPresent | //div/p | |
| verifyElementPresent | //div/a | |
| verifyElementPresent | id=Login | |
| verifyElementPresent | link=Go to Marketing Research | |
| verifyElementPresent | //a[2] | |
| verifyElementPresent | //head/title |
Эти примеры иллюстрируют различные способы тестирования элементов пользовательского интерфейса. Снова, следующий раздел объяснит локаторы.
Подтвердите текст
Когда вам нужно проверить текст и его элементы пользовательского интерфейса, используйте verifyText. verifyText должен использовать локатор. Если вы выберете локатор XPath или DOM, вы можете проверить, что конкретный текст появляется на странице относительно других компонентов пользовательского интерфейса на странице в определенных местах.
| Command | Target | Value |
|---|---|---|
| verifyText | //table/tr/td/div/p | This is my text and it occurs right after the div inside the table. |
Расположение элементов
Для многих команд Selenium требуется цель. Target идентифицирует элемент в содержимом веб-приложения и содержит политику расположения, за которой следует местоположение в формате locatorType = location. Во многих случаях тип локатора может быть опущен. Различные типы локаторов объясняются ниже на примерах.
Расположение по идентификатору
Это, вероятно, наиболее часто используемый метод определения местоположения элементов. Когда тип локатора не распознается, все настройки по умолчанию являются настройками по умолчанию. При этой стратегии будет использоваться первый элемент, значение атрибута которого соответствует позиции. Если ни один элемент не имеет соответствующего атрибута id, будет использоваться первый элемент атрибута name, который соответствует позиции.
Например, ваш источник страницы может иметь следующие атрибуты id и name:
<html>
 <body>
  <form id="loginForm">
   <input name="username" type="text" />
   <input name="password" type="password" />
   <input name="continue" type="submit" value="Login" />
  </form>
 </body>
<html>
Следующая стратегия локатора представляет элементы, возвращенные из приведенного выше фрагмента HTML, в виде номеров строк:
- identifier=loginForm (3)
- identifier=password (5)
- identifier=continue (6)
- continue (6)
Поскольку тип идентификатора локатора используется по умолчанию, идентификатор = не требуется в предыдущих трех примерах.
Поиск по идентификатору
Этот тип локатора более ограничен, но более точен, чем тип локатора идентификатора. Используйте его, когда вы знаете атрибут id элемента.
1    <html>
2      <body>
3       <form id="loginForm">
4        <input name="username" type="text" />
5        <input name="password" type="password" />
6        <input name="continue" type="submit" value="Login" />
7        <input name="continue" type="button" value="Clear" />
8      </form>
9    </body>
10   <html>
- id=loginForm (3)
Расположение по имени
При использовании имени для позиционирования элемента иногда возникают проблемы, то есть если несколько элементов имеют одинаковое имя на странице, может быть найден только первый элемент, соответствующий имени.
Если у нескольких элементов одинаковое значение для атрибута имени, вы можете использовать фильтры для дальнейшего уточнения стратегии позиционирования. Тип фильтра по умолчанию — значение (соответствует атрибуту значения).
1  <html>
2    <body>
3     <form id="loginForm">
4       <input name="username" type="text" />
5       <input name="password" type="password" />
6      <input name="continue" type="submit" value="Login" />
7      <input name="continue" type="button" value="Clear" />
8    </form>
9   </body>
10  <html>
- name=username (4)
- name=continue value=Clear (7)
- name=continue Clear (7)
- name=continue type=button (7)
Примечание:
В отличие от некоторых типов локаторов XPath и DOM, эти три типа локаторов позволяют Selenium тестировать элемент пользовательского интерфейса независимо от положения страницы. Следовательно, если структура и организация страницы будут изменены, тест все равно будет пройден. Вы можете или не можете проверить, изменилась ли структура страницы. В ситуациях, когда веб-дизайнеры часто меняют страницы, но их функциональность должна быть регрессивно протестирована, протестирована с атрибутами id и name или протестирована с любым атрибутом HTML, становится очень важной.
Поиск по XPath
XPath — это язык для поиска узлов в документах XML. Поскольку HTML может быть реализацией XML (XHTML), пользователи Selenium могут использовать этот мощный язык для поиска элементов в веб-приложениях. XPath расширяет (и поддерживает) простые методы позиционирования по атрибутам id или name и открывает различные новые возможности, такие как позиционирование третьего флажка на странице.
Одна из основных причин использования XPath заключается в том, что у вас нет подходящего атрибута id или name для элемента, который вы хотите найти. Вы можете использовать XPath для поиска элементов с абсолютными терминами (не рекомендуется) или относительно элементов с атрибутами id или name. Локаторы XPath также можно использовать для указания элементов по атрибутам, отличным от id и name.
Абсолютный xpath содержит положение всех элементов из корня (html), поэтому даже малейшая настройка приложения может завершиться неудачей. Находя близлежащие элементы с атрибутами id или name (идеальные родительские элементы), вы можете настроить таргетинг элементов на основе отношений. Эта ситуация вряд ли изменится и может сделать ваши тесты более надежными.
Поскольку только локатор xpath начинается с «//», вам не нужно включать тег xpath = при указании локатора xpath.
1     <html>
2      <body>
3       <form id="loginForm">
4        <input name="username" type="text" />
5        <input name="password" type="password" />
6        <input name="continue" type="submit" value="Login" />
7        <input name="continue" type="button" value="Clear" />
8       </form>
9    </body>
10   <html>
- xpath=/html/body/form[1] (3) — Absolute path (would break if the HTML was changed only slightly)
- //form[1] (3) — First form element in the HTML
- xpath=//form[@id=‘loginForm’] (3) — The form element with attribute named ‘id’ and the value ‘loginForm’
xpath=//form[input/@name=‘username’] (3) — First form element with an input child element with attribute named ‘name’ and the value ‘username’ - //input[@name=‘username’] (4) — First input element with attribute named ‘name’ and the value ‘username’
- //form[@id=‘loginForm’]/input[1] (4) — First input child element of the form element with attribute named ‘id’ and the value ‘loginForm’
- //input[@name=‘continue’][@type=‘button’] (7) — Input with attribute named ‘name’ and the value ‘continue’ and attribute named ‘type’ and the value ‘button’
- //form[@id=‘loginForm’]/input[4] (7) — Fourth input child element of the form element with attribute named ‘id’ and value ‘loginForm’
Эти примеры включают в себя некоторые основы, но чтобы узнать больше, рекомендуются следующие ссылки:
- W3Schools XPath Tutorial
- W3C XPath Recommendation
Вы можете скопировать XPath, используя devtools вашего браузера:

Скопируйте XPath, используя devtools
Найдите гиперссылки по тексту ссылки. (Поиск гиперссылок по тексту ссылки)
Это простой способ найти гиперссылку на вашей веб-странице, используя связанный текст. Если есть две ссылки на один и тот же текст, будет использовано первое совпадение.
1  <html>
2   <body>
3    <p>Are you sure you want to do this?</p>
4    <a href="continue.html">Continue</a>
5    <a href="cancel.html">Cancel</a>
6  </body>
7  <html>
- link=Continue (4)
- link=Cancel (5)
Локализация по CSS
CSS (каскадные таблицы стилей) — это язык, который описывает представление документов HTML и XML. CSS использует селекторы для привязки атрибутов стиля к элементам в документе. Эти селекторы могут быть использованы в качестве другой стратегии позиционирования.
1    <html>
2     <body>
3       <form id="loginForm">
4        <input class="required" name="username" type="text" />
5        <input class="required passfield" name="password" type="password" />
6        <input name="continue" type="submit" value="Login" />
7        <input name="continue" type="button" value="Clear" />
8      </form>
9    </body>
10   <html>
- css=form#loginForm (3)
- css=input[name=“username”] (4)
- css=input.required[type=“text”] (4)
- css=input.passfield (5)
- css=#loginForm input[type=“button”] (7)
- css=#loginForm input:nth-child(2) (5)
Для получения дополнительной информации о селекторах CSS лучше всего обратитьсяthe W3C publication, Вы найдете больше ссылок там.
Примечание:
Большинство опытных пользователей Selenium рекомендуют CSS в качестве стратегии выбора, так как он намного быстрее XPath и может находить самые сложные объекты во внутреннем HTML-документе.
Неявные локаторы
Вы можете опустить тип локатора в следующих случаях:
-
Локатор без явно определенной политики локатора будет использовать политику позиционирования идентификатора по умолчанию. ссылкаLocating by Identifier。
-
Локаторы, начинающиеся с «//», будут использовать стратегию локатора XPath. ссылкаLocating by XPath。
Команды магазина и переменные Selenium
Вы можете использовать переменные Selenium для хранения констант в начале скрипта. Кроме того, в сочетании с управляемым данными тестовым проектом (обсуждаемым в следующем разделе) переменные Selenium могут использоваться для хранения значений, передаваемых в вашу тестовую программу из командной строки, другой программы или файла.
Команда plain store является самой основной из многих команд хранения и может использоваться для простого сохранения постоянного значения в переменной селен. Требуется два параметра: текстовое значение для хранения и переменная селена. При выборе имени для переменной используйте стандартное соглашение о присвоении имен уникальным буквенно-цифровым символам.
| Command | Target | Value |
|---|---|---|
| store | [email protected] | userName |
Позже в вашем скрипте вы захотите использовать сохраненное значение переменной. Чтобы получить доступ к значению переменной, заключите ее в фигурные скобки ({}) и поставьте перед ней знак доллара.
| Command | Target | Value |
|---|---|---|
| verifyText | //div/p | ${userName} |
| Command | Target | Value |
|---|---|---|
| type | id=login | ${userName} |
Распространенным использованием переменных является хранение входных данных для полей ввода.
| Command | Target | Value |
|---|---|---|
| type | id=login | ${userName} |
Переменные Selenium могут использоваться в первом или втором параметре и могут интерпретироваться Selenium перед любой другой операцией, выполняемой командой. Переменные селена также могут использоваться в выражениях локатора.
Для каждой команды проверки и утверждения существует эквивалентная команда хранилища. Вот некоторые часто используемые команды хранения.
Сохранить текст (storeText)
StoreText соответствует verifyText. Он использует локаторы для распознавания конкретного текста страницы. Если текст найден, он сохраняется в переменной. StoreText может использоваться для извлечения текста из тестируемой страницы.
echo-Selenese Print Command
У Selenese есть простая команда, которая позволяет вам печатать текст на выходе теста. Это полезно для предоставления информационных инструкций о ходе выполнения в тестах, отображаемых на консоли во время выполнения теста. Эти комментарии также можно использовать для предоставления контекста в отчете о результатах теста, который полезен для поиска дефектов на странице, когда тест обнаруживает проблему. Наконец, вы можете использовать оператор echo для вывода содержимого переменных Selenium.
Оповещения, всплывающие окна и несколько окон
Suppose that you are testing a page that looks like this.
<!DOCTYPE HTML>
<html>
<head>
  <script type="text/javascript">
    function output(resultText){
      document.getElementById('output').childNodes[0].nodeValue=resultText;
    }

    function show_confirm(){
      var confirmation=confirm("Chose an option.");
      if (confirmation==true){
        output("Confirmed.");
      }
      else{
        output("Rejected!");
      }
    }

    function show_alert(){
      alert("I'm blocking!");
      output("Alert is gone.");
    }
    function show_prompt(){
      var response = prompt("What's the best web QA tool?","Selenium");
      output(response);
    }
    function open_window(windowName){
      window.open("newWindow.html",windowName);
    }
    </script>
</head>
<body>

  <input type="button" id="btnConfirm" onclick="show_confirm()" value="Show confirm box" />
  <input type="button" id="btnAlert" onclick="show_alert()" value="Show alert" />
  <input type="button" id="btnPrompt" onclick="show_prompt()" value="Show prompt" />
  <a href="newWindow.html" id="lnkNewWindow" target="_blank">New Window Link</a>
  <input type="button" id="btnNewNamelessWindow" onclick="open_window()" value="Open Nameless Window" />
  <input type="button" id="btnNewNamedWindow" onclick="open_window('Mike')" value="Open Named Window" />

  <br />
  <span id="output">
  </span>
</body>
</html>
Пользователь должен ответить на окно предупреждения / подтверждения и переключить фокус на новое открытое всплывающее окно. К счастью, Selenium может перекрывать всплывающие окна JavaScript.
Однако, прежде чем перейти к предупреждению / подтверждению / подсказке для каждой детали, полезно понять общие черты между ними. Предупреждение, окно подтверждения и подсказка имеют следующие изменения.
| Command | Description |
|---|---|
| assertFoo(pattern) | throws error if pattern doesn’t match the text of the pop-up |
| assertFooPresent | throws error if pop-up is not available |
| assertFooNotPresent | throws error if any pop-up is present |
| storeFoo(variable) | stores the text of the pop-up in a variable |
| storeFooPresent(variable) | stores the text of the pop-up in a variable and returns true or false |
Во время работы Selenium всплывающие окна JavaScript не отображаются. Это происходит потому, что вызовы функций на самом деле перезаписываются собственным JavaScript-кодом Selenium во время выполнения. Однако то, что вы не видите всплывающее окно, не означает, что вам не нужно с ним сталкиваться. Для обработки всплывающих окон вы должны вызвать его функцию assertFoo (pattern). Если вы не можете утверждать, что следующая всплывающая команда будет заблокирована, вы получите ошибку, похожую на следующую ошибку [error]: Произошло неожиданное подтверждение! (Выберите один из вариантов.)
Alerts
| Command | Target | Value |
|---|---|---|
| open | / | |
| click | btnAlert | |
| assertAlert | I’m blocking! | |
| verifyTextPresent | Alert is gone. |
Давайте начнем с оповещений, так как они являются простейшими всплывающими окнами для обработки. Сначала откройте пример HTML в вашем браузере и нажмите кнопку «Показать предупреждение». Вы заметите, что после закрытия оповещения текст «оповещение исчезло». Отображается на странице. Теперь используйте запись Selenium IDE для выполнения тех же шагов и проверки текста после закрытия оповещения. Ваш тест будет выглядеть так:
| Command | Target | Value |
|---|---|---|
| open | / | |
| click | btnAlert | |
| assertAlert | I’m blocking! | |
| verifyTextPresent | Alert is gone. |
Вы можете подумать: «Это странно, я никогда не думал об утверждении предупреждения». «Но это обработка Selenium-IDE и закрытие предупреждения. Если вы удалите этот шаг и повторите тест, вы получите следующую ошибку [ошибка] : Произошло неожиданное оповещение! [Я блокирую!] .. Вы должны включить утверждение в оповещение, чтобы подтвердить его существование.
Если вы просто хотите утверждать, что предупреждение существует, не знаете или не заботитесь о его содержимом, вы можете использовать assertAlertPresent. Это вернет истину или ложь и остановит тест, если оно ложно.
Подтверждение (Подтверждения)
Подтверждение ведет себя почти так же, как предупреждение, с assertConfirmation и assertConfirmationPresent, которые предоставляют те же функции, что и копия предупреждения. Однако по умолчанию Selenium выберет ОК, когда появится подтверждение. На странице примера попробуйте выполнить запись, нажмите кнопку «Показать окно подтверждения», но нажмите кнопку «Отмена» во всплывающем окне, а затем подтвердите выводимый текст. Ваш тест может выглядеть так:
| Command | Target | Value |
|---|---|---|
| open | / | |
| click | btnConfirm | |
| chooseCancelOnNextConfirmation | ||
| assertConfirmation | Choose an option. | |
| verifyTextPresent Rej | ected |
Функция choosecancelonnextconfirm сообщает Selenium, что все последующие подтверждения должны возвращать false. Его можно сбросить, вызвав selectokonnextconfirm.
Вы можете заметить, что не можете повторить этот тест, потому что Selenium жалуется на необработанное подтверждение. Это происходит из-за того, что последовательность событий, вызванных записями Selenium ide, нажимает ChooseCancelOnNextConfirmation, расположенную в неправильном порядке (имеет смысл, если вы подумаете об этом, селен не может знать, прежде чем вы отмените открытие подтверждения). Просто переключите эти две команды. Тест будет в порядке.
Контекстное меню (подсказки)
Подсказки ведут себя так же, как и предупреждения, с assertPrompt и assertPromptPresent, предоставляя те же характеристики, что и их оповещатели. По умолчанию Selenium будет ждать ввода данных при появлении запроса. Попробуйте нажать кнопку «Показать приглашение» на странице примера и набрать «Selenium» в приглашении. Ваш тест может выглядеть так:
| Command | Target | Value |
|---|---|---|
| open | / | |
| answerOnNextPrompt | Selenium! | |
| click | id=btnPrompt | |
| assertPrompt | What’s the best web QA tool? | |
| verifyTextPresent Se | lenium! |
Если вы нажмете кнопку «Отмена» в окне подсказки (Подсказки), вы можете заметить, что answerOnNextPrompt будет показывать только пустую цель. Ручки Selenium отменяются, и пустые записи в приглашении в основном одинаковы.
Отладка (отладка)
Отладка означает поиск и исправление ошибок в ваших тестовых примерах. Это нормальная часть разработки тестового примера.
Мы не будем учить отладке здесь, потому что большинство новых пользователей уже имеют некоторый базовый опыт отладки. Если это плохо для вас, мы рекомендуем вам обратиться к разработчику в вашей организации.
Точка останова (контрольные точки)
Selelenium IDE поддерживает настройку точек останова и возможность запускать и останавливать запуск тестовых наборов, начиная с любой точки тестового набора. То есть вы можете запустить определенную команду в середине тестового примера и проверить его поведение на этом этапе. Для этого установите точку останова на команду, которую вы хотите проверить.
Чтобы установить точку останова, выберите команду, щелкните правой кнопкой мыши и выберите «Переключить точку останова» в контекстном меню. Затем нажмите кнопку «Выполнить», чтобы запустить контрольный пример от начала до точки останова.
Иногда также полезно запустить контрольный пример в середине контрольного примера или в точке останова после начальной точки. Например, предположим, что ваш тестовый пример сначала регистрируется на веб-сайте, а затем выполняет серию тестов, и вы пытаетесь отладить один из них. Однако вам нужно войти в систему только один раз, но вам нужно продолжить повторный запуск теста во время его разработки. Вы можете войти в систему один раз и запустить тестовый набор с начальной точки после части входа тестового набора. Это избавит вас от необходимости выходить вручную каждый раз при повторном запуске тестового примера.
Проходя через тестовый набор
Чтобы выполнить один тестовый случай за раз («шаг через»), просто нажмите кнопку несколько раз.

Кнопка перехода через
Find Button
Кнопка «Найти» используется для просмотра элементов пользовательского интерфейса (в браузере) на отображаемой в данный момент странице в выбранной в данный момент команде Selenium. Это полезно при создании локатора для первого параметра команды (см. Раздел о локаторах в главе «Команды Selenium»). Его можно использовать с любой командой, которая идентифицирует элемент пользовательского интерфейса на веб-странице, такой как щелчок, щелчок, ввод и некоторые команды подтверждения и проверки.
В табличном представлении выберите любую команду с параметром локатора. Нажмите кнопку Найти. Теперь посмотрите на веб-страницу: должен быть ярко-зеленый прямоугольник, окружающий элемент, указанный параметром locator.
Источник страницы для отладки
Как правило, при отладке тестового примера необходимо определить источник страницы (HTML-код веб-страницы, используемой для тестирования), чтобы определить проблему. Браузер позволяет вам просто щелкнуть правой кнопкой мыши на странице и затем нажать «Проверить». Это откроет devtools вашего браузера, что позволит вам легко просматривать исходный код страницы.
Автоматизация командной строки для запуска сторонних файлов, экспортируемых Selenium-IDE
Здесь используется автоматическое развертывание jenkins для автоматического тестирования
В дополнительном файле для запуска из командной строки требуется утилита Selen-Side-Runner, адрес github:https://github.com/SeleniumHQ/selenium-ide/tree/master/packages/selenium-side-runner
Узел должен быть установлен, вы можете обратиться к установке узла в https://blog.csdn.net/luanpeng825485697/article/details/83420405. После установки последнего узла введите контейнер jenkins
sudo npm i -g npm # использовать последнюю версию npm
 sudo npm install -g selenium-side-runner # Установить selenium-side-runner с последней версией npm
Добавление программных ссылок можно выполнить из командной строки где угодно
ln -s /soft/node/bin/selenium-side-runner /usr/local/bin/selenium-side-runner
ln -s /soft/node/bin/selenium-side-runner /usr/bin/selenium-side-runner
Адрес для загрузки Google Drive сейчас:https://chromedriver.storage.googleapis.com/index.html
адрес загрузки драйвера браузера phantomjs http://phantomjs.org/download.html
После загрузки скопируйте chromedriver в каталог / usr / bin / и phantomjs в каталог / usr / bin /.
Примечание. Теперь селен больше не поддерживает phantomjs, chromedrive также может быть реализован без интерфейса путем настройки параметра «chrome_options.add_argument (’ — headless ’)».
Это может быть выполнено в каталоге файлов на стороне (без слов интерфейса)
# Google Chrome без интерфейса
sudo selenium-side-runner -c "browserName=chrome platform=linux chromeOptions.binary='/opt/google/chrome/chrome' chromeOptions.args=[disable-infobars,no-sandbox,headless]" --base-url http://xxx.xx.xx.xx test.side


 Или фантомы без интерфейса
selenium-side-runner -c "browserName=phantomjs platform=linux" --base-url http://xxx.xx.xx.xx test.side
Со словами интерфейса
sudo selenium-side-runner -c "browserName=chrome platform=linux chromeOptions.binary='/opt/google/chrome/chrome' chromeOptions.args=[disable-infobars,no-sandbox]" --base-url http://xxx.xx.xx.xx test.side
Record-and-Playback
currently Record and Playback is supported by Selenium Buidler
Selenium Builder
Taken from Builder Docs
Selenium Builder 0.9.6
Installation
Selenium Builder is an extension for the Firefox browser which make installation a snap.
Step 1
Launch Firefox and navigate to the Selenium Builder download page or view on Github
Step 2
Click the Install button

If prompted, confirm that you would like to allow installation from this location.
Step 3
Click through the wizard

Step 4
Restart Firefox
Step 5
Start Selenium builder by choosing Launch Selenium Builder item from the Tools menu.
or from the Selenium Labs logo in the browser quicklaunch bar.
Once installed, you will be notified of updated versions of Selenium Builder automatically thanks to the seamless integration with Firefox.
Recording your first script
Recording a new script is ridiculously easy.
Step 1
Put the starting URL for your script in the URL box of Selenium Builder and press click Go!.
Step 2
Switch windows from Selenium Builder to the main Firefox one. Notice that there is a tab that is green; this is the Selenium Builder tab where your interactions will be captured.
Step 3
Interact with your application in whatever means is needed to fulfill your script’s requirements.
Step 4
A script that goes end-to-end without error tells provides value, but really there needs to be some checks put in it. To add a check while recording, click the Record a verification button. This pauses recording and enables the element highlighter.
Using the element highlighter, select the portion of the page you want to check. Once the check is recorded Selenium Builder returns to recording actions.
By default, the check recorded by Selenium Builder is verifyTextPresent. This is a sensible default, but there are a number of situations where you would want to change it to another one. You can do it during the recording process or afterwards. The procedure for editing a step is the same in either case and is documented in Editing a Selenium Builder step
Step 5
Once you have recorded everything you want in the script, click Stop recording
Step 6
Perhaps the most important part of recording a script is saving it. After stopping recording, the buttons at the bottom of the Selenium Builder window will change and include one for saving. Clicking it presents you will a list of formats that the script can be saved in.
Selenium Builder supports a number of formats that it can save as, but it’s native format is HTML (Selenese). Choose that one for now and save your file. It is now safe to close turn off Selenium Builder.
Opening an existing script
Since Selenium Builder’s native format is Selenese, it can import scripts that were created with either Selenium Builder, [Selenium IDE](selenium ide) or Selenium IDE. To load a script created by any of these, click the Open a test file link on the main Selenium Builder screen.
This will open the Firefox file browser for you to find and select your existing Selenese formatted script. Once it has been parsed successfully it will open and be ready for editing.
Editing a script
Sometimes we know better about what a step should be than what Selenium Builder captured during the recording phase or perhaps our an existing step just needs a bit of fine tuning. In order to do this we click the (change) link beside the step command which reveals up the step details.
The first thing to notice is that rather than having all the possible commands displayed to you in a single list like Selenium IDE they are categorized for easier location.
-
Actions — Actions are the most common category of command used when creating Selenese scripts. Commands for clicking, typing and navigation through browser windows and frames are all found here. Actions can be further modified to include basic synchronization by waiting for a page to load as a result of whatever it just did. To enable this modifier, click the Wait for a new page to load after executing the action checkbox and select the AndWait version of the command.
-
Checks — Selenium Builder can check the content of the browser in two ways. An assert will stop the script and fail it immediately whereas a verify will continue the script, but fail it at the end. A good script will make use of both types of check; use the radio button below the lists to toggle between the assert commands and the verify ones. To check for the negative of something, check the assert that something is not true box.
-
Waits — More complex synchronization commands can be found in the Waits list. WaitForElementPresent, WaitForVisible and WaitForEval are all found here. As are WaitForElementNotPresent, WaitForNotVisible and WaitForNotEval when you select the wait for the condition to stop being true box.
-
Other — Some commands cannot be easily categorized; settings and screenshots for instance. These are listed under Other.
Regardless of which command you select, if it requires additional information (like a locator), the fields for those details will be shown at the bottom of the details section.
Once the step reflects your intention, click the OK button to save the changes.
Changing existing steps is the most common task when editing a script but sometimes it is easier to just remove chunks and replace them with new ones.
To remove a step from the script, open the tasks menu at the right of the step and choose to delete step. After accepting the warning that this is a one-way process the step will be gone.
Once the step is gone you can either manually Append one step or Record further steps. Which one you choose is largely dependant on how many steps will be needed to added to the script.
Both recording new steps and appending new step will put them at the end of the script. To move them, simply drag each step to the desired location.
Script Playback
While useful testing and observation happens during the recording process, it is important to actually run the scripts we create for maximum value. Selenium Builder can playback scripts either locally or in Selenium RC.
Very rarely do all the locators and synchronization work exactly as intended the first time. Because of this you should run your script locally first to work out all the hitches before attempting to run it in the cloud. To run the script locally, click the Run test locally button. The steps will be executed in the Selenium Builder tab from the start of the script until there is either an error (incorrect locator, synchronization) or a failed assertion.
The status of each completed step is reflected in its background colour.
- Blue — Not yet run
- Yellow — In process
- Green — Success
- Red — Failure
A solid green script indicates success and is what we are aiming for. Red steps indicate some further investigation is required either to determine if this is a legitimate failure or as a result of a locator or synchronization problem. In the case of the latter, go back and edit the script to solve the issue
With your script running locally it is time to try it on Selenium RC. To do this, click Run on Selenium RC.
User Extensions
Coming Soon…
Saving Non-Selenese scripts
Part of the power of Selenium Builder is its ability to save recorded scripts into other languages than just Selenese (HTML). While Selenese is convenient, it lacks certain advantages that a full programming language has like conditionals and loops.
To export your Selenium Builder in a non Selenese format, choose the Save to disk button as you would normally but instead of selecting HTML select the format you want to export as. For instance, Java (TestNG) — Selenium RC saves the script in such a way that it can be run from the popular Java test framework JUnit against your local Selenium server.
Once a script has been saved as a non-Selenese format, that script is no longer considered a Selenium Builder script and cannot be opened by Selenium Builder — even if no changes have been made to the underlying script. This is because the various formats can include things that Selenium Builder cannot represent in its GUI. It is because of this that saving in another format should be done only once you have a level of comfort with the script’s contents in terms of flow and execution.
That said, exporting to something other than Selenese is considered a Best Practice in the Selenium community. It does increase the level of technical knowledge required to modify scripts though.
Test Suites
If having one test script is good, then having many is fantastic. Opening one, running it then loading the next would be tedious and inefficient though. For this reason you can group similar scripts as a Suite.
To create a new suite, record a new script or open an existing one and click the Record another script button. This creates a suite for you having the starting script as well as a new one. You now also have some new buttons at the top of Selenium Builder for controlling your suite; all of which do pretty much what they claim to do.
One thing to be aware of though when dealing with suites is that if you change a script, then you need to save the script and if you change a suite then you need to save the suite. Just saving one does not save the other. Like with regular Selenium Builder scripts, suites are an HTML based format so the convention is to save them as .html.
You do not need to have many scripts in a suite to have it be effective; often only two is enough. Consider the situation where the main content that needs to be scripted is behind a username and password form. Sure, you could put those steps in each and every script, but that is a guaranteed method of introducing extra maintenance costs to your script. Instead, what you want to do is isolate the login steps in their own script and include them in the beginning of each suite. Now when the login process changes you don’t need to change every script, but just one that is shared across all scripts. (The same trick can be used for logging out at the end of a suite as well.)
At the same time though, be cautious of creating a suite that is too large. Suites often imply or result-in interdependencies between scripts and a failure in the 4th script could interfere in scripts 5 through 37. The result of this cascading failure is too often a hour or two of wasted investigation and debugging.
Don’t let that scare you away from suites though; they are an important part of how to manage your investment in automation.
Unique Values
Sometimes having hardcoded data in scripts in necessary to exercise specific conditions, but in many more cases it is smell indicating the risk of the both the Pesticide Paradox and the Landmine Problem. The Pesticide Paradox is when your application learns to evade your test conditions to hide bugs and the Landmine Problem is when it learns to evade the paths the tests take through the application.
Selenium Builder includes functionality to start addressing the Pesticide Paradox in an area that often requires it the most — registration. Specifically, Selenium Builder can generate random usernames and email addresses. To enable non-static data with one of these values, choose the unique values task for that step to open the details pane.
- Usernames — An individual Selenium Builder script can have up to 9 unique usernames in them. To insert a unique username, click the ${unique_username_1} link in the details pane. The existing value for the step will be replaced by that value. At runtime, that step will have a string value of ‘sbxxxxx’ where the x’s are random, lower-case values.
- Email Addresses — A Selenium Builder script can also have up to 9 unique email addresses in them. Much like with unique usernames, selecting the ${unique_email_1} link will insert a unique email address at runtime into a step. The email address format is ‘sbxxxxx@.???.com’, again with the x’s replaced with random, lower-case values.
With both unique usernames and email addresses, once you have included one, the next one is now available to you in the details pane. This is especially useful for registration forms that have multiple email fields (like social media sites) where you could have _1, _2, _3, etc.
Locators
There are a number of different ways that Selenium Builder can find the parts of the web page you are trying to automate. Selenium Builder makes use of most of them automatically depending on the situation.
The first group of locators all hook off of a unique attribute value of the desired element.
-
id — Locators that begin with id= will interact with the first element that has an id attribute of that value, otherwise the step will error and subsequently fail the script. According to the HTML specification, id’s must be unique throughout the page for it to be considered ‘valid’. If however your HTML is not valid and there are multiple items on the page with the same id, this will only interact with the first one.
-
name — Similar to the id locator, Selenium Builder will interact with the first HTML element that has a matching name attribute to the specified name= value.
-
Identifier — While Selenium Builder does not record scripts using this locator, it can play them back so it bears mentioning. A locators without a prefix is consider to be an Identifier one and will check elements on the page first using the id strategy and then the name one if it still hasn’t found a match. This is actually the Selenium default strategy, but it requires giving up some control and could return the wrong element if you have markup which has both id and name attributes that share values.
Whenever possible, it is highly desirable to use the attribute locators mentioned above, but when they are not available, not unique or are randomly generated by the application framework then you need to move to more complex locators.
-
xpath — Locators that start with either xpath= or just //. XPath treats your page as a structured document and can traverse it both up and down (and a combination of up and down) making it arguably the most powerful locator Selenium Builder can use. There are some known performance problems with Internet Explorer though which decrease its desirability in situations where you don’t need that power. The XPath Tutorial on W3C Schools is a good place to start to understand how to use it.
-
css — The CSS locator strategy should be the structural strategy you choose by default and those locators begin with css=. Selenium Builder actually uses the Sizzle library for its CSS Selector support and so it’s documentation is something you will want to have bookmarked. Unlike xpath though, css can only peer down the page, in the situations where you need to look over your shoulder you are forced to use xpath.
One thing to remember is that both these strategies tie you to the current structure of the HTML. If that structure changes, then you might have a situation where your script is broken even though the button you wanted just moved slightly to the right in the rendered page. This is almost always caused by a ‘brittle’ structural locator. To de-brittle a locator, try to use move the base element that the locator uses closer to the desired and/or make use of the more sophisticated functions and pseudo-functions that both xpath and css provide like contains() or :contains() on attributes. Selenium Builder has no way of knowing and understanding the pattern of non-random attributes so cannot do this at recording time.
The final Locator is similar to the id and name ones in that it keys off of a link’s displayed name.The Link locator, not surprisingly is prefixed with link=. This is another powerful strategy that needs to come with a warning. If your site can be displayed in multiple languages (say, English, French and Spanish) then you will need to to create a copy of the script for each language. This is because when the displayed link content changes, so too does the locator. It is much better to use the id strategy in this situation. But if you don’t have a multilingual site, then link= can certainly make your script more readable.
Synchronization
Aside from using improper or brittle locators for accessing objects on the page, the biggest cause for step failures relates to synchronization. Selenium Builder will execute the steps of your script as fast as your machine will allow, pausing only when it is told to pause.
When recording a script, Selenium Builder knows when a page load occurs and so is able to put in the appropriated waitForPageToLoad step after an action. If you are editing an existing step, you can turn it into a synchronized action by checking the Wait for a new page to load after executing the action box in its step details. These andWait variants are great for simple, Web 1.0 applications but are insufficient for modern, dynamic applications. For that we need some other synchronization approaches.
Dynamic applications that use the AJAX basket of tricks to display content without reloading the page will cause you great amounts of synchronization woes if you try to use andWait with them. The brute-force solution is to insert a setSpeed step which adds a delay to the execution of the next command, but that is not always guaranteed to work (and will over time guarantee that your script takes longer to run than it needs to). Brute-force should not be the goal though; fineness should.
To properly synchronize an AJAX application, the two most common commands are waitForElementPresent and waitForVisible. These ones are employed because most AJAX calls either add/remove elements from a page or show/hide them (or both). These commands are in the page content menu in the wait for condition category and take a locator as an argument.
But even waitForElementPresent and waitForVisible fail some of the times. Especially when dealing with COMET technologies (once such site like that is GMail). Successful synchronization here is a collaboration between the developer writing the AJAX/Comet action and the scripter. Actually, all successful automation is a collaboration, but that’s not the point here. Through a combination of setting a property in the browser’s window object via the ‘completed’ callback in and waitForCondition, Selenium Builder will wait until synchronization is achieved. waitForCondition takes two arguments;a Javascript snippet as an argument that it waits for, and a timeout value for how long to wait.
In this particular case, the step will wait up to 30 seconds for an attribute on the window object called ‘latch’ to be given a value of ‘done’.
None of these synchronization techniques is a one-size-fits-all solution and most applications will need a combination of all three to be kept in synch.
Record-and-Playback
currently Record and Playback is supported by Selenium Buidler
Selenium Builder
Taken from Builder Docs
Selenium Builder 0.9.6
Installation
Selenium Builder is an extension for the Firefox browser which make installation a snap.
Step 1
Launch Firefox and navigate to the Selenium Builder download page or view on Github
Step 2
Click the Install button
If prompted, confirm that you would like to allow installation from this location.
Step 3
Click through the wizard
Step 4
Restart Firefox
Step 5
Start Selenium builder by choosing Launch Selenium Builder item from the Tools menu.
or from the Selenium Labs logo in the browser quicklaunch bar.
Once installed, you will be notified of updated versions of Selenium Builder automatically thanks to the seamless integration with Firefox.
Recording your first script
Recording a new script is ridiculously easy.
Step 1
Put the starting URL for your script in the URL box of Selenium Builder and press click Go!.
Step 2
Switch windows from Selenium Builder to the main Firefox one. Notice that there is a tab that is green; this is the Selenium Builder tab where your interactions will be captured.
Step 3
Interact with your application in whatever means is needed to fulfill your script’s requirements.
Step 4
A script that goes end-to-end without error tells provides value, but really there needs to be some checks put in it. To add a check while recording, click the Record a verification button. This pauses recording and enables the element highlighter.
Using the element highlighter, select the portion of the page you want to check. Once the check is recorded Selenium Builder returns to recording actions.
By default, the check recorded by Selenium Builder is verifyTextPresent. This is a sensible default, but there are a number of situations where you would want to change it to another one. You can do it during the recording process or afterwards. The procedure for editing a step is the same in either case and is documented in Editing a Selenium Builder step
Step 5
Once you have recorded everything you want in the script, click Stop recording
Step 6
Perhaps the most important part of recording a script is saving it. After stopping recording, the buttons at the bottom of the Selenium Builder window will change and include one for saving. Clicking it presents you will a list of formats that the script can be saved in.
Selenium Builder supports a number of formats that it can save as, but it’s native format is HTML (Selenese). Choose that one for now and save your file. It is now safe to close turn off Selenium Builder.
Opening an existing script
Since Selenium Builder’s native format is Selenese, it can import scripts that were created with either Selenium Builder, [Selenium IDE](selenium ide) or Selenium IDE. To load a script created by any of these, click the Open a test file link on the main Selenium Builder screen.
This will open the Firefox file browser for you to find and select your existing Selenese formatted script. Once it has been parsed successfully it will open and be ready for editing.
Editing a script
Sometimes we know better about what a step should be than what Selenium Builder captured during the recording phase or perhaps our an existing step just needs a bit of fine tuning. In order to do this we click the (change) link beside the step command which reveals up the step details.
The first thing to notice is that rather than having all the possible commands displayed to you in a single list like Selenium IDE they are categorized for easier location.
-
Actions — Actions are the most common category of command used when creating Selenese scripts. Commands for clicking, typing and navigation through browser windows and frames are all found here. Actions can be further modified to include basic synchronization by waiting for a page to load as a result of whatever it just did. To enable this modifier, click the Wait for a new page to load after executing the action checkbox and select the AndWait version of the command.
-
Checks — Selenium Builder can check the content of the browser in two ways. An assert will stop the script and fail it immediately whereas a verify will continue the script, but fail it at the end. A good script will make use of both types of check; use the radio button below the lists to toggle between the assert commands and the verify ones. To check for the negative of something, check the assert that something is not true box.
-
Waits — More complex synchronization commands can be found in the Waits list. WaitForElementPresent, WaitForVisible and WaitForEval are all found here. As are WaitForElementNotPresent, WaitForNotVisible and WaitForNotEval when you select the wait for the condition to stop being true box.
-
Other — Some commands cannot be easily categorized; settings and screenshots for instance. These are listed under Other.
Regardless of which command you select, if it requires additional information (like a locator), the fields for those details will be shown at the bottom of the details section.
Once the step reflects your intention, click the OK button to save the changes.
Changing existing steps is the most common task when editing a script but sometimes it is easier to just remove chunks and replace them with new ones.
To remove a step from the script, open the tasks menu at the right of the step and choose to delete step. After accepting the warning that this is a one-way process the step will be gone.
Once the step is gone you can either manually Append one step or Record further steps. Which one you choose is largely dependant on how many steps will be needed to added to the script.
Both recording new steps and appending new step will put them at the end of the script. To move them, simply drag each step to the desired location.
Script Playback
While useful testing and observation happens during the recording process, it is important to actually run the scripts we create for maximum value. Selenium Builder can playback scripts either locally or in Selenium RC.
Very rarely do all the locators and synchronization work exactly as intended the first time. Because of this you should run your script locally first to work out all the hitches before attempting to run it in the cloud. To run the script locally, click the Run test locally button. The steps will be executed in the Selenium Builder tab from the start of the script until there is either an error (incorrect locator, synchronization) or a failed assertion.
The status of each completed step is reflected in its background colour.
- Blue — Not yet run
- Yellow — In process
- Green — Success
- Red — Failure
A solid green script indicates success and is what we are aiming for. Red steps indicate some further investigation is required either to determine if this is a legitimate failure or as a result of a locator or synchronization problem. In the case of the latter, go back and edit the script to solve the issue
With your script running locally it is time to try it on Selenium RC. To do this, click Run on Selenium RC.
User Extensions
Coming Soon…
Saving Non-Selenese scripts
Part of the power of Selenium Builder is its ability to save recorded scripts into other languages than just Selenese (HTML). While Selenese is convenient, it lacks certain advantages that a full programming language has like conditionals and loops.
To export your Selenium Builder in a non Selenese format, choose the Save to disk button as you would normally but instead of selecting HTML select the format you want to export as. For instance, Java (TestNG) — Selenium RC saves the script in such a way that it can be run from the popular Java test framework JUnit against your local Selenium server.
Once a script has been saved as a non-Selenese format, that script is no longer considered a Selenium Builder script and cannot be opened by Selenium Builder — even if no changes have been made to the underlying script. This is because the various formats can include things that Selenium Builder cannot represent in its GUI. It is because of this that saving in another format should be done only once you have a level of comfort with the script’s contents in terms of flow and execution.
That said, exporting to something other than Selenese is considered a Best Practice in the Selenium community. It does increase the level of technical knowledge required to modify scripts though.
Test Suites
If having one test script is good, then having many is fantastic. Opening one, running it then loading the next would be tedious and inefficient though. For this reason you can group similar scripts as a Suite.
To create a new suite, record a new script or open an existing one and click the Record another script button. This creates a suite for you having the starting script as well as a new one. You now also have some new buttons at the top of Selenium Builder for controlling your suite; all of which do pretty much what they claim to do.
One thing to be aware of though when dealing with suites is that if you change a script, then you need to save the script and if you change a suite then you need to save the suite. Just saving one does not save the other. Like with regular Selenium Builder scripts, suites are an HTML based format so the convention is to save them as .html.
You do not need to have many scripts in a suite to have it be effective; often only two is enough. Consider the situation where the main content that needs to be scripted is behind a username and password form. Sure, you could put those steps in each and every script, but that is a guaranteed method of introducing extra maintenance costs to your script. Instead, what you want to do is isolate the login steps in their own script and include them in the beginning of each suite. Now when the login process changes you don’t need to change every script, but just one that is shared across all scripts. (The same trick can be used for logging out at the end of a suite as well.)
At the same time though, be cautious of creating a suite that is too large. Suites often imply or result-in interdependencies between scripts and a failure in the 4th script could interfere in scripts 5 through 37. The result of this cascading failure is too often a hour or two of wasted investigation and debugging.
Don’t let that scare you away from suites though; they are an important part of how to manage your investment in automation.
Unique Values
Sometimes having hardcoded data in scripts in necessary to exercise specific conditions, but in many more cases it is smell indicating the risk of the both the Pesticide Paradox and the Landmine Problem. The Pesticide Paradox is when your application learns to evade your test conditions to hide bugs and the Landmine Problem is when it learns to evade the paths the tests take through the application.
Selenium Builder includes functionality to start addressing the Pesticide Paradox in an area that often requires it the most — registration. Specifically, Selenium Builder can generate random usernames and email addresses. To enable non-static data with one of these values, choose the unique values task for that step to open the details pane.
- Usernames — An individual Selenium Builder script can have up to 9 unique usernames in them. To insert a unique username, click the ${unique_username_1} link in the details pane. The existing value for the step will be replaced by that value. At runtime, that step will have a string value of ‘sbxxxxx’ where the x’s are random, lower-case values.
- Email Addresses — A Selenium Builder script can also have up to 9 unique email addresses in them. Much like with unique usernames, selecting the ${unique_email_1} link will insert a unique email address at runtime into a step. The email address format is ‘sbxxxxx@.???.com’, again with the x’s replaced with random, lower-case values.
With both unique usernames and email addresses, once you have included one, the next one is now available to you in the details pane. This is especially useful for registration forms that have multiple email fields (like social media sites) where you could have _1, _2, _3, etc.
Locators
There are a number of different ways that Selenium Builder can find the parts of the web page you are trying to automate. Selenium Builder makes use of most of them automatically depending on the situation.
The first group of locators all hook off of a unique attribute value of the desired element.
-
id — Locators that begin with id= will interact with the first element that has an id attribute of that value, otherwise the step will error and subsequently fail the script. According to the HTML specification, id’s must be unique throughout the page for it to be considered ‘valid’. If however your HTML is not valid and there are multiple items on the page with the same id, this will only interact with the first one.
-
name — Similar to the id locator, Selenium Builder will interact with the first HTML element that has a matching name attribute to the specified name= value.
-
Identifier — While Selenium Builder does not record scripts using this locator, it can play them back so it bears mentioning. A locators without a prefix is consider to be an Identifier one and will check elements on the page first using the id strategy and then the name one if it still hasn’t found a match. This is actually the Selenium default strategy, but it requires giving up some control and could return the wrong element if you have markup which has both id and name attributes that share values.
Whenever possible, it is highly desirable to use the attribute locators mentioned above, but when they are not available, not unique or are randomly generated by the application framework then you need to move to more complex locators.
-
xpath — Locators that start with either xpath= or just //. XPath treats your page as a structured document and can traverse it both up and down (and a combination of up and down) making it arguably the most powerful locator Selenium Builder can use. There are some known performance problems with Internet Explorer though which decrease its desirability in situations where you don’t need that power. The XPath Tutorial on W3C Schools is a good place to start to understand how to use it.
-
css — The CSS locator strategy should be the structural strategy you choose by default and those locators begin with css=. Selenium Builder actually uses the Sizzle library for its CSS Selector support and so it’s documentation is something you will want to have bookmarked. Unlike xpath though, css can only peer down the page, in the situations where you need to look over your shoulder you are forced to use xpath.
One thing to remember is that both these strategies tie you to the current structure of the HTML. If that structure changes, then you might have a situation where your script is broken even though the button you wanted just moved slightly to the right in the rendered page. This is almost always caused by a ‘brittle’ structural locator. To de-brittle a locator, try to use move the base element that the locator uses closer to the desired and/or make use of the more sophisticated functions and pseudo-functions that both xpath and css provide like contains() or :contains() on attributes. Selenium Builder has no way of knowing and understanding the pattern of non-random attributes so cannot do this at recording time.
The final Locator is similar to the id and name ones in that it keys off of a link’s displayed name.The Link locator, not surprisingly is prefixed with link=. This is another powerful strategy that needs to come with a warning. If your site can be displayed in multiple languages (say, English, French and Spanish) then you will need to to create a copy of the script for each language. This is because when the displayed link content changes, so too does the locator. It is much better to use the id strategy in this situation. But if you don’t have a multilingual site, then link= can certainly make your script more readable.
Synchronization
Aside from using improper or brittle locators for accessing objects on the page, the biggest cause for step failures relates to synchronization. Selenium Builder will execute the steps of your script as fast as your machine will allow, pausing only when it is told to pause.
When recording a script, Selenium Builder knows when a page load occurs and so is able to put in the appropriated waitForPageToLoad step after an action. If you are editing an existing step, you can turn it into a synchronized action by checking the Wait for a new page to load after executing the action box in its step details. These andWait variants are great for simple, Web 1.0 applications but are insufficient for modern, dynamic applications. For that we need some other synchronization approaches.
Dynamic applications that use the AJAX basket of tricks to display content without reloading the page will cause you great amounts of synchronization woes if you try to use andWait with them. The brute-force solution is to insert a setSpeed step which adds a delay to the execution of the next command, but that is not always guaranteed to work (and will over time guarantee that your script takes longer to run than it needs to). Brute-force should not be the goal though; fineness should.
To properly synchronize an AJAX application, the two most common commands are waitForElementPresent and waitForVisible. These ones are employed because most AJAX calls either add/remove elements from a page or show/hide them (or both). These commands are in the page content menu in the wait for condition category and take a locator as an argument.
But even waitForElementPresent and waitForVisible fail some of the times. Especially when dealing with COMET technologies (once such site like that is GMail). Successful synchronization here is a collaboration between the developer writing the AJAX/Comet action and the scripter. Actually, all successful automation is a collaboration, but that’s not the point here. Through a combination of setting a property in the browser’s window object via the ‘completed’ callback in and waitForCondition, Selenium Builder will wait until synchronization is achieved. waitForCondition takes two arguments;a Javascript snippet as an argument that it waits for, and a timeout value for how long to wait.
In this particular case, the step will wait up to 30 seconds for an attribute on the window object called ‘latch’ to be given a value of ‘done’.
None of these synchronization techniques is a one-size-fits-all solution and most applications will need a combination of all three to be kept in synch.
Мы будем использовать веб-сайт Mercury Tours в качестве тестируемого веб-приложения. Это онлайн-система бронирования авиабилетов, которая содержит все элементы, необходимые для этого урока. Его URL-адрес http://demo.guru99.com/test/newtours/ , и это будет наш базовый URL-адрес.
Давайте теперь создадим наш первый тестовый скрипт в Selenium IDE, используя самый распространенный метод — путем записи. После этого мы выполним наш скрипт, используя функцию воспроизведения.
Вернитесь в Selenium IDE и нажмите кнопку Playback, чтобы выполнить весь сценарий. Selenium IDE должна быть в состоянии воспроизвести все безупречно.
Общие команды
| команда | Количество параметров | Описание |
|---|---|---|
| открытый | 0 — 2 |
Открывает страницу, используя URL. |
| нажмите / clickAndWait | 1 |
Клики по указанному элементу. |
| Тип / typeKeys | 2 |
Типы последовательности символов. |
| verifyTitle / assertTitle | 1 |
Сравнивает фактический заголовок страницы с ожидаемым значением. |
| verifyTextPresent | 1 |
Проверяет, найден ли определенный текст на странице. |
| verifyElementPresent | 1 |
Проверяет наличие определенного элемента. |
| verifyTable | 2 |
Сравнивает содержимое таблицы с ожидаемыми значениями. |
| waitForPageToLoad | 1 |
Приостанавливает выполнение до полной загрузки страницы. |
| waitForElementPresent | 1 |
Приостанавливает выполнение до тех пор, пока указанный элемент не станет представленным. |
Создать сценарий вручную с Firebug
Теперь мы заново создадим тот же тест, набрав команды. На этот раз нам нужно будет использовать Firebug.
Шаг 1
|
| Шаг 2: Нажмите на верхнюю пустую строку в редакторе.
|
|
Введите «open» в текстовое поле «Command» и нажмите Enter.
|
Шаг 3
|
Шаг 4
|
Шаг 5
|
| Нажмите на текстовое поле Имя пользователя. Обратите внимание, что Firebug автоматически показывает вам код HTML для этого элемента.
|
| Шаг 6
Обратите внимание, что в текстовом поле «Имя пользователя» нет идентификатора, но есть атрибут NAME. Поэтому мы будем использовать его ИМЯ в качестве локатора. Скопируйте значение NAME и вставьте его в поле Target в Selenium IDE.
Все еще в текстовом поле Target добавьте префикс «userName» с «name =», указывая, что Selenium IDE должен предназначаться для элемента, атрибут NAME которого — «userName».
Введите «invalidUN» в текстовое поле «Значение» в Selenium IDE. Ваш тестовый скрипт должен выглядеть так, как показано ниже. Мы закончили с третьей командой. Примечание. Вместо invalidUN вы можете ввести любую другую текстовую строку. Но в Selenium IDE учитывается регистр, и вы вводите значения / атрибуты точно так же, как в приложении.
|
Шаг 7
|
Шаг 8
|


Шаг 9: Сохраните контрольный пример так же, как мы делали в предыдущем разделе.
Использование кнопки поиска
Кнопка «Найти» в Selenium IDE используется для проверки того, действительно ли то, что мы поместили в текстовое поле «Цель», является правильным элементом пользовательского интерфейса.
Давайте используем тестовый пример Invalid_login, который мы создали в предыдущих разделах. Нажмите на любую команду с записью Target, скажем, третьей командой.

Нажмите на кнопку Найти. Обратите внимание, что текстовое поле «Имя пользователя» на странице Mercury Tours на секунду подсвечивается.

Это указывает на то, что Selenium IDE смогла правильно обнаружить и получить доступ к ожидаемому элементу. Если кнопка «Найти» выделяет другой элемент или вообще не содержит элемента, значит, в вашем скрипте что-то не так.
Выполнить команду
Это позволяет вам выполнить любую отдельную команду, не выполняя весь контрольный пример . Просто нажмите на строку, которую вы хотите выполнить, а затем либо нажмите «Действия> Выполнить эту команду» в строке меню, либо просто нажмите «X» на клавиатуре.
Шаг 1. Убедитесь, что ваш браузер находится на главной странице Mercury Tours. Нажмите на команду, которую вы хотите выполнить. В этом примере нажмите на строку «type | userName | invalidUN».

Шаг 2. Нажмите «X» на клавиатуре.
Шаг 3. Обратите внимание, что текстовое поле для имени пользователя заполняется текстом «invalidUN»

Выполнение команд таким способом сильно зависит от страницы, которую в данный момент отображает Firefox . Это означает, что если вы попробуете приведенный выше пример с главной страницей Google, отображаемой вместо Mercury Tours ‘, то ваш шаг завершится неудачей, поскольку на главной странице Google нет текстового поля с атрибутом «userName».
Точка отсчета
Начальная точка — это индикатор, который сообщает Selenium IDE, с каких строк начнется выполнение . Его сочетание клавиш «S».

В приведенном выше примере воспроизведение начнется с третьей строки (введите | password | invalidPW). Вы можете иметь только одну начальную точку в одном тестовом скрипте.
Начальная точка аналогична команде выполнения в том, что они зависят от отображаемой в данный момент страницы. Начальная точка потерпит неудачу, если вы находитесь не на той странице.
Контрольные точки
Точки останова — это индикаторы, которые указывают Selenium IDE, где автоматически приостанавливать тест. Сочетание клавиш «B».

Желтое выделение означает, что текущий шаг находится в состоянии ожидания. Это доказывает, что Selenium IDE приостановил выполнение на этом шаге. Вы можете иметь несколько точек останова в одном тестовом случае.
шаг
Это позволяет вам выполнять последующие команды по одной после приостановки теста. Давайте воспользуемся сценарием из предыдущего раздела «Точки останова».
|
|
Прежде чем нажать «Шаг». Тестовый случай останавливается в строке «clickAndWait | login». |
|
|
После нажатия «Шаг». Строка «clickAndWait | login» запускается и делает паузу для следующей команды (verifyTitle | Sign-on: Mercury Tours). Обратите внимание, что следующая строка приостановлена, хотя там нет точки останова. Это главная цель функции Step — она выполняет последующие команды по одной, чтобы дать вам больше времени для проверки результатов после каждого шага. |


Важные замечания, которые следует учитывать при использовании других форматов в представлении исходного кода

Selenium IDE хорошо работает только с HTML — другие форматы все еще находятся в экспериментальном режиме . Это НЕ рекомендуется создавать и редактировать тесты с использованием других форматов в Source View , потому что есть еще много работы , необходимо , чтобы сделать ее более стабильной. Ниже приведены известные ошибки версии 1.9.1.
- Вы не сможете ни воспроизвести, ни переключиться обратно на просмотр таблиц, если не вернетесь к HTML.
- Единственный способ безопасно добавить команды в исходный код — записать их.
- Когда вы изменяете исходный код вручную, все это будет потеряно при переключении на другой формат.
- Несмотря на то, что вы можете сохранить свой тестовый пример в режиме просмотра исходного кода, Selenium IDE не сможет его открыть.
Рекомендуемый способ преобразования тестов Selenese — использовать опцию «Export Test Case As …» в меню «Файл», а не в представлении «Исходный код».
Резюме
- Тестовые сценарии могут быть созданы путем записи или ввода команд и параметров вручную.
- При создании сценариев вручную Firebug используется для получения локатора.
- Кнопка «Найти» используется для проверки того, что команда может получить доступ к нужному элементу.
- В табличном представлении тестовый скрипт отображается в виде таблицы, а в исходном представлении — в формате HTML.
- Изменение исходного представления в не-HTML формат все еще экспериментально.
- Не используйте представление исходного кода при создании тестов в других форматах. Вместо этого используйте функции экспорта.
- Параметры не обязательны все время. Это зависит от команды.
- Существует три типа команд:
- Действия — напрямую взаимодействует с элементами страницы
- Аксессоры — «читает» свойство элемента и сохраняет его в переменной
- Утверждения — сравнивает фактическое значение с ожидаемым
- Утверждения имеют три типа:
- Утвердить — при неудаче последующие шаги больше не выполняются
- Проверить — при неудаче все последующие шаги все еще выполняются.
- WaitFor — проходит, если указанное условие становится истинным в течение периода ожидания; в противном случае это не удастся
- Наиболее распространенные команды:
- открытый
- нажмите / clickAndWait
- Тип / typeKeys
- verifyTitle / assertTitle
- verifyTextPresent
- verifyElementPresent
- verifyTable
- waitForPageToLoad
- waitForElementPresent
Step-by-step instructions for constructing a Selenium script
Once you have Selenium installed and
Drivers installed, you’re ready to write Selenium code.
Eight Basic Components
Everything Selenium does is send the browser commands to do something or send requests for information.
Most of what you’ll do with Selenium is a combination of these basic commands:
1. Start the session
For more details on starting a session read our documentation on driver sessions
- Java
- Python
- CSharp
- Ruby
- JavaScript
- Kotlin
WebDriver driver = new ChromeDriver(); driver = webdriver.Chrome() IWebDriver driver = new ChromeDriver(); driver = Selenium::WebDriver.for :chrome driver = await new Builder().forBrowser('chrome').build();2. Take action on browser
In this example we are navigating to a web page.
- Java
- Python
- CSharp
- Ruby
- JavaScript
- Kotlin
driver.get("https://www.selenium.dev/selenium/web/web-form.html"); driver.get("https://www.selenium.dev/selenium/web/web-form.html") driver.Navigate().GoToUrl("https://www.selenium.dev/selenium/web/web-form.html"); driver.get('https://www.selenium.dev/selenium/web/web-form.html') await driver.get('https://www.selenium.dev/selenium/web/web-form.html'); driver.get("https://www.selenium.dev/selenium/web/web-form.html")3. Request browser information
There are a bunch of types of information about the browser you
can request, including window handles, browser size / position, cookies, alerts, etc.
- Java
- Python
- CSharp
- Ruby
- JavaScript
- Kotlin
String title = driver.getTitle(); var title = driver.Title; let title = await driver.getTitle();4. Establish Waiting Strategy
Synchronizing the code with the current state of the browser is one of the biggest challenges
with Selenium, and doing it well is an advanced topic.
Essentially you want to make sure that the element is on the page before you attempt to locate it
and the element is in an interactable state before you attempt to interact with it.
An implicit wait is rarely the best solution, but it’s the easiest to demonstrate here, so
we’ll use it as a placeholder.
Read more about Waiting strategies.
- Java
- Python
- CSharp
- Ruby
- JavaScript
- Kotlin
driver.manage().timeouts().implicitlyWait(Duration.ofMillis(500)); driver.implicitly_wait(0.5) driver.Manage().Timeouts().ImplicitWait = TimeSpan.FromMilliseconds(500); driver.manage.timeouts.implicit_wait = 500 await driver.manage().setTimeouts({implicit: 500}); driver.manage().timeouts().implicitlyWait(Duration.ofMillis(500))5. Find an element
The majority of commands in most Selenium sessions are element related, and you can’t interact
with one without first finding an element
- Java
- Python
- CSharp
- Ruby
- JavaScript
- Kotlin
        WebElement textBox = driver.findElement(By.name("my-text"));
        WebElement submitButton = driver.findElement(By.cssSelector("button"));
text_box = driver.find_element(by=By.NAME, value="my-text")
submit_button = driver.find_element(by=By.CSS_SELECTOR, value="button") var textBox = driver.FindElement(By.Name("my-text"));
var submitButton = driver.FindElement(By.TagName("button")); text_box = driver.find_element(name: 'my-text')
submit_button = driver.find_element(tag_name: 'button') let textBox = await driver.findElement(By.name('my-text'));
let submitButton = await driver.findElement(By.css('button')); var textBox = driver.findElement(By.name("my-text"))
val submitButton = driver.findElement(By.cssSelector("button"))6. Take action on element
There are only a handful of actions to take on an element,
but you will use them frequently.
- Java
- Python
- CSharp
- Ruby
- JavaScript
- Kotlin
textBox.sendKeys("Selenium");
submitButton.click(); text_box.send_keys("Selenium")
submit_button.click() textBox.SendKeys("Selenium");
submitButton.Click(); text_box.send_keys('Selenium')
submit_button.click await textBox.sendKeys('Selenium');
await submitButton.click(); textBox.sendKeys("Selenium")
submitButton.click()7. Request element information
Elements store a lot of information that can be requested.
- Java
- Python
- CSharp
- Ruby
- JavaScript
- Kotlin
String value = message.getText(); var value = message.Text; let value = await message.getText(); val value = message.getText()8. End the session
This ends the driver process, which by default closes the browser as well.
No more commands can be sent to this driver instance.
- Java
- Python
- CSharp
- Ruby
- JavaScript
- Kotlin
after(async () => await driver.quit());Putting everything together
Let’s combine these 8 things into a complete script with assertions that can be executed by a test runner.
- Java
- Python
- CSharp
- Ruby
- JavaScript
- Kotlin
package dev.selenium.getting_started;
import org.junit.jupiter.api.Test;
import org.openqa.selenium.By;
import org.openqa.selenium.WebDriver;
import org.openqa.selenium.WebElement;
import org.openqa.selenium.chrome.ChromeDriver;
import java.time.Duration;
import static org.junit.jupiter.api.Assertions.assertEquals;
public class FirstScriptTest {
@Test
public void eightComponents() {
WebDriver driver = new ChromeDriver();
driver.get("https://www.selenium.dev/selenium/web/web-form.html");
String title = driver.getTitle();
assertEquals("Web form", title);
driver.manage().timeouts().implicitlyWait(Duration.ofMillis(500));
WebElement textBox = driver.findElement(By.name("my-text"));
WebElement submitButton = driver.findElement(By.cssSelector("button"));
textBox.sendKeys("Selenium");
submitButton.click();
WebElement message = driver.findElement(By.id("message"));
String value = message.getText();
assertEquals("Received!", value);
driver.quit();
}
}
from selenium import webdriver
from selenium.webdriver.common.by import By
def test_eight_components():
driver = webdriver.Chrome()
driver.get("https://www.selenium.dev/selenium/web/web-form.html")
title = driver.title
assert title == "Web form"
driver.implicitly_wait(0.5)
    text_box = driver.find_element(by=By.NAME, value="my-text")
    submit_button = driver.find_element(by=By.CSS_SELECTOR, value="button")
text_box.send_keys("Selenium")
submit_button.click()
message = driver.find_element(by=By.ID, value="message")
value = message.text
assert value == "Received!"
driver.quit()
using System;
using Microsoft.VisualStudio.TestTools.UnitTesting;
using OpenQA.Selenium;
using OpenQA.Selenium.Chrome;
namespace SeleniumDocs.GettingStarted
{
[TestClass]
public class FirstScriptTest
{
[TestMethod]
public void ChromeSession()
{
IWebDriver driver = new ChromeDriver();
driver.Navigate().GoToUrl("https://www.selenium.dev/selenium/web/web-form.html");
var title = driver.Title;
Assert.AreEqual("Web form", title);
driver.Manage().Timeouts().ImplicitWait = TimeSpan.FromMilliseconds(500);
            var textBox = driver.FindElement(By.Name("my-text"));
            var submitButton = driver.FindElement(By.TagName("button"));
textBox.SendKeys("Selenium");
submitButton.Click();
var message = driver.FindElement(By.Id("message"));
var value = message.Text;
Assert.AreEqual("Received!", value);
driver.Quit();
}
}
}# frozen_string_literal: true
require 'spec_helper'
RSpec.describe 'First Script' do
it 'uses eight components' do
driver = Selenium::WebDriver.for :chrome
driver.get('https://www.selenium.dev/selenium/web/web-form.html')
title = driver.title
expect(title).to eq('Web form')
driver.manage.timeouts.implicit_wait = 500
    text_box = driver.find_element(name: 'my-text')
    submit_button = driver.find_element(tag_name: 'button')
text_box.send_keys('Selenium')
submit_button.click
message = driver.find_element(id: 'message')
value = message.text
expect(value).to eq('Received!')
driver.quit
end
end
const {By, Builder} = require('selenium-webdriver');
const {suite} = require('selenium-webdriver/testing');
const assert = require("assert");
suite(function (env) {
describe('First script', function () {
let driver;
before(async function () {
driver = await new Builder().forBrowser('chrome').build();
});
after(async () => await driver.quit());
it('First Selenium script', async function () {
await driver.get('https://www.selenium.dev/selenium/web/web-form.html');
let title = await driver.getTitle();
assert.equal("Web form", title);
await driver.manage().setTimeouts({implicit: 500});
      let textBox = await driver.findElement(By.name('my-text'));
      let submitButton = await driver.findElement(By.css('button'));
await textBox.sendKeys('Selenium');
await submitButton.click();
let message = await driver.findElement(By.id('message'));
let value = await message.getText();
assert.equal("Received!", value);
});
});
});package dev.selenium.getting_started
import io.github.bonigarcia.wdm.WebDriverManager
import org.junit.jupiter.api.*
import org.junit.jupiter.api.Assertions.assertEquals
import org.openqa.selenium.By
import org.openqa.selenium.WebDriver
import org.openqa.selenium.chrome.ChromeDriver
import java.time.Duration
@TestInstance(TestInstance.Lifecycle.PER_CLASS)
class FirstScriptTest {
private lateinit var driver: WebDriver
@BeforeAll
fun setupAll() {
WebDriverManager.chromedriver().setup()
}
@BeforeEach
fun setup() {
driver = ChromeDriver()
}
@AfterEach
fun teardown() {
driver.quit()
}
@Test
fun eightComponents() {
driver.get("https://www.selenium.dev/selenium/web/web-form.html")
val title = driver.title
assertEquals("Web form", title)
driver.manage().timeouts().implicitlyWait(Duration.ofMillis(500))
        var textBox = driver.findElement(By.name("my-text"))
        val submitButton = driver.findElement(By.cssSelector("button"))
        textBox.sendKeys("Selenium")
        submitButton.click()
val message = driver.findElement(By.id("message"))
val value = message.getText()
assertEquals("Received!", value)
}
}Test Runners
If you are using Selenium for testing,
you will want to execute your Selenium code using test runner tools.
Many of the code examples in this documentation can be found in our example repositories.
There are multiple options in each language, but here is what we are using in our examples:
- Java
- Python
- CSharp
- Ruby
- JavaScript
- Kotlin
// Add instructions
// Add instructions
// Add instructions
// Add instructions
Install Mocha Test runner using below command in your terminal
and run your tests using below command
mocha firstScript.spec.js
// Add instructions
Next Steps
Take what you’ve learned and build out your Selenium code.
As you find more functionality that you need, read up on the rest of our
WebDriver documentation.
Support the Selenium Project
Want to support the Selenium project? Learn more or view the full list of sponsors.
The aim of this blog is to show you in 6 steps how to install the Selenium IDE Add-on, create basic Selenium IDE automation tests by recording, execute them and export them into a programming language (e.g. C#, Java, Python).
What is Selenium IDE?
Selenium IDE is a Firefox/Chrome Add-on that helps create Selenium test cases and test suites against web applications. It is a useful tool to create the bulk of your Selenium scripts, but it does also have its limitations.
For this blog, we will concentrate on just Firefox, although Chrome is pretty much the same.
1. Install the Selenium IDE Add-on
The first step is to download the Selenium IDE which – at the time of writing – is via the following URL:
https://selenium.dev/downloads/
Just click on the browser you are interested in (for these notes we are going to use Firefox, although Chrome is really not that different).
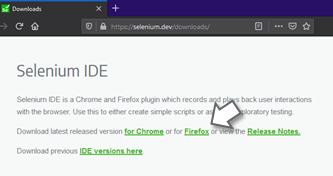
This should take you to the actual Add-on page.
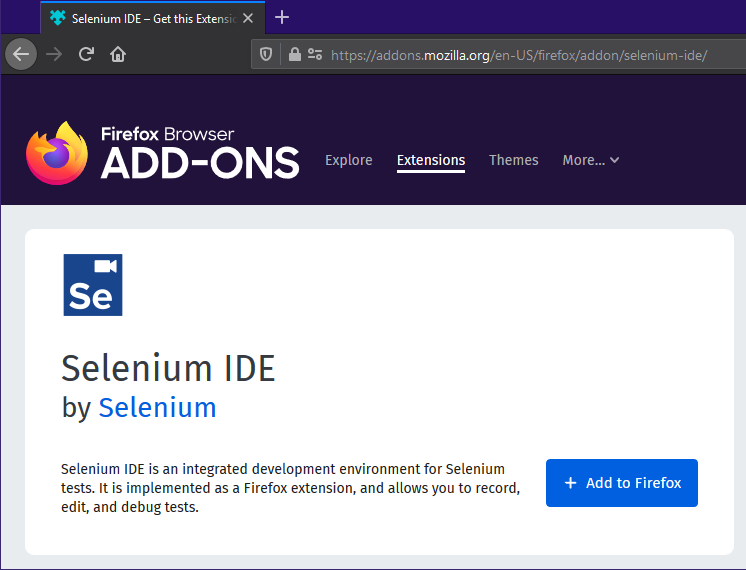
Clicking the Add to Firefox button will start installation.
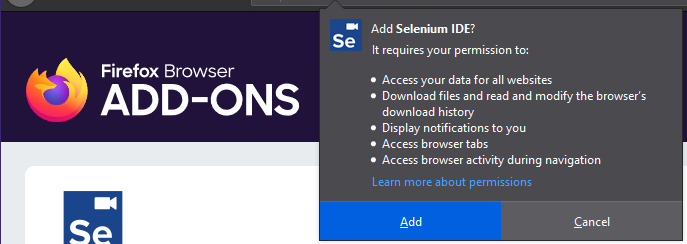
After accepting all the defaults, it will appear on your browser toolbar.

2. Record a script to create tests using the Selenium IDE
To record a test case:
Ensure you have browsed to the Application under Test (AUT) that you wish to record against.
For these notes we have our own website.
From the Firefox Tool bar, select the Selenium IDE icon.
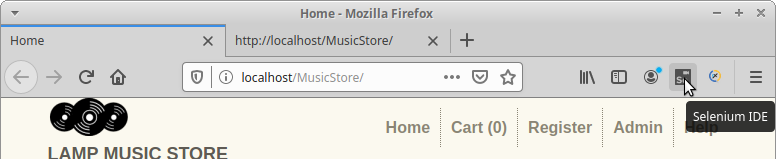
The Selenium IDE Application will start by displaying a menu:
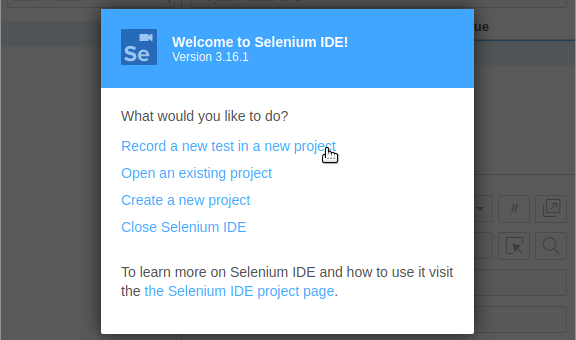
As we have never used it before, the above screen is selecting the first option.
When creating a new project, it will ask for the name. For these notes we have used the imaginative name of demo.
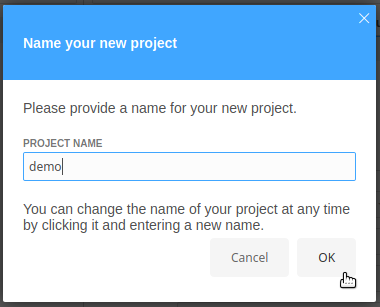
It will then want to run a test, and will prompt you for the project’s base URL. You can get this by copying the main URL from the original browser window and pasting it across.
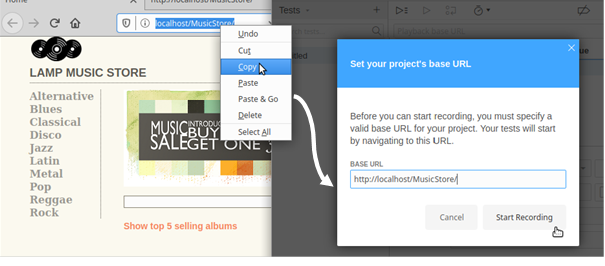
Selenium will then open a new browser window which you use to record your steps for your test.
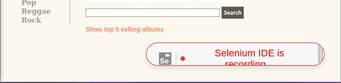
From this point forward the IDE monitors all mouse interactions and keyboard inputs and records them in the Selenium IDE interface. Until you stop the recorder.
Selenium IDE does have a habit of placing the web page in a window in front of the Selenium IDE and will record the action of moving it in your script.
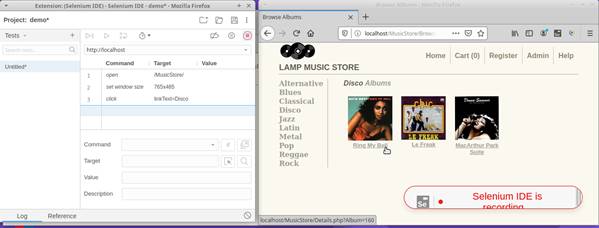
The Selenium IDE table tab will then display all actions captured by the recorder. It is possible to view, modify or delete commands from this view. To delete a command, right click on the command and select delete from the menu.
When all recorded steps are complete, stop the recorder by clicking on the red circle.

To save your test, you will need to save the entire project, click on the Save project button in the top right-hand corner of the IDE screen.

3. Replay the script in the Selenium IDE
Once all the required test steps have been captured, you can now replay the test by clicking on the Run current test icon.

If you have closed the window Selenium used to record the test, the IDE will now open it again.
On successful execution of the test the captured tests steps will turn green:
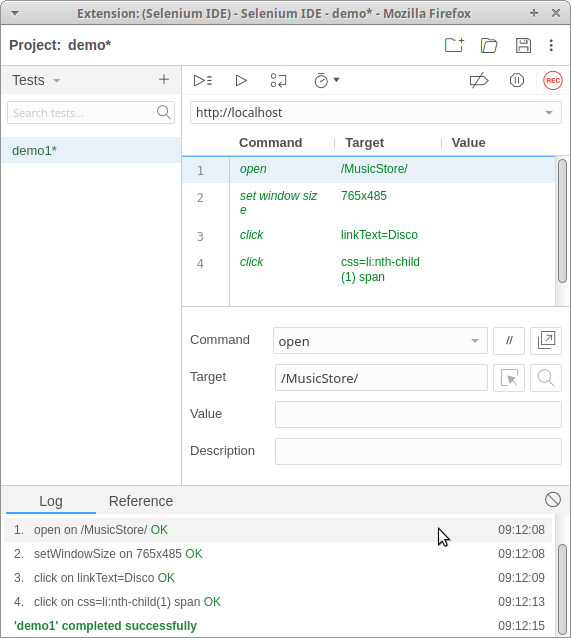
Should the test fail, the failed line (usually highlighted in red) and the failure count on the left-hand side will increment by one.
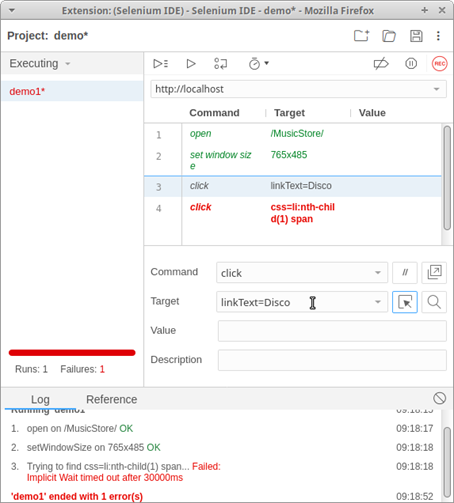
Any errors also appear in the log tab at the bottom of the Selenium IDE interface.
Inserting Commands
When using Selenium IDE as an automated test tool it is inevitable that you are going to need to modify the recorded steps to include an additional step e.g. an extra click, some synchronisation or an Assertion (A method of passing or failing a test).
To insert a new command:
Select the point in the script where you wish to place the new command.
Right click the Selenium IDE interface and select Insert New Command
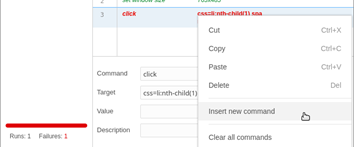
Initially the new command will appear in the script as a blank line.
Structure of a line in the test case
Each command requires up to three inputs:
- Command
- Target
- Value
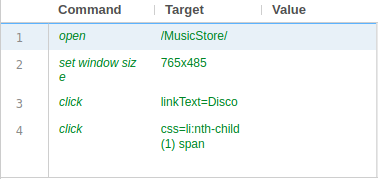
Command
Command is the action the Selenium Script is to perform. Commands range in functionality from Navigation e.g. Click a Button, Synchronisation e.g. Wait for text to appear on the screen and Assertions e.g. ensure the correct text has appeared on the screen.
To select a command, click on the black arrow to expand the drop-down list of available commands.
Target
Target refers to the Object or “WebElement” that you wish to record the action.
For example, if the Selenium IDE script was required to click on a link a “description” of the object would be included in the target field.
Value
The value is an optional field used when the command needs some additional information. For example, if you want to type in a text box, then this field would contain the text you wished to type.
4. Replay all tests in the Selenium IDE
If the Selenium IDE project has more than one test, we can run them all sequentially.
In the screenshot below, we have a couple of tests sitting in the IDE…
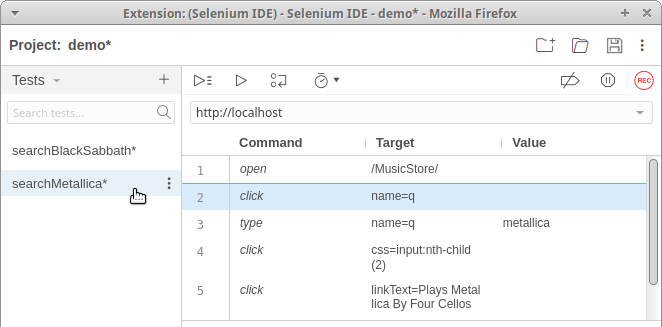
To execute all tests in the test suite, select the Run all tests button:

The test cases show up as green when the tests have executed successfully:
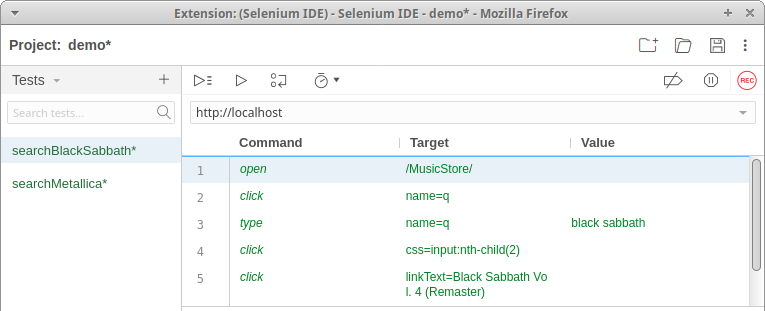

5. Export the tests from Selenium IDE
The Selenium IDE enables recorded test cases to be exported to a range of programming languages and their respective testing frameworks.
To do this:
Either right-click on the test name or hover the mouse near the end of the test name field until three dots appear.
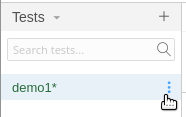
Click on this and select export.

Selenium will then prompt you to select the language (in this example we have selected C# NUnit).
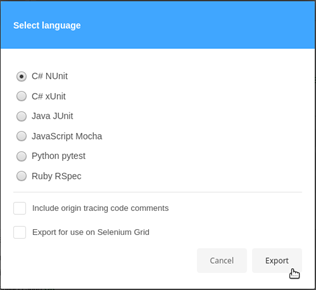
Give a filename and save it in the desired location.
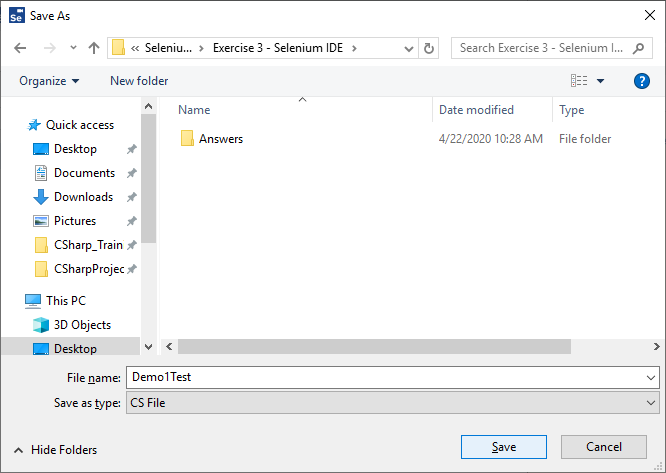
The choice of programming language and test framework would be either be a personal preference or an organisational norm and would depend on tools and skills of the tester or developers available.
6. Running Selenium IDE test cases from the command line
Once you add the test cases into a Selenium IDE test suite, it is possible to execute them from the command line.
Open a new instance of File Manager (“Win + E”).
Navigate to the folder where you saved your project (the file with the extension “side”).
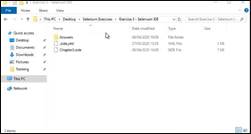
Hold down Control & Shift and then Right click the mouse and select Open PowerShell window Here:
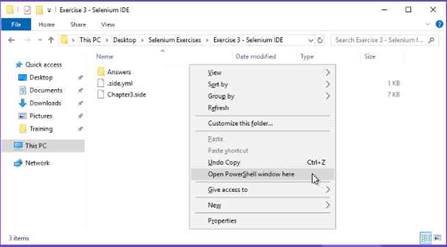
Run the tests from the command line
In the terminal window, type in the following:
selenium-side-runner *.side
This will run selenium from the command line.
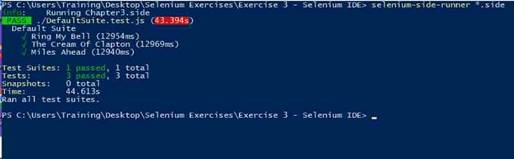
To exit out of the terminal window, type in exit.
Want to find out more?
Want find out more about setting up the Selenium IDE, exporting test cases to other languages and running them as actual code?
Well, at the Expleo Academy we deliver a few courses on Selenium and many other subjects. Feel free to visit the Academy website.
- If you are interested in learning all about how to use Selenium with Java then feel free to have a look at out Using Selenium with Workshop course.
- If you are interested in learning all about how to use Selenium with CSharp then feel free to have a look at out Using Selenium in CSharp with Workshop course.
More information on the Selenium IDE can be found at the following location:
https://selenium.dev/selenium-ide/docs/en/introduction/getting-started
John Kurowski has been delivering training for over 10 years specialising in Automation, Agile and ISTQB. John also develops the courseware and creates virtual machines in AWS for automation courses.
John has been working in IT for over 30 years and has also been a tester, test manager, developer, development manager, project manager, support consultant (the list goes on…)